1. Introducció
Aquest manual proporciona instruccions completes per al muntatge, funcionament i manteniment del tancament per a mascotes Zipper ZI-CR342. Llegiu atentament aquest manual abans del muntatge i l'ús per garantir un funcionament segur i correcte. Conserveu aquest manual per a futures consultes.

Figura 1: El recinte per a mascotes Zipper ZI-CR342. Aquesta imatge mostra l'estructura completa del recinte, amb una estructura metàl·lica galvanitzada i parets de malla metàl·lica recobertes de PVC, amb una porta d'accés. El disseny de la teulada en punta proporciona ampespai i protecció.
2. Instruccions de seguretat
- Assegureu-vos que tots els components estiguin ben fixats durant el muntatge per evitar que es col·lapsin.
- Col·loqueu la carcassa sobre una superfície plana i estable per mantenir la integritat estructural.
- Inspeccioneu regularment la carcassa per detectar peces danyades, vores afilades o connexions soltes. Repareu-la o substituïu-la si cal.
- No permeteu que els nens s'enfilin o juguin dins del recinte sense supervisió.
- Aquest recinte està dissenyat per a mascotes; no l'utilitzeu per a altres finalitats que no siguin les previstes.
- Feu servir equip de protecció adequat (guants) durant el muntatge per evitar talls amb malla metàl·lica o vores metàl·liques.
3. Contingut del paquet
Verifiqueu que tots els components que s'enumeren a continuació siguin presents i no estiguin danyats abans de començar el muntatge.
- Tubs d'acer galvanitzat (Ø25 x 0.65 mm) per a la construcció del marc.
- Panells de malla metàl·lica galvanitzada recoberts de PVC.
- Pel·lícula de protecció solar resistent als raigs UV per a la teulada.
- Conjunt de porta amb tancament de cremallera.
- Materials de fixació (connectors, cargols, femelles, brides de cable).
4. Muntatge i muntatge
La cremallera ZI-CR342 presenta un sistema d'enclavament modular senzill per a un muntatge senzill. Es recomanen dues persones per facilitar la instal·lació.
- Prepara la zona: Trieu un lloc exterior pla, net i estable per al recinte. Assegureu-vos que hi hagi prou espai per a la petjada de 3 m x 4 m.
- Muntar el marc base: Connecteu els tubs galvanitzats per formar la base rectangular (3 m x 4 m) utilitzant els connectors proporcionats. Assegureu-vos que totes les connexions estiguin ben ajustades.
- Erigir suports verticals: Fixeu els tubs verticals al marc base als punts designats.
- Instal·leu el marc del sostre: Construeix l'estructura de la teulada en punta connectant els tubs restants als suports verticals.
- Fixeu els panells de malla metàl·lica: Fixeu els panells de malla metàl·lica galvanitzada recoberts de PVC al marc amb els materials de fixació proporcionats (per exemple, brides, clips). Assegureu-vos que la malla estigui tensa i cobreixi tots els costats oberts.
- Instal·lar la porta: Integra el conjunt de la porta a l'obertura designada. Assegura't que s'obri i es tanqui suaument i que el tancament de la cremallera funcioni correctament.
- Aplicar pel·lícula de protecció solar: Col·loqueu i fixeu la pel·lícula de protecció solar resistent als raigs UV sobre la secció del sostre. Això proporciona ombra i protecció contra els elements.
- Inspecció final: Comproveu dues vegades totes les connexions, assegurant-vos que estiguin ben ajustades i segures. Verifiqueu que no hi hagi buits ni vores afilades que puguin fer mal als animals.

Figura 2: Detall d'una unió de marc. Aquesta imatge il·lustra com es connecten els tubs galvanitzats mitjançant el sistema modular, destacant els punts de fixació segurs essencials per a l'estabilitat estructural.

Figura 3: Detall de la malla metàl·lica. La malla metàl·lica galvanitzada recoberta de PVC proporciona durabilitat i protecció als animals dins del recinte.
5. Funcionament de la carcassa
- Accés: Feu servir la porta amb cremallera per entrar i sortir. Assegureu-vos sempre que la cremallera estigui completament tancada quan els animals siguin a dins per evitar que s'escapin.
- Col·locació: Col·loqueu el tancament en una zona que ofereixi ombra natural addicional o protecció contra vents forts, si és possible, a més de la pel·lícula de protecció solar proporcionada.
- Introducció d'animals: Introduïu les mascotes al recinte gradualment, assegurant-vos que tinguin accés a menjar, aigua i refugi adequat dins del recinte (per exemple, un petit galliner per a aus de corral).
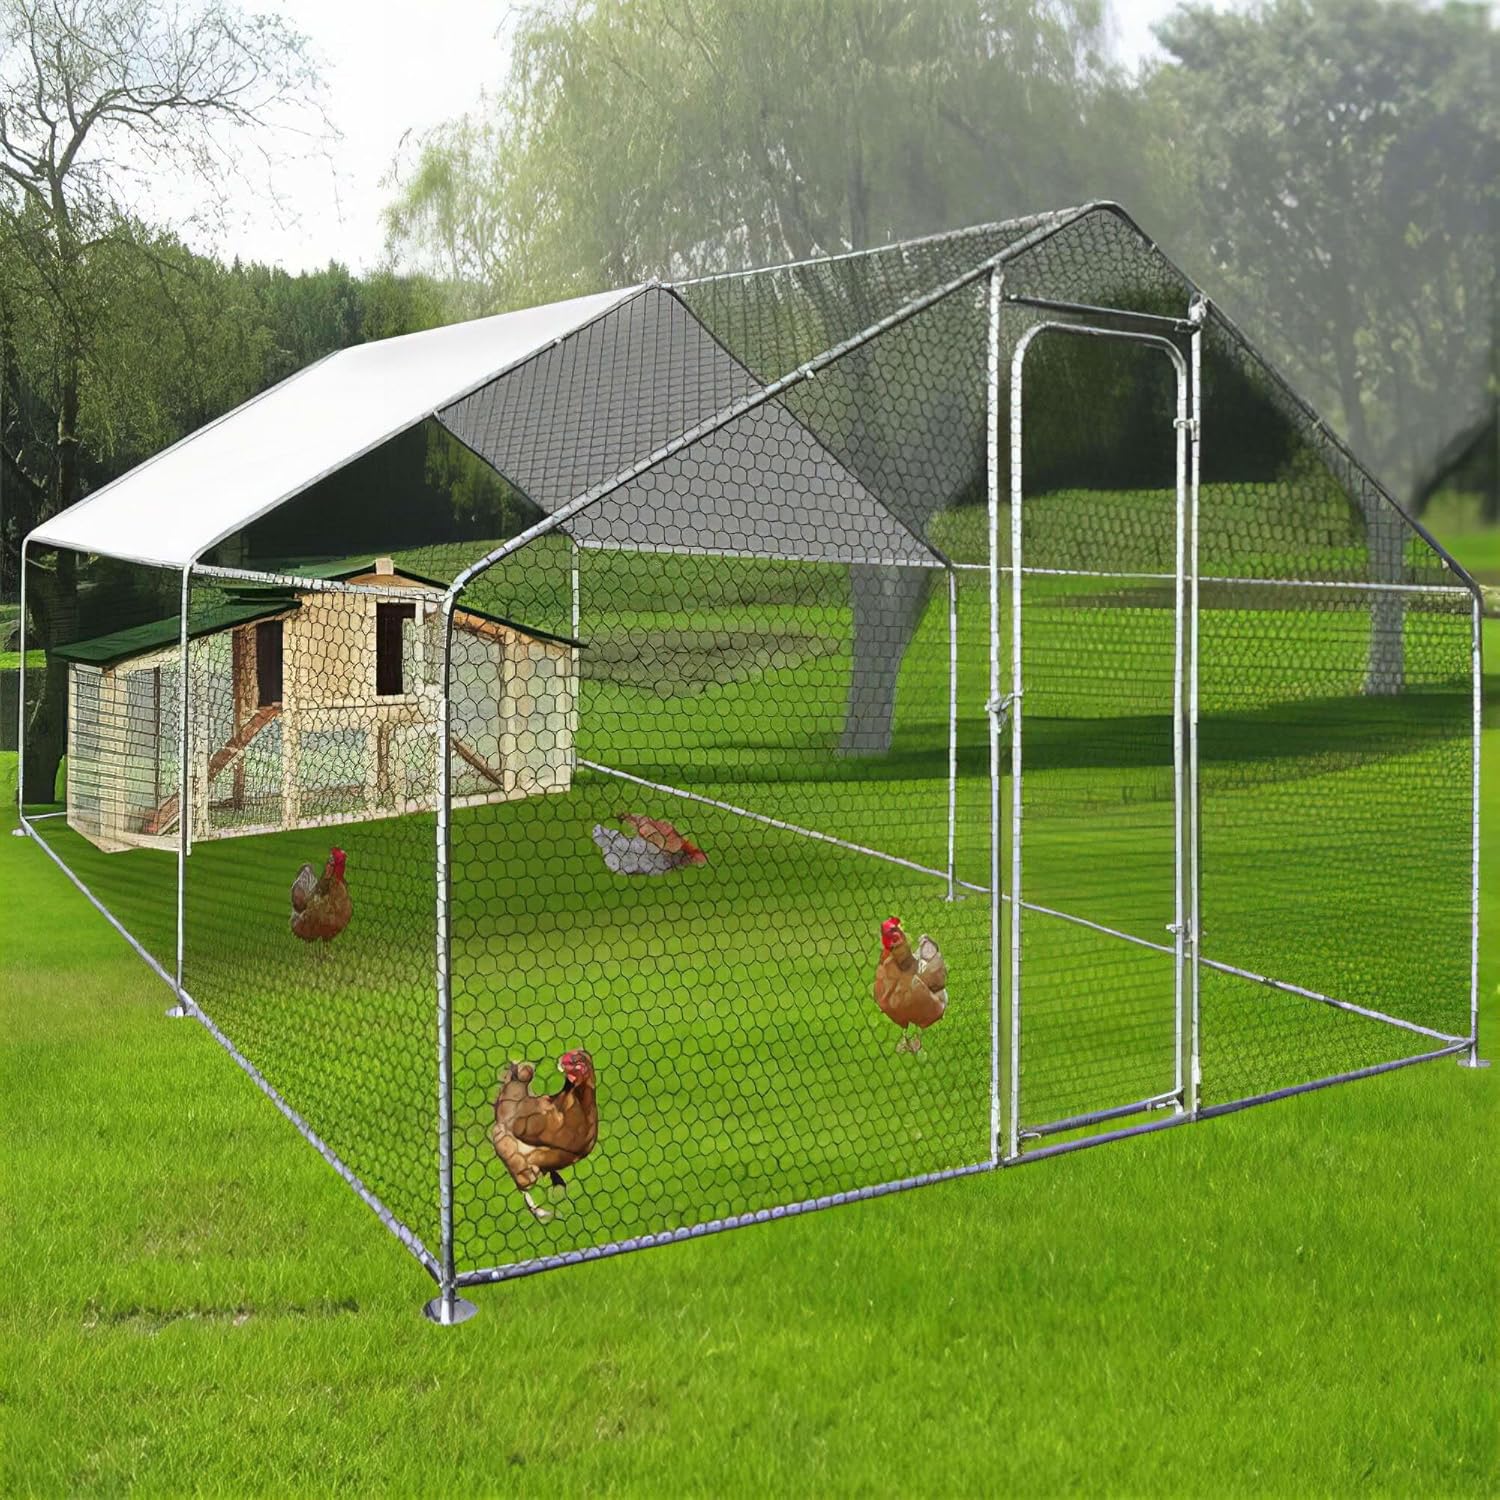
Figura 4: Exampús del tancat. Aquesta imatge mostra el tancat per a mascotes Zipper ZI-CR342 en una configuració típica, que proporciona un entorn segur i espaiós per a les aus de corral, amb un refugi intern complet.
6. Manteniment
- Neteja: Netegeu regularment el recinte, inclosa la malla i el marc, amb aigua i sabó suau. Esbandiu-lo bé i deixeu-lo assecar.
- Inspecció: Comproveu periòdicament totes les connexions del marc, la integritat de la malla i el mecanisme de la porta per detectar desgast o danys. Estrenyeu els cargols solts.
- Pel·lícula UV: Inspeccioneu la pel·lícula de protecció UV per si hi ha esquinçaments o degradació. Substituïu-la si cal per mantenir la protecció solar.
- Hivernització: En zones amb molta neu o condicions meteorològiques extremes, considereu desmuntar o reforçar la carcassa per evitar danys.
7. Solució De Problemes
- Inestabilitat del recinte: Assegureu-vos que tots els tubs del marc estiguin completament inserits als connectors i que tots els cargols estiguin ben ajustats. Verifiqueu que la carcassa estigui sobre un terreny anivellat.
- Danys a la malla: Els petits esquinçaments a la malla recoberta de PVC sovint es poden reparar amb brides de cremallera resistents o kits especialitzats de reparació de malla. En cas de danys importants, considereu la possibilitat de substituir el panell afectat.
- Mal funcionament de la cremallera: Comproveu si hi ha obstruccions a les dents de la cremallera. Apliqueu un lubricant a base de silicona si la cremallera és rígida. Si està malmesa, és possible que calgui substituir el panell de la porta.
8. Especificacions
| Característica | Detall |
|---|---|
| Model | ZI-CR342 |
| Dimensions (L x A x A) | 3 m x 4 m x 2 m (aproximadament 9.8 peus x 13.1 peus x 6.6 peus) |
| Pes | 35.9 kg (aproximadament 79.1 lliures) |
| Material del marc | Tubs d'acer galvanitzat (Ø25 x 0.65 mm) |
| Material de malla | Malla de filferro galvanitzat recoberta de PVC |
| Material de la teulada | Pel·lícula de protecció solar resistent als raigs UV |
| Tipus de tancament | Cremallera |
| Característiques especials | Sistema d'enclavament modular, resistent als raigs UV |
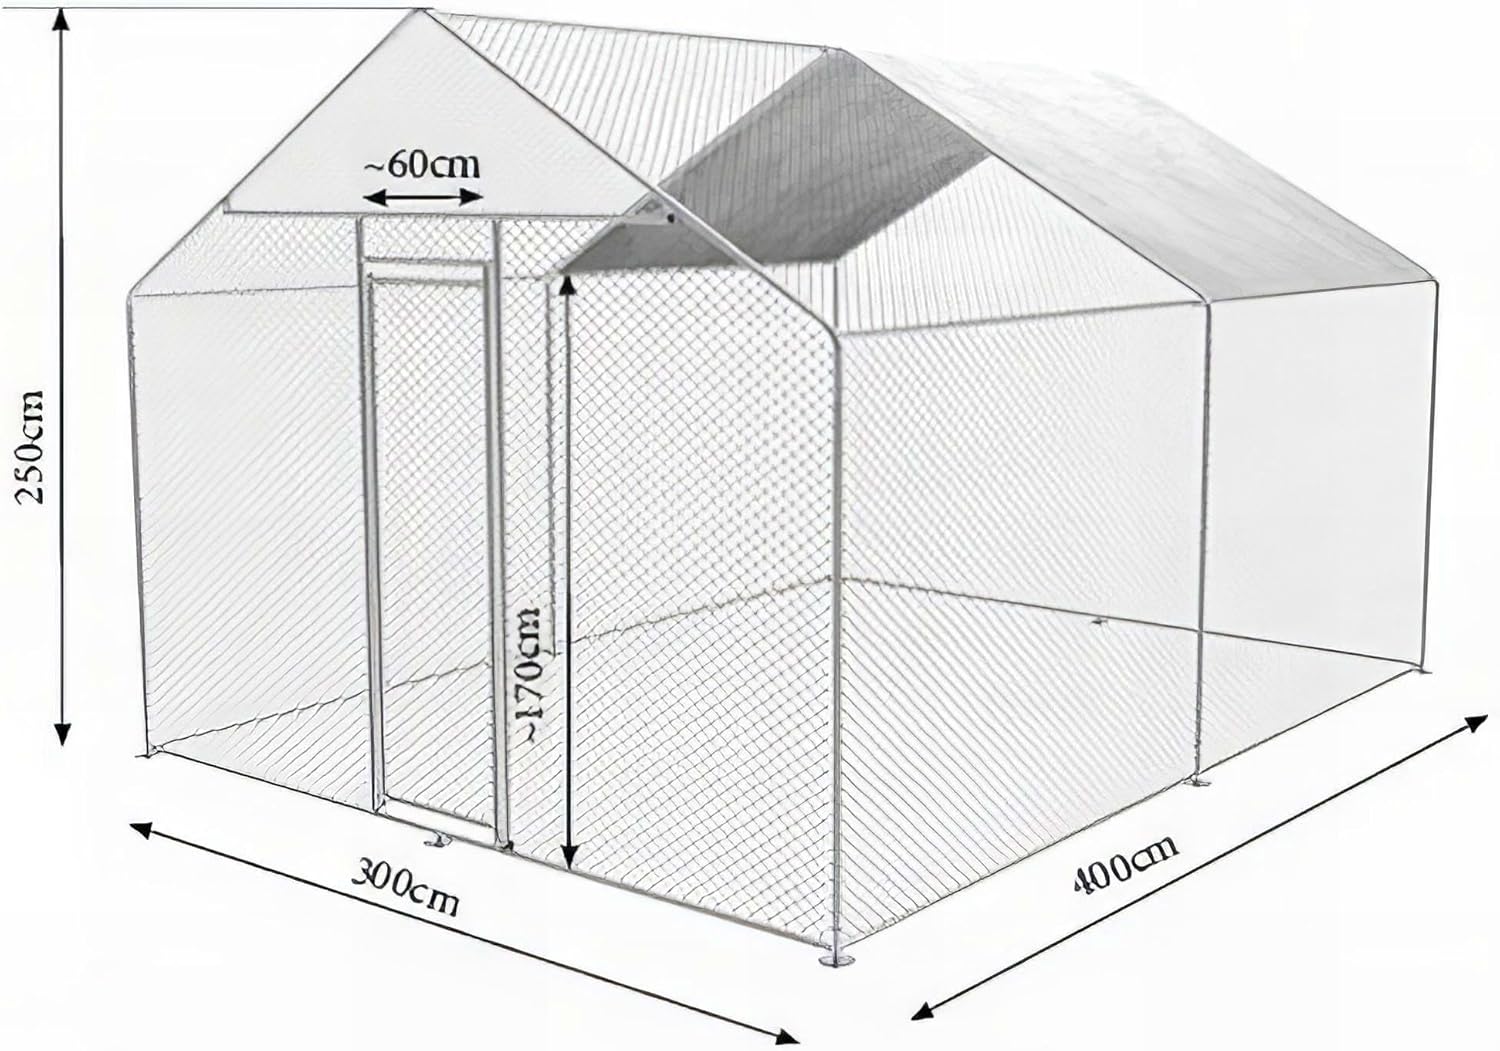
Figura 5: Dimensions de la carcassa. Aquest diagrama proporciona una visió claraview de les mesures del recinte, incloent-hi la longitud total, l'amplada, l'alçada i les dimensions de la porta d'accés.
9. Garantia i Suport
El recinte per a mascotes Zipper ZI-CR342 inclou un Disponibilitat de recanvis durant 2 anyPer a reclamacions de garantia, assistència tècnica o per demanar peces de recanvi, poseu-vos en contacte amb el vostre distribuïdor o directament amb el fabricant. Assegureu-vos de tenir a mà el comprovant de compra i el número de model (ZI-CR342) quan contacteu amb l'assistència.


