1. Introducció i finalview
The SMART SENSOR AR850+ Ultrasonic Thickness Gauge is a handheld device designed for quick and precise measurement of material thickness. Utilizing ultrasonic measuring principles and controlled by a microprocessor, it is suitable for a wide range of industrial materials including steel, cast iron, aluminum, copper, brass, zinc, quartz glass, polyethylene, PVC, gray cast iron, and ductile iron.
This manual provides comprehensive instructions for the proper setup, operation, and maintenance of your AR850+ Ultrasonic Thickness Gauge to ensure accurate measurements and prolonged device lifespan.
2. Contingut del paquet
Upon opening the aluminum carrying case, verify that all the following items are included:
- 1 x AR850+ Ultrasonic Thickness Gauge Host
- 1 x Aluminum Carrying Case
- 1 x Manual d'instruccions (aquest document)
- 1 x Calibration Block
- 2 x Sondes
- 1 x Bottle of Coupling Agent (50ml)

Figure 2.1: Complete AR850+ Ultrasonic Thickness Gauge kit, including the gauge, coupling agent, instruction manual, calibration certificate, and probes, all neatly packed in its aluminum carrying case.

Figure 2.2: The two ultrasonic probes supplied with the AR850+ gauge, essential for transmitting and receiving ultrasonic waves during measurement.
3. Característiques del producte
The AR850+ Ultrasonic Thickness Gauge incorporates several features designed for ease of use and accuracy:
- Suitable for measuring the thickness of various hard materials.
- Data storage function for up to 10 test results, retaining data even when powered off.
- Sound test speed (m/s) with 12 storage memories.
- Ability to switch between mm or m/s readings using UP or DOWN arrow keys.
- Automatic Zero Adjustment for consistent accuracy.
- Automatic Power Shut Off function to conserve battery life.
- High-precision linear compensation circuit for accurate measurements.
4. Configuració
4.1 Instal·lació de la bateria
The AR850+ gauge requires three (3) 1.5V AAA batteries (not included). To install the batteries:
- Localitzeu el compartiment de la bateria a la part posterior del dispositiu.
- Feu lliscar la tapa del compartiment de la bateria cap avall per obrir-lo.
- Introduïu tres piles AAA, assegurant-vos de la polaritat correcta (+/-) tal com s'indica a l'interior del compartiment.
- Torneu a col·locar la tapa del compartiment de la bateria lliscant-la cap amunt fins que encaixi al seu lloc.
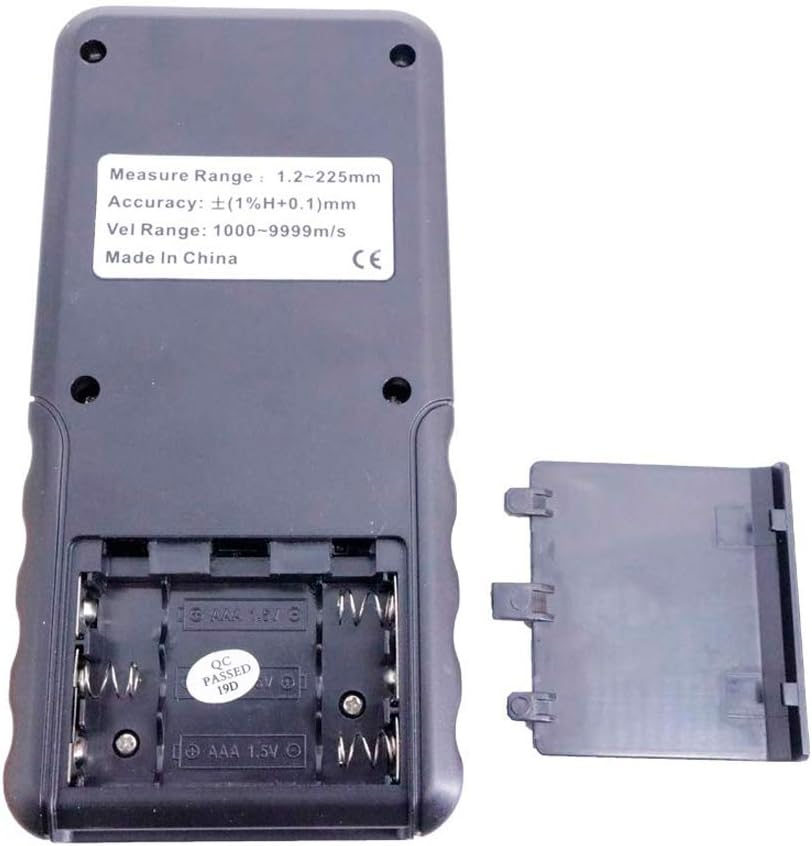
Figura 4.1: posterior view of the AR850+ gauge with the battery compartment open, showing the slots for three AAA batteries and polarity markings.
4.2 Connexió de la sonda
Connect the probes to the bottom of the gauge:
- Identify the two probe ports at the bottom edge of the gauge.
- Insert the connectors from the probes firmly into these ports. Ensure a secure connection.

Figura 4.2: A baix view of the AR850+ gauge, highlighting the two circular ports where the ultrasonic probes are connected.
5. Instruccions de funcionament
5.1 Encès/Apagat
Premeu el botó vermell d'engegada (⑂) located on the front panel to turn the device on or off.
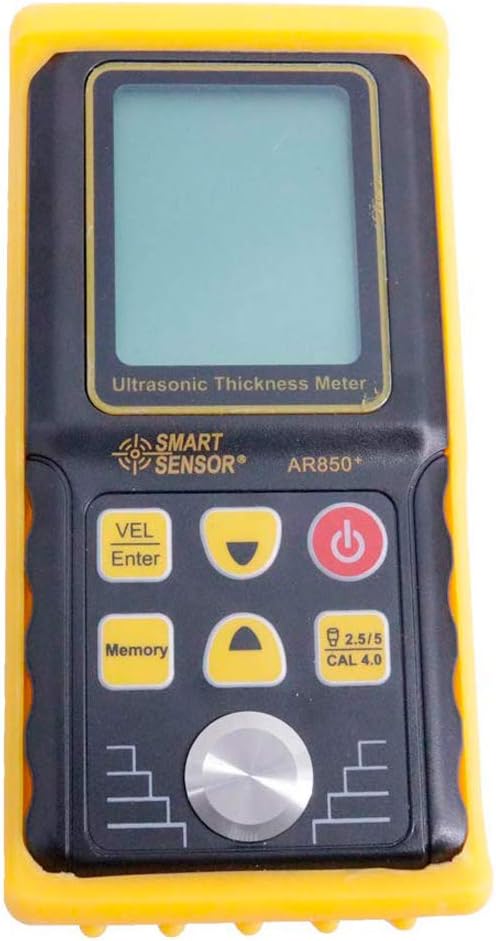
Figure 5.1: Front panel of the AR850+ gauge, showing the display screen, power button, VEL/Enter button, Memory button, and navigation/calibration buttons.
5.2 Calibració
Before taking measurements, it is recommended to perform a zero adjustment using the included calibration block.
- Assegureu-vos que la sonda estigui neta i lliure de residus.
- Apply a small amount of coupling agent to the surface of the calibration block.
- Place the probe firmly and flatly onto the calibration block.
- The device will automatically perform a zero adjustment. Refer to the display for confirmation.
5.3 Prendre mesures
To measure the thickness of a material:
- Ensure the surface of the material to be measured is clean and smooth. Remove any rust, paint, or loose particles.
- Apply a small amount of coupling agent to the measurement point on the material surface. The coupling agent ensures proper transmission of ultrasonic waves.
- Place the probe firmly and flatly onto the prepared surface. Ensure there are no air gaps between the probe and the material.
- The thickness reading will appear on the LCD display.
- If the reading is unstable or shows '----', reapply coupling agent or adjust the probe position.

Figure 5.2: The AR850+ gauge's display showing a sound velocity reading of 5900 m/s, indicating the current setting for material sound speed.
5.4 Switching Units (mm/m/s)
To switch between millimeters (mm) for thickness readings and meters per second (m/s) for sound speed readings, press the UP or ABAIX arrow buttons on the front panel.
5.5 Emmagatzematge i recuperació de dades
The device can store up to 10 measurement results and 12 sound speed values. To store or recall data, use the Memòria button and navigation keys as per the on-screen prompts.
6. Manteniment
6.1 Neteja
Regular cleaning ensures optimal performance and longevity of your gauge:
- After each use, wipe the probe and the gauge's surface with a soft, dry cloth to remove any residual coupling agent or dirt.
- No utilitzeu productes de neteja abrasius ni dissolvents, ja que poden danyar el dispositiu.
6.2 Emmagatzematge
When not in use, store the AR850+ gauge in its aluminum carrying case in a cool, dry place, away from direct sunlight and extreme temperatures.
6.3 Substitució de la bateria
When the low battery indication (3V +/- 0.2V) appears on the display, replace all three AAA batteries promptly to ensure accurate readings and prevent device malfunction.

Figure 6.1: The AR850+ gauge with its yellow protective silicone cover removed, illustrating how to access the main body for cleaning or inspection.
7. Solució De Problemes
If you encounter issues with your AR850+ Ultrasonic Thickness Gauge, refer to the following common problems and solutions:
| Problema | Causa possible | Solució |
|---|---|---|
| No hi ha pantalla/El dispositiu no s'encén | Piles gastades o instal·lades incorrectament. | Check battery polarity; replace with new AAA batteries. |
| Unstable or '----' reading | Insufficient coupling agent; poor probe contact; rough surface; material outside measurement range. | Apply more coupling agent; ensure firm, flat probe contact; prepare surface (smooth, clean); verify material thickness is within 1.2-225.0mm. |
| Lectures inexactes | Improper calibration; incorrect sound speed setting for material; worn probe. | Perform zero adjustment; ensure correct sound speed is set for the material; consider replacing probe if worn. |
| Els botons no responen | Dispositiu bloquejat; bateria baixa. | Turn off and on again; replace batteries. |
8. Especificacions
Detailed technical specifications for the AR850+ Ultrasonic Thickness Gauge:
- Interval de mesura: 1.2-225.0mm (Steel)
- Precisió: ± (1% + 0.1)mm
- Minimum Limit for Tube Measuring: 20 * 3mm (Steel)
- Sound Speed Range: 1000-9999 m/s
- Freqüència de funcionament: 5 MHz
- Interval de temperatura de funcionament: 0-40 °C (32-104 °F)
- Temperatura de funcionament de la sonda: 0-60°C (32-140°F) at normal temperature
- Indicació de bateria baixa: 3V ± 0.2V
- Bateria: 3 x 1.5 V AAA (no inclòs)
- Dimensions: Aprox. 153 x 75 x 35 mm (6 x 3 x 1.4 polzades)
- Material: Plàstic
- Color: Negre i groc
- Fabricant: Sensor intel·ligent
- Número de peça: AR850+
9. Garantia i Suport
For warranty information or technical support regarding your SMART SENSOR AR850+ Ultrasonic Thickness Gauge, please contact the seller or manufacturer directly. Keep your purchase receipt as proof of purchase for any warranty claims.
For further assistance, you may visit the official SMART SENSOR Store on Amazon: SMART SENSOR Store


