Introducció
Gràcies per la compraasing the SHARDOR Drip Coffee Maker. This manual provides important information for the safe and efficient operation of your new coffee machine. Please read these instructions thoroughly before first use and retain them for future reference.
Instruccions importants de seguretat
- Llegiu totes les instruccions abans d'utilitzar l'aparell.
- No toqueu superfícies calentes. Utilitzeu nanses o poms.
- Per protegir-se contra incendis, descàrregues elèctriques i lesions a les persones, no submergiu el cable, els endolls o l'aparell en aigua o altres líquids.
- És necessària una supervisió estreta quan qualsevol aparell és utilitzat per o a prop dels nens.
- Desendolleu la presa de corrent quan no utilitzeu i abans de netejar. Deixeu refredar abans de posar o treure peces i abans de netejar l'aparell.
- No feu servir cap aparell amb un cable o un endoll danyats o després que l'aparell funcioni malament o s'hagi fet malbé de cap manera. Torneu l'aparell al centre de servei autoritzat més proper per examinar-lo, reparar-lo o ajustar-lo.
- L'ús d'accessoris no recomanats pel fabricant de l'aparell pot provocar incendis, descàrregues elèctriques o lesions a persones.
- No utilitzar a l'aire lliure.
- No deixeu que el cable pengi de la vora de la taula o del taulell, ni toqui superfícies calentes.
- No col·loqueu-lo sobre o prop d'un cremador de gas o elèctric calent, ni en un forn calent.
- Connecteu sempre primer l'endoll a l'aparell i després el cable a la presa de corrent. Per desconnectar-lo, gireu qualsevol control a la posició "off" i, a continuació, retireu l'endoll de la presa de corrent.
- No utilitzeu l'aparell per a un altre ús que el previst.
- La garrafa està dissenyada per utilitzar-la amb aquest aparell. No s'ha d'utilitzar mai a la part superior de la gamma.
- No col·loqueu una garrafa calenta sobre una superfície humida o freda.
- No utilitzeu una garrafa esquerdada o una garrafa amb un mànec solt o debilitat.
- No netegeu la garrafa amb netejadors, coixinets de llana d'acer o altres materials abrasius.
Producte acabatview
Familiarize yourself with the components of your SHARDOR Drip Coffee Maker.

Image: The SHARDOR Drip Coffee Maker in black, showing its main body, glass carafe, and a hand pouring coffee into a white cup. This image illustrates the product's capacity to brew 12-15 cups.
Components:
- Embassament d'aigua: For filling with water.
- Tauler de control: Features digital display, PROG, STRONG, ON/OFF AUTO, HOUR, and MIN buttons.
- Cistella de cervesa: Holds the filter and ground coffee.
- Filtre de malla reutilitzable: Elimina la necessitat de filtres de paper.
- Garrafa de vidre: 60oz capacity for 12-15 cups of coffee.
- Placa d'escalfament: Keeps coffee hot after brewing.
- Drip Stop Mechanism: Allows for pouring coffee mid-brew.

Imatge: Una explosió view of the coffee maker showing its removable parts: the reusable mesh filter, smart drip tank, programmable panel, and coffee pot (carafe). This illustrates the ease of cleaning.
Configuració i primer ús
- Desembalatge: Traieu amb cura tots els materials d'embalatge i inspeccioneu la cafetera per detectar qualsevol dany.
- Neteja inicial: Before first use, clean all removable parts (carafe, brew basket, reusable filter) in warm, soapy water. Rinse thoroughly and dry. Wipe the exterior of the coffee maker with a damp tela.
- Primer cicle d'elaboració (netja):
- Ompliu el dipòsit d'aigua amb aigua neta fins a la marca de 12 tasses.
- Place the empty reusable filter or a paper filter (if preferred) into the brew basket, then insert the brew basket into its position.
- Col·loqueu la garrafa buida al plat d'escalfament.
- Connecteu la cafetera a una presa de corrent estàndard.
- Press the "ON/OFF AUTO" button to start a brew cycle without coffee grounds.
- Allow the cycle to complete. Discard the water from the carafe. This process cleans the internal components and removes any manufacturing residues.
Instruccions de funcionament
1. Configuració del rellotge

Image: A close-up of the coffee maker's control panel, featuring a digital display showing "AM 12:00" and buttons for PROG, STRONG, ON/OFF AUTO, HOUR, and MIN. This highlights the programmable and strong brew features.
- Plug in the coffee maker. The display will flash "12:00".
- Press the "HOUR" button to set the hour. Pay attention to the AM/PM indicator.
- Press the "MIN" button to set the minutes.
- El rellotge es configurarà automàticament després d'uns segons d'inactivitat.
2. Elaboració de cafè
- Omplir el dipòsit d'aigua: Open the lid and fill the water reservoir with fresh, cold water to the desired level, indicated by the cup markings. Do not exceed the "MAX" fill line.
- Afegeix el marc de cafè: Place the reusable filter into the brew basket. Add the desired amount of ground coffee. A general guideline is one tablespoon of ground coffee per cup. Adjust to your taste.
- Posició de la garrafa: Ensure the glass carafe is placed correctly on the warming plate.
- Selecciona la intensitat de la infusió (opcional): Press the "STRONG" button once for a bolder coffee flavor. The "STRONG" indicator light will illuminate. Press again to deactivate.
- Comença a fer cervesa: Press the "ON/OFF AUTO" button. The indicator light will illuminate, and brewing will begin.
- Funció de mantenir la calor: After brewing is complete, the warming plate will keep the coffee hot for approximately 2 hours before automatically shutting off.

Image: A close-up of the coffee maker's warming plate, glowing orange, indicating it is active and keeping coffee warm. This feature maintains coffee temperature for up to 2 hours.
3. Programmable Brewing (Auto Brew)
You can set the coffee maker to start brewing automatically at a preset time.
- Prepare the coffee maker as described in "Brewing Coffee" (fill water, add grounds, place carafe).
- Press the "PROG" button. The display will flash "12:00".
- Use the "HOUR" and "MIN" buttons to set your desired auto-brew time.
- Press the "PROG" button again to confirm the setting. The "AUTO" indicator light will illuminate.
- A l'hora configurada, la cafetera començarà a preparar cafè automàticament.
4. Pause and Serve Feature
The drip stop mechanism allows you to pour a cup of coffee before the entire brewing cycle is complete.

Image: A diagram illustrating the internal mechanism of the coffee maker that automatically pauses the brewing cycle when the carafe is removed, preventing drips. This highlights the anti-drip valve system.
- During brewing, you can temporarily remove the carafe to pour a cup. The coffee flow will automatically stop.
- Return the carafe to the warming plate within 20 seconds to prevent overflow from the brew basket.
- Brewing will resume once the carafe is back in place.
Manteniment i Neteja
Una neteja regular garanteix un rendiment òptim i allarga la vida útil de la teva cafetera.
Neteja diària:
- Desconnecteu sempre la cafetera abans de netejar-la.
- Wash the carafe, brew basket, and reusable filter in warm, soapy water. Rinse thoroughly and dry. These parts are top-rack dishwasher safe.
- Wipe the exterior of the coffee maker and the warming plate with a soft, damp tela. No utilitzeu netejadors abrasius ni fregalls.
- Do not immerse the coffee maker's main body, cord, or plug in water or any other liquid.
Descalcificació (eliminació de dipòsits minerals):
Mineral deposits (calcium) can build up in your coffee maker over time, affecting performance. Descale every 2-3 months, or more frequently if you have hard water.
- Fill the water reservoir with a mixture of white vinegar and water (1 part vinegar to 2 parts water). For example, 2 cups vinegar and 4 cups water.
- Place the empty reusable filter or a paper filter into the brew basket.
- Col·loqueu la garrafa buida al plat d'escalfament.
- Press the "ON/OFF AUTO" button to start a brew cycle. Allow half of the mixture to brew through.
- Turn off the coffee maker and let it stand for at least 15 minutes to allow the vinegar solution to clean the internal components.
- Turn the coffee maker back on and allow the remaining mixture to brew through.
- Discard the vinegar solution from the carafe.
- Run 2-3 full cycles with fresh, clean water to rinse out any remaining vinegar taste or odor.
Resolució de problemes
| Problema | Causa possible | Solució |
|---|---|---|
| El cafè no es fa infusió. |
|
|
| El cafè té un gust fluix o massa fort. |
|
|
| L'aigua desborda de la cistella de la cafetera. |
|
|
| El cafè no és prou calent. |
|
|
Especificacions
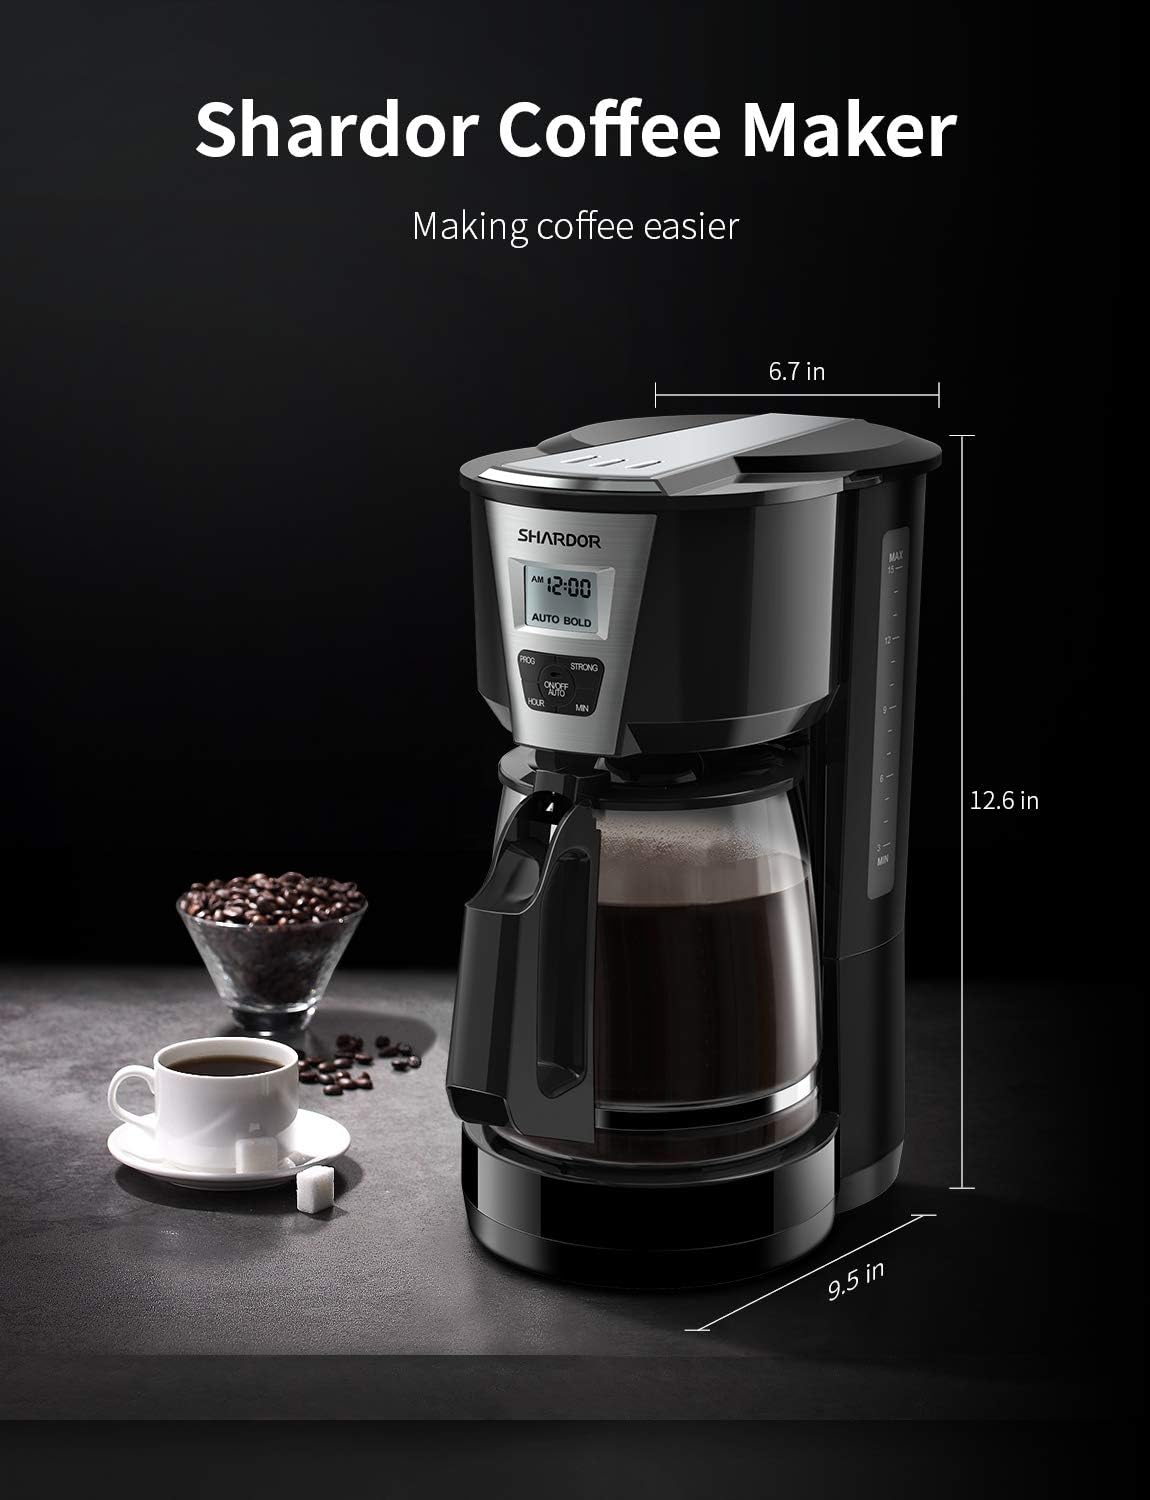
Image: The SHARDOR Drip Coffee Maker shown with its key dimensions: 12.6 inches height, 9.5 inches width, and 6.7 inches depth. This provides a visual reference for product size.
| Característica | Detall |
|---|---|
| Número de model | US-CM515B |
| Capacitat | 12-15 Cups (60 oz) |
| Dimensions (L x A x A) | 11.8 x 7.6 x 13.8 polzades |
| Pes de l'article | 4.84 lliures |
| Material | Got (garrafa) |
| Característiques especials | Programmable, Brew Strength Control, Automatic Shut-Off, Warming Plate, Pause & Serve |
| Components inclosos | Gerra, filtre reutilitzable |
Garantia i Suport
For warranty information or product support, please refer to the warranty card included with your purchase or contact SHARDOR customer service. Contact details can typically be found on the manufacturer's official weblloc web o a l'embalatge del producte.
For further assistance, visit the official SHARDOR store on Amazon: SHARDOR Store


