1. Introducció
The Walfront UT219DS is a professional digital clamp meter designed for accurate and reliable electrical measurements. It is an essential tool for electrical maintenance personnel, HVAC technicians, and anyone requiring precise measurements of AC/DC current, AC/DC voltage, resistance, capacitance, frequency, temperature, and diode testing. This manual provides detailed instructions for the safe and effective use of your UT219DS clamp metre.
2. Informació de seguretat
AVÍS: Per evitar possibles descàrregues elèctriques, incendis o lesions personals, llegiu tota la informació de seguretat abans d'utilitzar el producte.
- Respecteu sempre els codis de seguretat locals i nacionals.
- No utilitzeu el mesurador si sembla danyat o si els cables de prova estan danyats.
- Verificar el funcionament del mesurador amb un volum coneguttagla font abans d'usar-la.
- No apliqueu més del volum nominaltage, tal com està marcat al comptador, entre els terminals o entre qualsevol terminal i terra.
- Tingueu precaució amb el voltagper sobre de 30 V CA RMS, 42 V pic o 60 V CC. Aquests voltagsuposen un risc de xoc.
- Keep fingers behind the finger guards on the test probes during use.
- Substituïu les piles quan aparegui l'indicador de bateria baixa per garantir lectures precises.
- No feu funcionar el mesurador en ambients amb gasos explosius, vapors o pols.
- Assegureu-vos que l'interruptor rotatiu estigui en la posició correcta per a la mesura desitjada abans de connectar-lo al circuit.
- When measuring current, ensure the circuit is de-energized before clamping the jaw around the conductor.
3. Producte acabatview
The Walfront UT219DS Digital Clamp Meter is designed for robust performance and ease of use. It features a large LCD display, a durable clamp jaw, and a rotary dial for function selection.
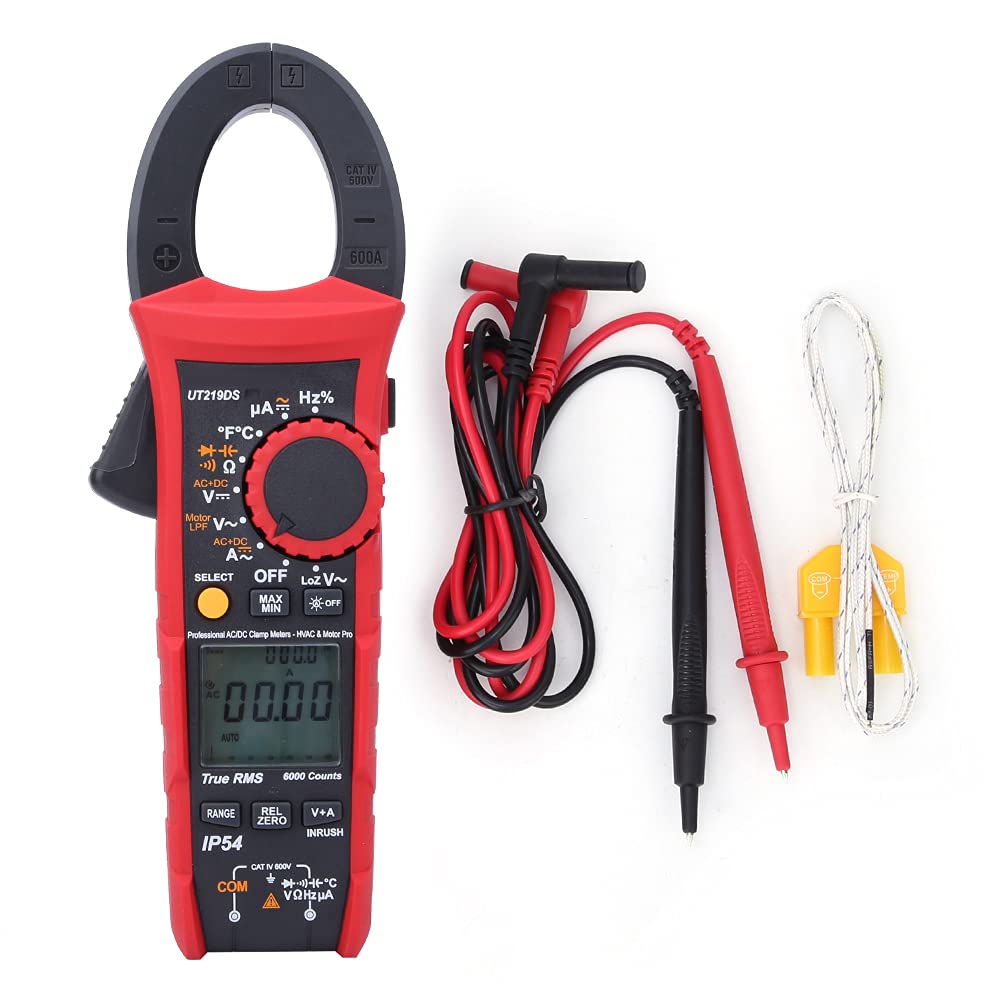
Figure 3.1: The Walfront UT219DS Digital Clamp Meter, including the main unit, red and black test leads, and a K-type temperature probe.
Característiques principals:
- 6000 Counts LCD Display: Provides clear and precise readings.
- Mesurament RMS real: Ensures accurate readings for non-sinusoidal waveforms.
- 33mm Jaw Opening: Allows for easy clamping around conductors without interrupting the circuit.
- Classificació IP54: Offers protection against dust and splashing water.
- 2-Meter Drop Test: Dissenyat per a la durabilitat en entorns exigents.
- Retroil·luminació automàtica: Millora la visibilitat en condicions de poca llum.
- Apagat automàtic: Conserva la durada de la bateria.
- Funcions especials: Includes LoZ voltage, Motor Phase Sequence, Low-Pass Filter (LPF), Inrush current, Data Hold, MAX/MIN, Relative Value, and Dual Display (V+A).

Figure 3.2: The ergonomic design of the UT219DS allows for comfortable single-hand operation.
Components:
- Clamp Mandíbula: S'utilitza per a la mesura de corrent AC/DC sense contacte.
- Marcador rotatiu: Selecciona funcions de mesura.
- Pantalla LCD: Mostra lectures de mesura, unitats i indicadors de funció.
- Botons de funció: (SELECT, MAX/MIN, REL/ZERO, V+A, INRUSH) for additional features.
- Terminals d'entrada: For connecting test leads and temperature probe.
- Activador: Opens the clamp mandíbula.

Figura 3.3: Detallada view del clamp jaw mechanism and the input jacks for test leads and probes.
4. Configuració
Instal·lació de la bateria:
The UT219DS requires three (3) 1.5V AAA alkaline batteries for operation. Follow these steps to install or replace the batteries:
- Ensure the meter is powered off and disconnect all test leads from the meter and any circuit.
- Localitzeu la tapa del compartiment de la bateria a la part posterior del mesurador.
- Feu servir un tornavís per afluixar el(s) cargol(s) que fixen la tapa de la bateria.
- Traieu la tapa de la bateria.
- Insert three new 1.5V AAA alkaline batteries, observing the correct polarity (+ and -) as indicated inside the compartment.
- Torneu a col·locar la tapa de la bateria i estrenyeu fermament el(s) cargol(s).

Figura 4.1: posterior view of the meter with the battery compartment open, illustrating the placement for three AAA batteries.
5. Instruccions de funcionament
Before taking any measurements, ensure the meter is set to the correct function and the test leads are properly connected.
5.1 Selecció de la funció
Turn the rotary dial to select the desired measurement function. The meter will automatically select the appropriate range for most functions (Auto Range). Press the SELECCIONA button to toggle between different sub-functions within a single dial position (e.g., AC/DC voltage, resistència/continuïtat/díode).
5.2 Mesura de corrent AC/DC (Clamp Mandíbula)
- Gireu el dial giratori cap a A~ (corrent altern) o A= Posició (corrent continu).
- Premeu el gallet per obrir el clamp mandíbula.
- Tanqueu només un conductor del circuit dins del clamp jaw. For AC current, ensure the conductor is centered. For DC current, observe polarity.
- Llegiu el valor actual a la pantalla LCD.
5.3 AC/DC Voltage Mesura
- Introduïu el cable de prova vermell al VΩHz terminal and the black test lead into the COM terminal.
- Gireu el dial giratori cap a V~ (Volum AC)tage) o V= (DC Voltage) position. Use the SELECCIONA button to switch between AC and DC if needed.
- Connecteu les sondes de prova al circuit o component que s'ha de mesurar.
- Llegeix el voltage valor a la pantalla LCD.
5.4 Resistance, Continuity, Diode, and Capacitance Measurement
- Introduïu el cable de prova vermell al VΩHz terminal and the black test lead into the COM terminal.
- Gireu el dial giratori cap a Ω (Resistance/Continuity/Diode/Capacitance) position.
- Premeu el botó SELECCIONA button to cycle through Resistance (Ω), Continuity ()))), Diode (->|), and Capacitance (F) funcions.
- Connect the test probes across the component to be measured. For continuity, a beep indicates a continuous circuit. For diode, forward voltage drop is displayed. For capacitance, ensure the capacitor is discharged before measurement.
- Llegiu el valor a la pantalla LCD.
5.5 Frequency/Duty Cycle Measurement (Hz%)
- Introduïu el cable de prova vermell al VΩHz terminal and the black test lead into the COM terminal.
- Gireu el dial giratori cap a % Hz posició.
- Connect the test probes across the circuit where frequency or duty cycle is to be measured.
- Read the frequency (Hz) or duty cycle (%) value on the LCD display.
5.6 Mesura de la temperatura
- Gireu el dial giratori cap a °C°F posició.
- Insert the K-type temperature probe into the input terminals, observing polarity.
- Place the tip of the temperature probe on the object or in the environment to be measured.
- Read the temperature value in Celsius or Fahrenheit on the LCD display. Use the SELECCIONA button to switch between units.
5.7 LoZ Voltage Mesura
The LoZ (Low Impedance) voltage measurement function provides a low input impedance to eliminate ghost voltages, ensuring more accurate readings in certain applications.
- Introduïu el cable de prova vermell al VΩHz terminal and the black test lead into the COM terminal.
- Gireu el dial giratori cap a LoZ V~ posició.
- Connect the test probes across the circuit to be measured.
- Read the LoZ voltage valor a la pantalla LCD.
5.8 Motor Phase Sequence Measurement
This function helps identify the phase sequence of a three-phase motor or power supply.
- Insert the test leads into the appropriate terminals as indicated for voltage mesura.
- Gireu el dial giratori cap a Motor LPF V~ posició.
- Follow the on-screen prompts or specific instructions for connecting the probes to the three phases.
- The display will indicate the phase sequence.
5.9 Low-Pass Filter (LPF) Measurement
The LPF function filters out high-frequency noise, providing stable and accurate voltage and frequency measurements for variable frequency drives (VFDs) and other noisy environments.
- Insert the test leads into the appropriate terminals for voltage mesura.
- Gireu el dial giratori cap a Motor LPF V~ posició.
- Connect the test probes across the circuit.
- The meter will display the filtered voltage o freqüència.
5.10 Mesura del corrent d'irrupció
This function measures the initial surge of current when a motor or other inductive load starts up.
- Turn the rotary dial to an AC Current (A~) posició.
- Premeu el botó INRUSH button. The meter will enter inrush measurement mode.
- Clamp the jaw around the single conductor of the motor or load.
- Start the motor/load. The meter will capture and display the peak inrush current.
5.11 Data Hold (H)
Premeu el botó H per congelar la lectura actual a la pantalla. Premeu-lo de nou per alliberar-la.
5.12 Maximum/Minimum (MAX/MIN)
Premeu el botó MAX/MIN button to record the maximum and minimum readings over time. Press again to cycle between MAX, MIN, and current reading. Hold to exit.
5.13 Relative Value (REL/ZERO)
Premeu el botó REL/ZERO button to store the current reading as a reference value and display subsequent measurements as a deviation from this reference. This is useful for nulling out test lead resistance or comparing values. Hold to exit.
5.14 Dual Display (V+A)
In certain modes, the meter can display both voltage and current simultaneously. Press the V+A button to activate this feature, allowing for automatic monitoring of voltage in current mode.
6. Manteniment
6.1 Neteja:
Netegeu el comptador casing amb anunciamp drap i detergent suau. No utilitzeu abrasius ni dissolvents. Assegureu-vos que el mesurador estigui completament sec abans d'utilitzar-lo.
6.2 Substitució de la bateria:
Refer to Section 4. Setup for detailed instructions on battery replacement. Always replace all three batteries simultaneously with new 1.5V AAA alkaline batteries.
6.3 Emmagatzematge:
If the meter is not used for an extended period, remove the batteries to prevent leakage and damage. Store the meter in a cool, dry place, away from direct sunlight and extreme temperatures.

Figure 6.1: The included carrying case provides protection for the meter during storage and transport.
7. Solució De Problemes
| Problema | Causa possible | Solució |
|---|---|---|
| El mesurador no s'encén. | Piles gastades o instal·lades incorrectament. | Comproveu la polaritat de la bateria; substituïu les piles. |
| No reading or 'OL' (Overload) displayed. | Incorrect function selected; open circuit; measurement exceeds range. | Select correct function; check circuit continuity; ensure measurement is within meter's range. |
| Lectures inexactes. | Low battery; poor test lead connection; external interference. | Replace batteries; ensure secure connections; move away from strong electromagnetic fields. |
| Display shows 'Lo Batt'. | Vol de bateria baixatage. | Substituïu les piles immediatament. |
8. Especificacions
| Paràmetre | Especificació |
|---|---|
| Model | UT219DS |
| Mostra els recomptes | 6000 |
| Interval automàtic/manual | Sí |
| Jaw Opening Size | 33 mm (1.3 polzades) |
| RMS veritable | Sí |
| AC Current Frequency Response | 40 Hz ~ 400 Hz |
| Vol. ACtage Frequency Response | 40Hz~1kHz |
| Motor Phase Sequence Measurement | Fins a 600.0V |
| Low-Pass Filter Test | Yes (1 kHz and 3 dB attenuation) |
| Prova de díode | 3V |
| Digital Conversion Rate | 5 vegades / s |
| Analog Bar Conversion Rate | 20 vegades / s |
| Gràfic de barres analògic | 31 segments |
| Tipus de pantalla LCD | HTN Dual Display Interface |
| Apagat automàtic | Sí |
| Volum baixtage Visualització | Sí |
| Data Hold (H) | Sí |
| Valor relatiu (REL) | Sí |
| Maximum/Minimum (MAX/MIN) | Sí |
| Double Display of Voltage + Current (V+A) | Sí |
| Function Selection (SELECT) | Sí |
| Retroil·luminació automàtica | Sí |
| Classificació de la prova de caiguda | 2 metres |
| Classificació IP | IP54 |
| Impedància d'entrada | ≥10MΩ |
| Font d'alimentació | 3 piles alcalines AAA de 1.5 V |
| Mida de pantalla LCD | 35 x 31 mm (1.4 x 1.2 polzades) |
| Pes de l'article | 0.71 quilos |
| Certificacions | CE, FCC, RoHS |
9. Garantia i Suport
For product support, technical assistance, or warranty inquiries, please contact Walfront customer service or visit the official Walfront store on Amazon:
Si us plau, conserveu el rebut de compra per motius de garantia.


