1. Introducció
Thank you for choosing the Sainlogic Weather Station Model 1. This device is designed to provide accurate indoor and outdoor temperature and humidity readings, helping you monitor environmental conditions in various locations. The system includes a main display unit and three wireless remote sensors, allowing for comprehensive monitoring. This manual will guide you through the setup, operation, and maintenance of your weather station.
2. Contingut del paquet
Si us plau, comproveu el contingut del paquet per assegurar-vos que hi hagi tots els elements:
- 1 x Sainlogic Weather Station Main Display Unit
- 3 sensors remots sense fil
- 1 x Manual d'usuari (aquest document)
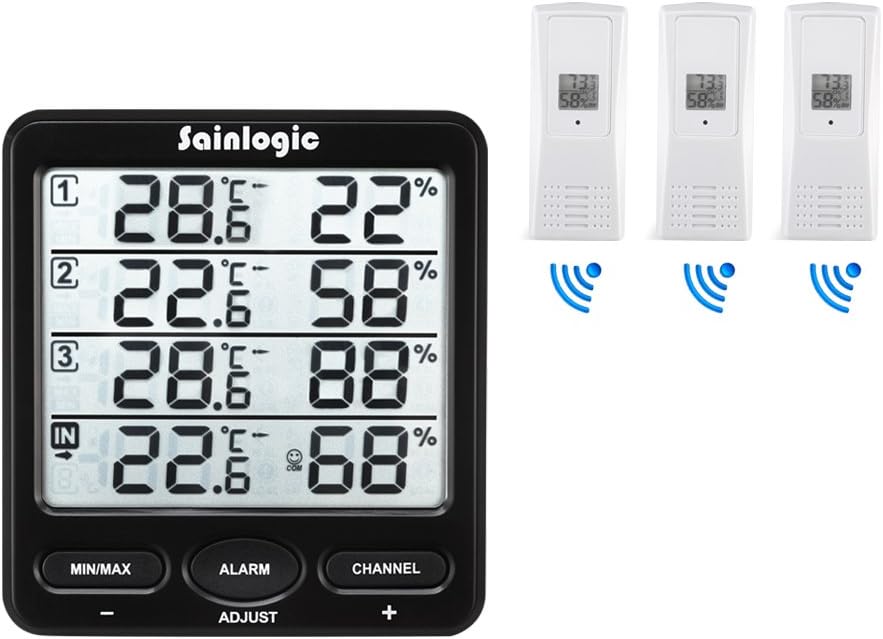
Image: The Sainlogic Weather Station main display unit shown alongside three wireless remote sensors, illustrating the complete package contents.
3. Producte acabatview
3.1 Unitat de visualització principal
The main display unit features a large LCD screen that simultaneously shows indoor temperature and humidity, along with readings from up to three remote sensors. It includes several buttons for configuration and data viewing.
- Botó MÍN/MÀX: Acostumat a view the minimum and maximum recorded temperature and humidity values.
- Botó ALARMA: Used to set and activate temperature and humidity alarms.
- CHANNEL Button: Used to switch between displaying individual remote sensor channels or to activate an auto-cycle display.
- ADJUST (+/-) Buttons: Used to adjust values during settings configuration.

Image: A dual view of the main display unit, showing its front with the LCD screen and control buttons, and its back with the battery compartment and wall-mounting option.
3.2 Wireless Remote Sensors
Each remote sensor is a compact unit designed to measure temperature and humidity in its location and transmit data wirelessly to the main display unit. They are suitable for both indoor and outdoor use, provided they are protected from direct weather elements.

Image: A white wireless remote sensor positioned outdoors in a garden, demonstrating its potential placement for environmental monitoring.
4. Configuració
4.1 Instal·lació de la bateria
Proper battery installation is crucial for the correct functioning of your weather station.
- Unitat de visualització principal: Obriu el compartiment de les piles a la part posterior de la unitat principal. Introduïu 3 piles AAA, assegurant-vos de la polaritat correcta (+/-). Tanqueu el compartiment.
- Sensors remots: Open the battery compartment on each remote sensor. Insert 2 appropriate batteries (typically AAA), ensuring correct polarity (+/-). Close the compartment.
Note: It is recommended to install batteries in the remote sensors first, then in the main display unit, to facilitate easier pairing.

Imatge: La part posterior view of the main display unit, highlighting the battery compartment for 3 AAA batteries, the wall-mountable slot, and the foldable stand.
4.2 Emparellament de sensors
After installing batteries, the main unit will automatically attempt to connect with the remote sensors.
- Place all remote sensors within close proximity (e.g., 1 meter) of the main display unit.
- Ensure each remote sensor is powered on. Each sensor has a channel switch (1, 2, or 3). Assign a unique channel to each sensor.
- The main unit will display readings for each connected sensor. This process may take a few minutes. If a sensor does not connect, try removing and reinserting its batteries, or pressing the 'CHANNEL' button on the main unit to initiate a search.
4.3 Col·locació
Optimal placement ensures accurate readings and reliable wireless transmission.
- Unitat de visualització principal: Place the main unit indoors on a stable surface or mount it on a wall. Avoid direct sunlight, heat sources, or areas with high electromagnetic interference (e.g., near TVs, computers).
- Sensors remots: Place remote sensors in desired monitoring locations. For outdoor use, ensure sensors are protected from direct rain, snow, and prolonged direct sunlight. A sheltered spot under an eaves or porch is ideal. The wireless range is approximately 60 meters (200 feet) in open air, but walls and obstacles will reduce this range.

Image: The weather station display unit shown in different indoor settings such as an office, bedroom, baby room, and wine cellar, illustrating versatile placement options.

Image: An illustration depicting the main display unit wirelessly communicating with a remote sensor placed in a baby room, highlighting the 60m/200ft wireless range capability.
5. Funcionament
5.1 Mostra informació
La unitat de visualització principal proporciona una visió claraview of current conditions:
- Secció interior: Displays the current temperature and humidity measured by the main unit itself.
- Sensor 1, 2, 3 Sections: Each section displays the current temperature and humidity from the corresponding remote sensor.
5.2 Funcions dels botons
- MIN / MAX: Premeu una vegada per view maximum recorded temperature and humidity. Press again to view minimum recorded values. Press and hold to clear recorded MIN/MAX data.
- ALARMA: Press to enter alarm setting mode. Use the ADJUST (+/-) buttons to set desired high/low temperature or humidity thresholds. Press ALARM again to confirm and move to the next setting. Press and hold ALARM to activate/deactivate the alarm function.
- CANAL: Press to manually cycle through the remote sensor channels (1, 2, 3). Press and hold to activate the auto-cycle feature, which will automatically display readings from each sensor in sequence.
- ADJUST (+/-): In setting modes (e.g., alarm setting), these buttons are used to increase or decrease values.
5.3 Configuració d'alarmes
The weather station can alert you when temperature or humidity exceeds predefined limits.
- Premeu el botó ALARMA botó per entrar al mode de configuració d'alarma.
- The display will show the current alarm setting for a specific parameter (e.g., high indoor temperature). Use the ADJUST (+/-) buttons to set your desired value.
- Premeu ALARMA again to move to the next alarm parameter (e.g., low indoor temperature, high indoor humidity, low indoor humidity, then cycling through each sensor's high/low temperature and humidity alarms).
- Once all desired alarms are set, press and hold the ALARMA button to exit the setting mode and activate the alarms. An alarm icon will appear on the display.
- When an alarm condition is met, the unit will emit an audible alert and the corresponding reading will flash. Press any button to silence the alarm.
6. Manteniment
6.1 Substitució de la bateria
Replace batteries when the low battery indicator appears on the display. For optimal performance, replace all batteries simultaneously with new, high-quality batteries.
6.2 Neteja
Wipe the main unit and sensors with a soft, damp drap. No utilitzeu netejadors abrasius ni dissolvents, ja que poden danyar el plàstic.asing and display. Ensure no moisture enters the battery compartments or sensor openings.
7. Solució De Problemes
| Problema | Causa possible | Solució |
|---|---|---|
| No remote sensor reading | Low batteries in sensor; sensor out of range; interference; sensor not paired. | Replace sensor batteries; move sensor closer to main unit; avoid placing near electronic devices; re-pair sensor by removing/reinserting batteries and pressing 'CHANNEL' on main unit. |
| Lectures inexactes | Sensor/unit not stabilized; improper placement; calibration needed. | Allow 15-30 minutes for readings to stabilize after setup; ensure proper placement away from direct heat/cold sources; some units allow for manual calibration (refer to advanced settings if available, though not explicitly detailed in basic product info). |
| La pantalla està en blanc o tènue | Piles baixes a la unitat principal. | Replace batteries in the main display unit. |
8. Especificacions
| Característica | Detall |
|---|---|
| Dimensions del producte | 7.2 x 12 x 5 cm |
| Pes del producte | 320 grams |
| Material | Plàstic |
| Número de model | 1 |
| abast sense fils | Fins a 60 metres (200 peus) a l'aire lliure |
| Font d'alimentació (unitat principal) | 3 piles AAA (no incloses) |
| Power Source (Remote Sensors) | 2 x AAA batteries per sensor (not included) |
9. Garantia i Suport
For warranty information and technical support, please refer to the documentation included with your purchase or contact Sainlogic customer service directly. Contact details are typically available on the manufacturer's official weblloc o embalatge del producte.


