1. Introducció i finalview
The Escort EDM 1111A is a versatile digital multimeter designed for accurate measurement of various electrical parameters. This device is essential for electricians, technicians, and hobbyists for testing circuits, components, and power sources. It features a clear digital display and a rotary dial for selecting different measurement functions.

The Escort EDM 1111A Digital Multimeter with red and black test leads connected, ready for use.
Les funcions clau inclouen:
- DC Voltage (DCV) measurement
- Vol. ACtage (ACV) measurement
- DC Current (DCA) measurement
- AC Current (ACA) measurement
- Mesura de la resistència (Ω).
- Capacitance (CX) measurement
- Diode and Transistor (hFE) testing
2. Configuració
2.1 Instal·lació de la bateria
The Escort EDM 1111A requires a DC 9V 006P battery for operation. To install or replace the battery:
- Assegureu-vos que el multímetre estigui APAGAT.
- Localitzeu el compartiment de la bateria a la part posterior de la unitat.
- Carefully slide open or unscrew the battery cover.
- Insert a new 9V 006P battery, observing the correct polarity (+/-).
- Col·loqueu la tapa de la bateria de manera segura.

La part posterior view of the Escort EDM 1111A Digital Multimeter, showing the battery compartment cover and the product label.
2.2 Connexió dels cables de prova
The multimeter comes with two test leads, typically one red (positive) and one black (negative/common). Proper connection is crucial for accurate and safe measurements.
- Per a la majoria de volumstage, resistance, and low current measurements, connect the black lead to the 'COM' (Common) jack.
- Connect the red lead to the 'V-Ω-mA' jack for voltage, resistència i miliampmesures actuals.
- Per a mesures de corrent elevat (fins a 10 A), connecteu el cable vermell a la presa '10 A'. Always ensure the correct jack is used to prevent damage to the meter or circuit.

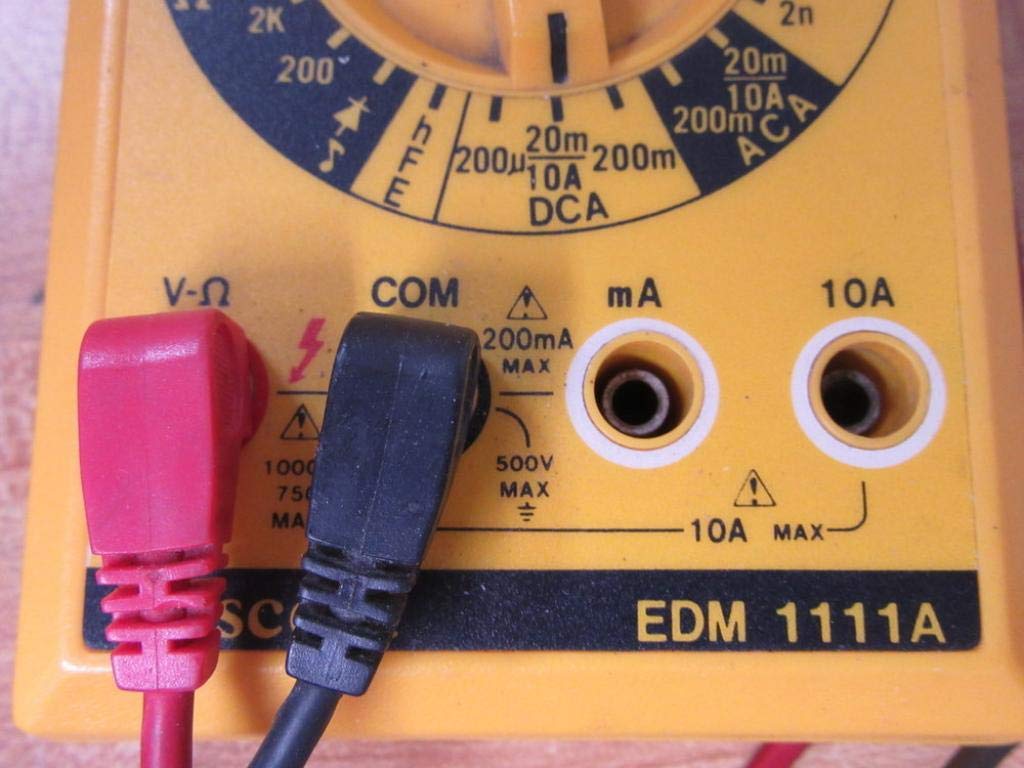
A closer look at the input jacks (V-Ω, COM, mA, 10A) and the lower portion of the rotary dial, indicating current measurement ranges.

The red and black test probes (leads) used with the Escort EDM 1111A Digital Multimeter, featuring pointed tips for electrical contact.
3. Instruccions de funcionament
Before taking any measurements, ensure the test leads are correctly connected and the rotary dial is set to the appropriate function and range.

Detallada view of the rotary selector dial on the Escort EDM 1111A Digital Multimeter, displaying various measurement functions such as DCV, ACV, Ω, DCA, ACA, and CX.
3.1 Mesurar DC Voltage (DCV)
- Set the rotary dial to the desired DCV range (e.g., 200m, 2, 20, 200, 1000). Choose a range higher than the expected voltage.
- Connect the red lead to the positive (+) side of the circuit and the black lead to the negative (-) side.
- Llegeix el voltage valor a la pantalla.
3.2 Mesurar AC Voltage (ACV)
- Set the rotary dial to the desired ACV range (e.g., 200m, 2, 20, 200, 750). Choose a range higher than the expected voltage.
- Connecteu els cables de prova a través del voltatge de CAtage source. Polarity does not matter for AC voltage.
- Llegeix el voltage valor a la pantalla.
3.3 Mesura de la resistència (Ω)
- Assegureu-vos que el circuit o component estigui desenergitzat abans de mesurar la resistència.
- Set the rotary dial to the desired Ω range (e.g., 200, 2K, 20K, 200K, 2M, 20M, 200M).
- Connecteu els cables de prova al component que s'ha de mesurar.
- Llegiu el valor de resistència a la pantalla.
3.4 Measuring DC Current (DCA)
- Assegureu-vos que el circuit estigui desenergitzat.
- Set the rotary dial to the desired DCA range (e.g., 200µ, 2m, 20m, 200m, 10A).
- Important: For currents up to 200mA, use the 'V-Ω-mA' jack for the red lead. For currents up to 10A, use the '10A' jack.
- Break the circuit and connect the multimeter in series with the load. The current must flow through the multimeter.
- Reengegueu el circuit i llegiu el valor del corrent.
3.5 Measuring AC Current (ACA)
- Assegureu-vos que el circuit estigui desenergitzat.
- Set the rotary dial to the desired ACA range (e.g., 200µ, 2m, 20m, 200m, 10A).
- Important: For currents up to 200mA, use the 'V-Ω-mA' jack for the red lead. For currents up to 10A, use the '10A' jack.
- Break the circuit and connect the multimeter in series with the load.
- Reengegueu el circuit i llegiu el valor del corrent.
3.6 Measuring Capacitance (CX)
- Assegureu-vos que el condensador estigui completament descarregat abans de fer la prova.
- Set the rotary dial to the CX range (e.g., 2n, 20n, 200n, 2µ, 20µ).
- Connecteu els cables de prova als terminals del condensador.
- Llegiu el valor de la capacitat a la pantalla.
3.7 Diode and Transistor (hFE) Testing
Refer to the specific markings on the dial for diode and transistor testing functions. Typically, diode test mode allows checking the forward voltage drop of a diode, and hFE mode is used for measuring the DC current gain of transistors.
4. Manteniment
4.1 Substitució de la bateria
Replace the 9V 006P battery when the low battery indicator appears on the display or if the multimeter fails to power on. Follow the instructions in Section 2.1.
4.2 Neteja
To clean the multimeter, use a soft, damp drap. No utilitzeu netejadors abrasius ni dissolvents, ja que poden danyar el casing or display. Ensure the device is turned off and disconnected from any circuits before cleaning.
4.3 Emmagatzematge
When not in use for extended periods, store the multimeter in a cool, dry place, away from direct sunlight and extreme temperatures. Consider removing the battery to prevent leakage, which could damage the internal components.
5. Solució De Problemes
| Problema | Causa possible | Solució |
|---|---|---|
| Sense pantalla o pantalla tènue | Bateria baixa o esgotada | Replace the 9V 006P battery. |
| Lectures incorrectes | Incorrect range selected Poor lead connection Damaged test leads Incorrect input jack used | Seleccioneu l'interval adequat. Ensure leads are firmly connected. Inspect and replace damaged leads. Verify leads are in the correct V-Ω-mA or 10A jack. |
| Es mostra "OL" (sobrecàrrega) | Measurement exceeds selected range | Canvia a un rang superior. |
| No hi ha bip de continuïtat | Continuity function not selected Circuit obert | Ensure dial is on continuity/diode test. Check the circuit for breaks. |
6. Especificacions
| Paràmetre | Valor |
|---|---|
| Model | EDM 1111A |
| Dimensions del producte (L x A x A) | 8 x 4 x 2 polzades |
| Pes de l'article | 1.84 lliures |
| Font d'alimentació | DC 9V 006P Battery |
| Tipus de mesura | Multímetre |
| Fabricant | Escolta |
| Data de primera disponibilitat | 21 de novembre de 2019 |
| DC Voltage Gammes | 200mV, 2V, 20V, 200V, 1000V |
| Vol. ACtage Gammes | 200mV, 2V, 20V, 200V, 750V |
| Rangs de corrent continu | 200µA, 2mA, 20mA, 200mA, 10A |
| Rangs de corrent altern | 200µA, 2mA, 20mA, 200mA, 10A |
| Intervals de resistència | 200Ω, 2KΩ, 20KΩ, 200KΩ, 2MΩ, 20MΩ, 200MΩ |
| Rangs de capacitança | 2nF, 20nF, 200nF, 2µF, 20µF |
7. Informació de la garantia
For specific warranty details regarding your Escort EDM 1111A Digital Multimeter, please refer to the documentation provided at the time of purchase or contact the manufacturer directly. Warranty terms typically cover defects in materials and workmanship under normal use.
8. Atenció al client
If you encounter any issues or have questions not covered in this manual, please contact Escort customer support. Have your product model number (EDM 1111A) and serial number (if applicable, found on the back label) ready when contacting support for faster assistance.
The product label on the back of the Escort EDM 1111A, indicating 'DIGITAL MULTIMETER DC 9V 006P BATTERY', serial number, and 'MADE IN TAIWAN R.O.C.'.


