1. Introducció i finalview
This manual provides detailed instructions for the setup, operation, and troubleshooting of your Waveshare 7-inch HDMI LCD IPS Capacitive Touch Screen. This display features a 1024x600 hardware resolution and capacitive touch control, making it suitable for various mini PCs and desktop computers.
Les característiques clau inclouen:
- 7-inch IPS screen with 1024x600 hardware resolution.
- Capacitive touch control.
- HDMI interface for display, USB interface for touch functionality.
- Compatibility with Raspberry Pi (Raspbian/Ubuntu/Kali/Retropie/WIN10 IOT, driver-free).
- Compatibility with general desktop computers (Windows 10/8.1/8/7, five-points touch, driver-free).
- Adjustable backlight for power consumption control.
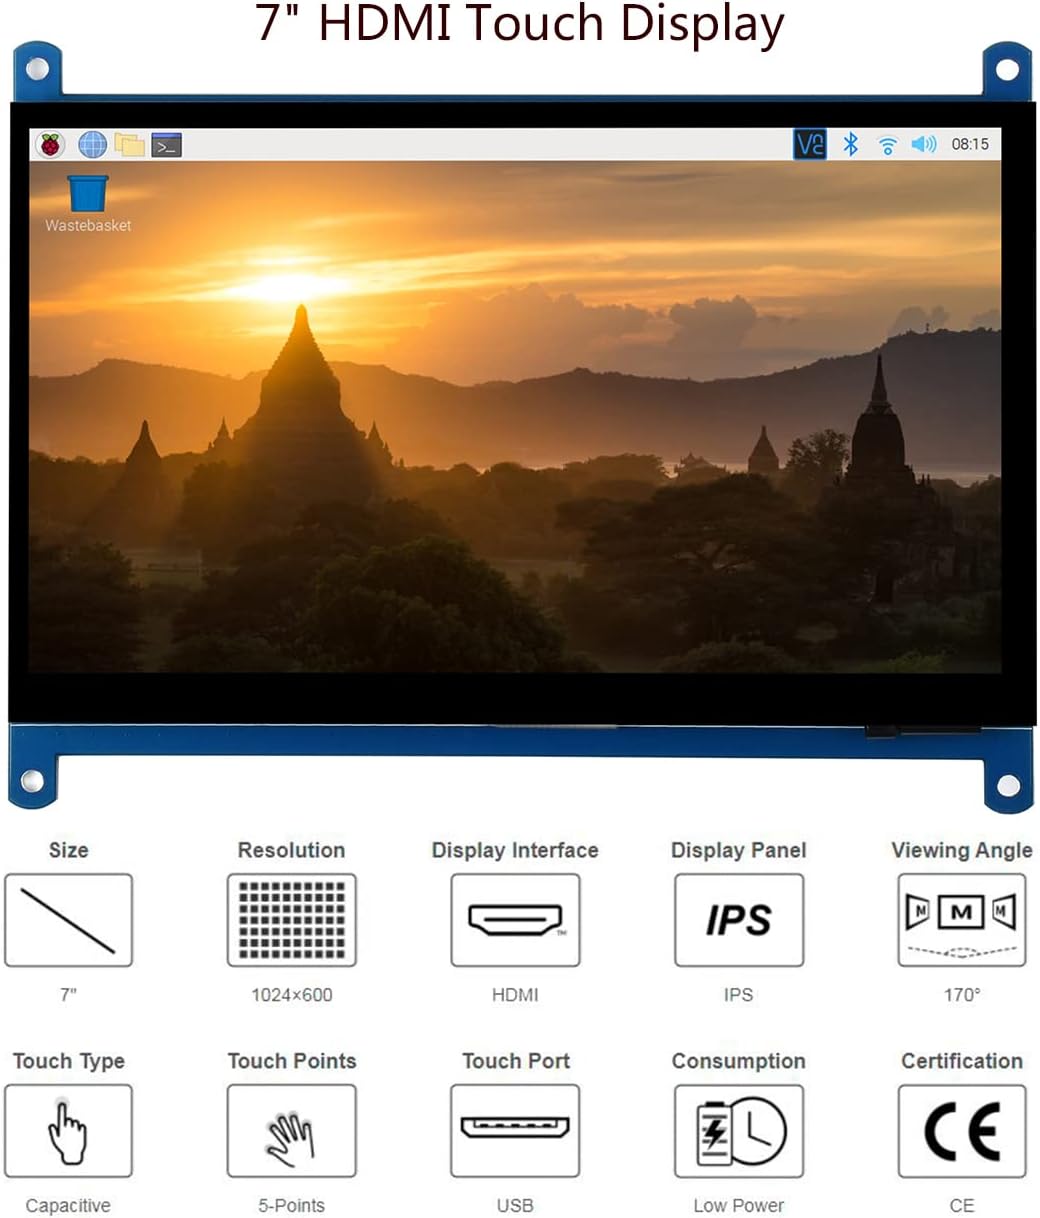
Figura 1: Waveshare 7-inch HDMI LCD IPS Capacitive Touch Screen. This image illustrates the display's size, 1024x600 resolution, HDMI display interface, IPS panel, 170° viewing angle, capacitive 5-point touch, USB touch port, low power consumption, and CE certification.
2. Contingut del paquet
Verifiqueu que tots els elements que s'enumeren a continuació s'inclouen al vostre paquet:
- 7inch HDMI LCD (C) x 1
- Cable HDMI x 1
- HDMI to Micro HDMI Adapter x 1
- USB type A plug to micro B plug cable x 1
- RPi screws pack (4pcs) x 1
- Quick start sheet x 1
3. Configuració i connexió
Follow these steps to connect your Waveshare 7-inch HDMI LCD to your device.
3.1 Connecting to Raspberry Pi 4
- Connect the HDMI cable from the display to the HDMI port on your Raspberry Pi 4.
- Connect the USB cable from the display's USB touch port to a USB port on your Raspberry Pi 4 for touch functionality and power.
- Ensure the Raspberry Pi 4 is powered with a 5V/3A power supply.

Figura 2: Connexió example with Raspberry Pi 4. The display connects via HDMI and USB to the Raspberry Pi 4, which requires a 5V/3A power supply.
3.2 Connecting to Raspberry Pi Zero W
For Raspberry Pi Zero W, additional cables are required and must be purchased separately:
- Mini HDMI adapter (or HDMI to Mini HDMI cable).
- USB-type-A-receptacle-to-Micro-B-plug-cable.
- Connect the display to the Raspberry Pi Zero W using the Mini HDMI adapter and HDMI cable.
- Connect the display's USB touch port to the Raspberry Pi Zero W using the USB-type-A-receptacle-to-Micro-B-plug-cable for touch and power.
- Ensure the Raspberry Pi Zero W is powered with a 5V/2.5A power supply.

Figura 3: Connexió examples with Raspberry Pi Zero W and a Mini PC. The top diagram shows the display connected to a Raspberry Pi Zero W via HDMI and USB, noting the need for additional adapters. The bottom diagram shows connection to a Mini PC via standard HDMI and USB cables.
3.3 Connecting to a Mini PC (Windows)
- Connect the HDMI cable from the display to the HDMI output of your Mini PC.
- Connect the USB cable from the display's USB touch port to a USB port on your Mini PC for touch functionality.
- The display will function as a standard monitor with five-point touch, driver-free, on Windows 10/8.1/8/7.
3.4 Connecting to BB Black
For BB Black, an additional HDMI cable is required and must be purchased separately.
- Connect the HDMI cable from the display to the HDMI port on your BB Black.
- Connect the USB cable from the display's USB touch port to a USB port on your BB Black for touch functionality and power.
4. Instruccions de funcionament
4.1 Engegada/apagada
Once connected, the display will power on automatically with your host device. To turn off the display, power down your host device or disconnect the power supply to the display.
Control de retroiluminació 4.2
The backlight can be turned off to reduce power consumption. Refer to the "Demystifying Design Details" image for the location of the backlight adjustment solder pads (PWM signal input) for advanced control, if applicable.
4.3 Funcionalitat tàctil
The display supports capacitive touch input. Depending on the operating system, it can support up to five-points touch.
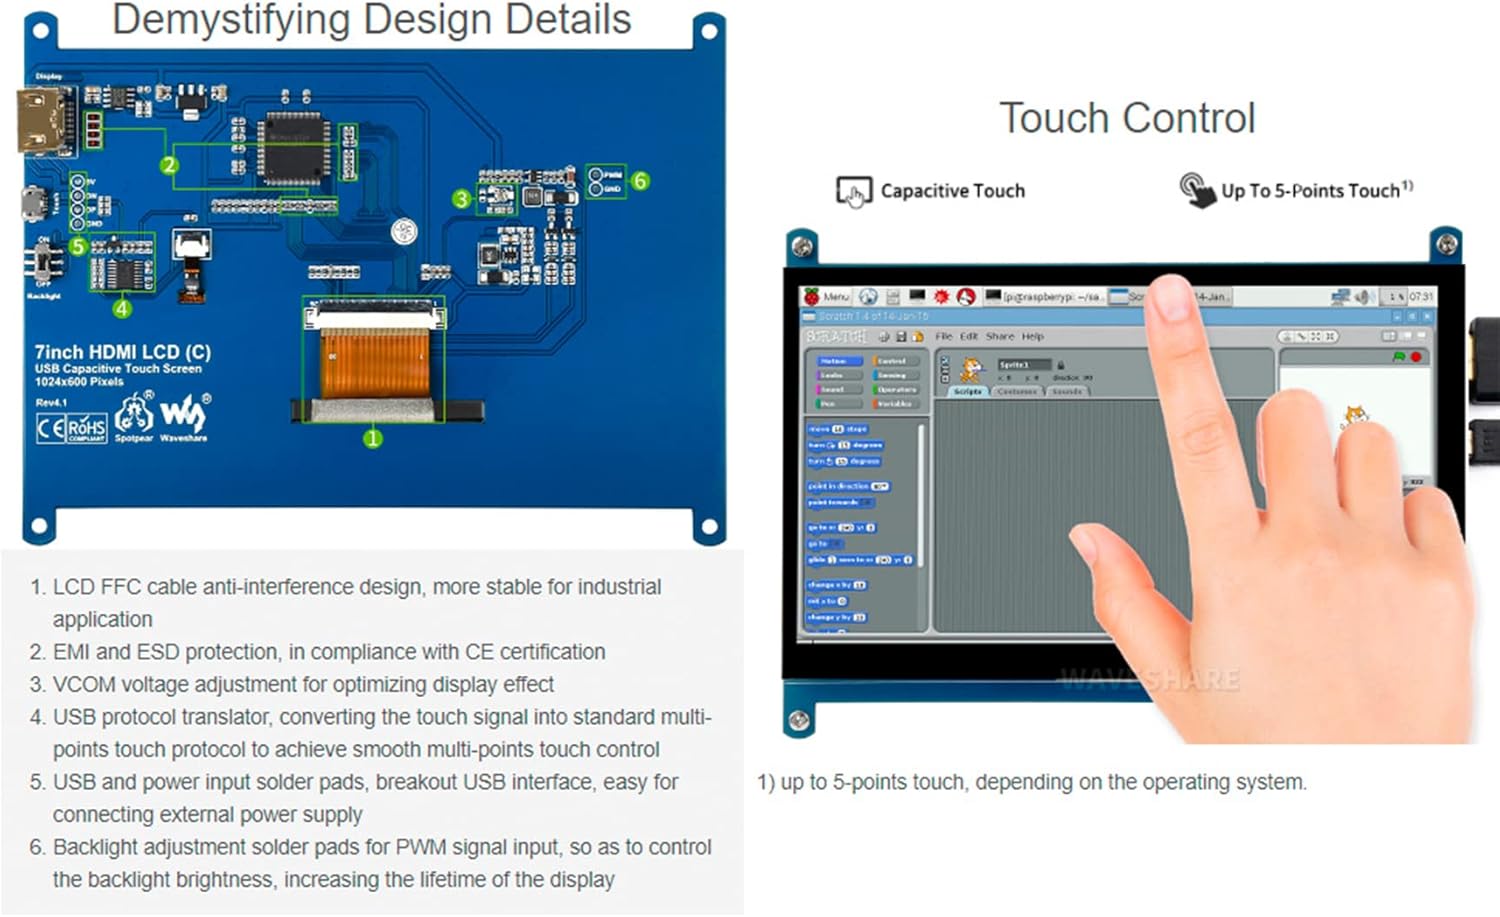
Figura 4: Internal design details and touch control demonstration. The left side shows the PCB layout with components like LCD FFC cable, EMI/ESD protection, VCOM voltage adjustment, USB protocol translator, and backlight adjustment pads. The right side demonstrates capacitive touch control on a Raspberry Pi interface, supporting up to 5-points touch depending on the OS.
4.4 Viewangle ing
El panell IPS ofereix un angle de visió ampli de 170° viewing angle, ensuring clear visibility from various positions.
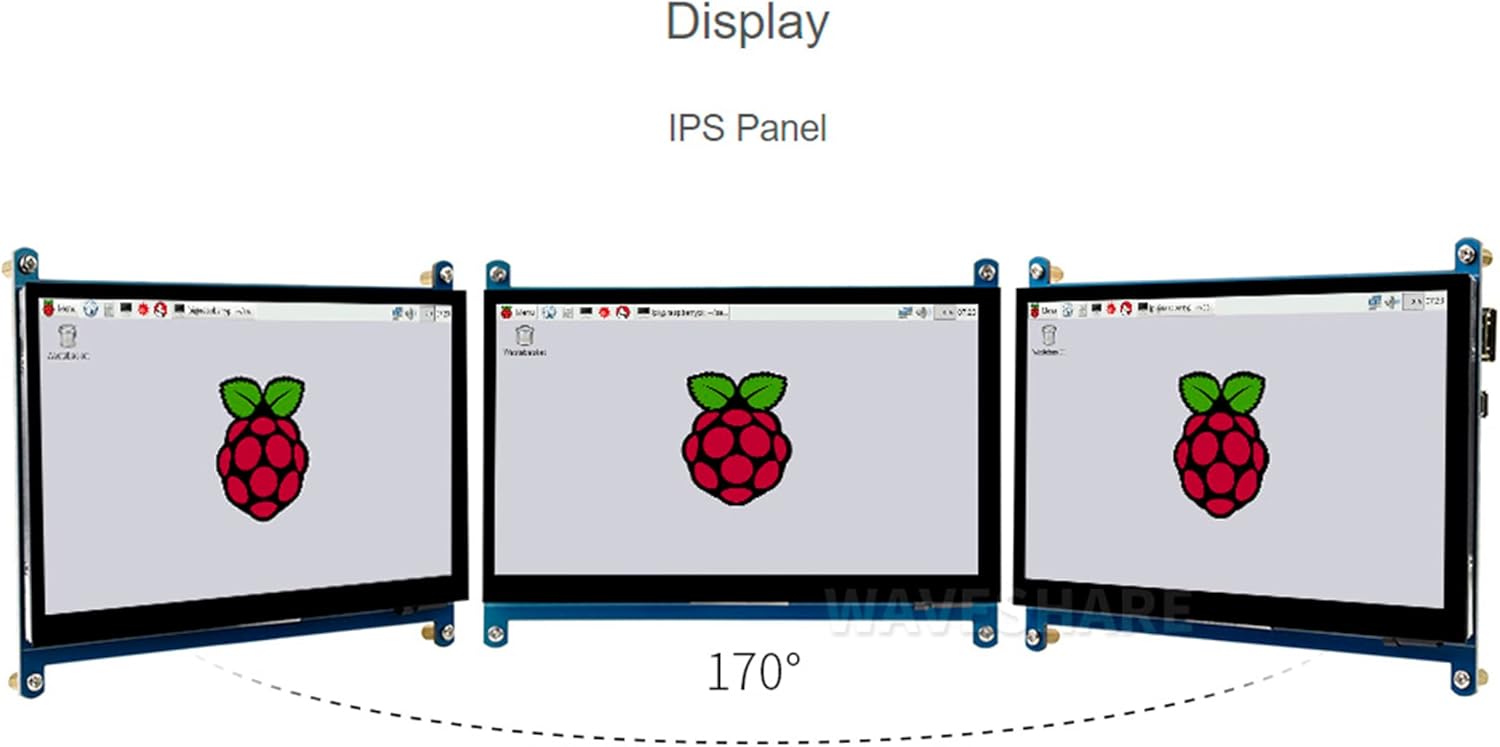
Figura 5: IPS Panel Display. This image shows three views of the display at different angles, illustrating the wide 170° viewing angle characteristic of an IPS panel.
5. Configuration (Raspberry Pi)
For optimal performance and to resolve common display issues with Raspberry Pi, modifications to the /boot/config.txt file may be necessary. Access this file on your Raspberry Pi's SD card.
5.1 Correct Resolution and Display Settings
If the display does not work properly or shows incorrect resolution, add the following lines to the end of your /boot/config.txt file:
max_usb_current=1
hdmi_group=2
hdmi_mode=87
hdmi_cvt 1024 600 60 6 0 0 0
hdmi_drive=1
Nota: If the LCD operates abnormally for an extended period without these settings, it may be damaged. After applying these settings, power off the screen and let it rest for a few hours to prevent flickering.
5.2 Removing Colored Squares (GPU Self-Test)
To remove the colored squares that appear during the GPU self-test on Raspberry Pi boot-up, add the following command to /boot/config.txt:
disable_splash=15.3 Replacing Raspberry Pi Startup Logo
To replace the default Raspberry Pi startup logo image, replace the custom image with the image located in the directory:
/usr/share/plymouth/themes/pix/splash.png
6. Especificacions
| Característica | Detall |
|---|---|
| Mida de la pantalla | 7 polzades |
| Resolució | 1024 x 600 píxels |
| Tipus de panell de visualització | IPS |
| Toca Tipus | Capacitive, 5-points (OS dependent) |
| Interfície de visualització | HDMI |
| Toqueu la interfície | USB |
| Relació d'aspecte | 1.70:1 |
| Viewangle ing | 170° |
| Pes de l'article | 13.4 unces |
| Dimensions del paquet | 8.27 x 5.83 x 2.13 polzades |
| Fabricant | Waveshare |
| Número de model | 7inch HDMI LCD (C) |
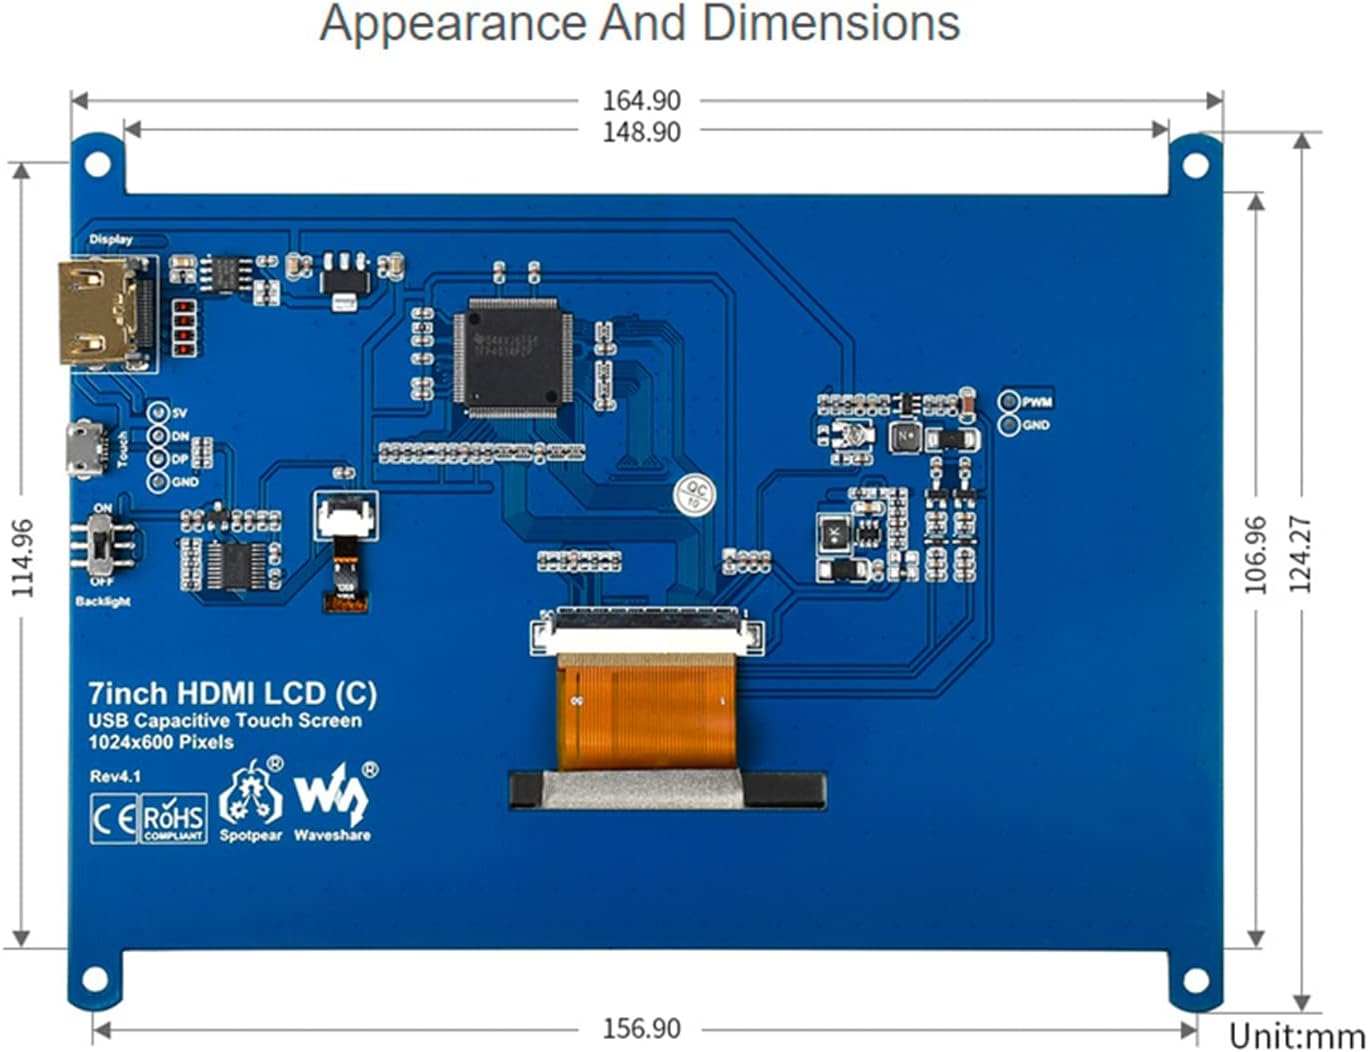
Figura 6: Appearance and dimensions of the 7-inch HDMI LCD (C). This diagram provides precise measurements in millimeters for the display's length, width, and height, along with the layout of its components and ports.
7. Solució De Problemes
Aquesta secció tracta problemes comuns i les seves solucions.
- Q: How to remove colored squares during GPU self-test on Raspberry Pi boot-up?
- A: Afegiu l'ordre següent a
/boot/config.txt:disable_splash=1 - Q: How to replace the Raspberry Pi startup logo image?
- A: Replace the custom image with the image in this directory:
/usr/share/plymouth/themes/pix/splash.png - Q: What can I do if thin red lines appear on the edge of the screen?
- A: Edita el
config.txtfile and add this line at the end:hdmi_drive=1 - Q: The display is dark or not easily visible.
- A: Ensure the backlight is on. If using with Raspberry Pi, verify the
config.txtsettings as described in Section 5.1. Incorrect settings can lead to display issues. - Q: Touch function stopped working or is not sensitive.
- A: Ensure the USB cable for touch is securely connected to both the display and the host device. If using with Raspberry Pi, confirm that
max_usb_current=1està establertconfig.txtto provide sufficient power to the USB port.
8. Manteniment
To ensure the longevity and optimal performance of your Waveshare 7-inch HDMI LCD, follow these maintenance guidelines:
- Neteja: Utilitzeu un drap suau i sense pelusa lleugerament dampNetegeu la superfície de la pantalla amb aigua o una solució netejadora de pantalles. Eviteu productes químics agressius, materials abrasius o humitat excessiva.
- Manipulació: Handle the display by its edges. Avoid applying pressure directly to the screen surface, especially when transporting.
- Emmagatzematge: When not in use, store the display in a cool, dry place away from direct sunlight and extreme temperatures. Keep it protected from dust and physical impact.
- Potència: Always use the recommended power supply for your host device to ensure stable operation of the display.
9. Garantia i Suport
For warranty information or technical support, please refer to the official Waveshare weblloc web o poseu-vos en contacte amb el vostre distribuïdor. Conserveu el rebut de compra per a reclamacions de garantia.
Additional resources and documentation may be available on the Waveshare support page.


