Introducció
The Phanteks Enthoo Pro 2 is a high-performance full tower PC chassis designed for enthusiasts and professionals. It features an innovative High-Performance Fabric mesh for optimal airflow, tempered glass side panel, and extensive support for high-end components, including dual systems and PSUs. This manual provides detailed instructions for setup, operation, and maintenance of your Enthoo Pro 2 chassis.

Imatge: Anvers view of the Phanteks Enthoo Pro 2 Full Tower PC Chassis, showcasing its tempered glass side panel and fabric mesh front panel.
Informació de seguretat
Please read and understand all safety instructions before installing components into the chassis. Failure to do so may result in personal injury or damage to the product or components.
- Always disconnect the power supply from the wall outlet before performing any installation or maintenance.
- Handle components with care to prevent electrostatic discharge (ESD) damage. Consider using an anti-static wrist strap.
- Avoid placing the chassis in direct sunlight, near heat sources, or in environments with excessive dust or moisture.
- Do not attempt to modify the chassis in any way not described in this manual.
- Mantingueu les peces petites i els cargols fora de l'abast dels nens.
Contingut del paquet
Verifiqueu que tots els components siguin presents al paquet:
- Phanteks Enthoo Pro 2 Chassis
- Accessory Box (containing screws, zip ties, and other mounting hardware)
- Manual d'usuari (aquest document)
- Additional brackets for dual system/PSU support (if applicable to your model variant)
Configuració i instal·lació de components
Follow these steps for proper installation of your PC components into the Enthoo Pro 2 chassis.
1. Preparació del xassís
- Place the chassis on a flat, stable surface.
- Remove the tempered glass side panel by unscrewing the thumb screws and carefully pulling it away. Place it on a soft, non-abrasive surface to prevent scratches.
- Remove the opposite steel side panel by unscrewing the thumb screws and sliding it backward.
- Familiarize yourself with the interior layout, including motherboard tray, PSU shroud, and drive bays.

Imatge: Interior view of the Phanteks Enthoo Pro 2 chassis, showing the spacious layout for component installation.
2. Instal·lació de la placa base
- The Enthoo Pro 2 supports various motherboard form factors, including E-ATX.
- Install the necessary motherboard standoffs into the motherboard tray according to your motherboard's form factor.
- Col·loca amb cura la placa base sobre els separadors, alineant els forats dels cargols.
- Secure the motherboard with the provided screws from the accessory box.
3. Instal·lació de la font d'alimentació (PSU)
- The chassis features a bottom-mount PSU design with an integrated PSU cover for a clean aesthetic.
- Slide the PSU into its designated compartment from the rear of the chassis.
- Fixeu la font d'alimentació amb cargols des de la part posterior del xassís.
- Route the necessary PSU cables through the cable management cutouts.
4. Instal·lació del dispositiu d'emmagatzematge
- The Enthoo Pro 2 offers massive storage capacity, supporting up to 12x HDDs or 11x SSDs.
- Install 3.5" HDDs into the removable drive cages located beneath the PSU shroud or in the front compartment.
- Install 2.5" SSDs onto the dedicated SSD brackets, often found behind the motherboard tray or on the PSU shroud.
- Secure all storage devices with the appropriate screws.
5. Instal·lació del ventilador i del radiador
- The chassis supports extensive air and water cooling configurations, including dual 480mm and dual 360mm radiator support simultaneously.
- Install case fans or radiators into the designated mounting locations (front, top, rear, bottom, side).
- Assegureu-vos la direcció adequada del flux d'aire per a un rendiment de refrigeració òptim.
6. Instal·lació de la targeta gràfica (GPU)
- Install your graphics card into the appropriate PCIe slot on your motherboard.
- The Enthoo Pro 2 supports dual vertical GPU installations (requires optional vertical GPU mount and riser cable, sold separately).
- Secure the GPU with the provided thumb screws or standard screws.
7. Gestió de cables
- Utilize the integrated cable routes, straps, and covers behind the motherboard tray to organize and hide cables.
- Proper cable management improves airflow and aesthetics.
8. Digital-RGB Lighting Setup
- The chassis features an integrated Digital-RGB controller.
- Connect the chassis's RGB cable to a compatible Digital-RGB header on your motherboard or to other Phanteks Digital-RGB products for synchronized lighting effects.
- Refer to your motherboard's manual for specific Digital-RGB software control.
9. Dual System/PSU Support
- The Enthoo Pro 2 is designed to accommodate a secondary ITX system or PSU.
- Specific mounting hardware and instructions for dual system configurations are typically provided with the optional ITX upgrade kit or secondary PSU.
Funcions operatives
Flux d'aire i refrigeració
The High-Performance Fabric mesh front panel and extensive ventilation throughout the chassis ensure superior airflow, contributing to lower component temperatures and stable system performance.

Imatge: Frontal view of the Phanteks Enthoo Pro 2 chassis, highlighting the high-performance fabric mesh for optimal airflow.
Digital-RGB Lighting Control
The integrated Digital-RGB controller allows for customizable lighting effects. Connect it to your motherboard's compatible header to synchronize lighting with other system components via motherboard software, or use Phanteks' own Digital-RGB products for expanded control.
Manteniment
Cleaning Dust Filters
The Enthoo Pro 2 features easily removable dust filters on the front, top, and bottom. Regularly clean these filters to maintain optimal airflow and prevent dust buildup inside your system.
- Gently pull out the dust filters.
- Use a soft brush or vacuum cleaner to remove accumulated dust.
- Reinsert the filters securely.

Imatge: Lateral view of the Phanteks Enthoo Pro 2 chassis, showing the ventilation areas that are protected by dust filters.
Neteja general
Wipe the exterior of the chassis with a soft, damp tela. Eviteu utilitzar productes químics o materials abrasius que puguin danyar l'acabat.
Resolució de problemes
If you encounter issues with your Enthoo Pro 2 chassis, consider the following common troubleshooting steps:
- No Power/System Not Starting: Ensure all power cables (24-pin ATX, CPU, GPU, etc.) are securely connected to the motherboard and components. Verify the PSU is switched on.
- Els ventiladors no giren / El RGB no s'il·lumina: Check fan headers and RGB connections to the motherboard or controller. Ensure all cables are properly seated.
- Flux d'aire deficient/Temperatures altes: Clean dust filters. Ensure fans are installed in the correct orientation (intake/exhaust). Verify no cables are obstructing airflow.
- Components solts: Re-check all screws and mounting points for components like the motherboard, GPU, and storage drives.
Especificacions
| Característica | Detall |
|---|---|
| Marca | Phanteks |
| Nom del model | Enthoo Pro 2 |
| Número de model de l'article | PH-ES620PTG_DBK01 |
| Tipus de cas | Torre plena |
| Compatibilitat amb la placa base | ATX estès |
| Material | Acer d'aliatge, plàstic |
| Color | Negre |
| Pes de l'article | 26.5 lliures |
| Dimensions del producte (LxWxH) | 22.8 x 9.49 x 22.01 polzades |
| Nombre de ports USB 3.0 | 4 |
| Tipus de muntatge de la font d'alimentació | Muntatge inferior |
| Mètode de refrigeració | Aigua, Aire |
| Color clar | RGB |
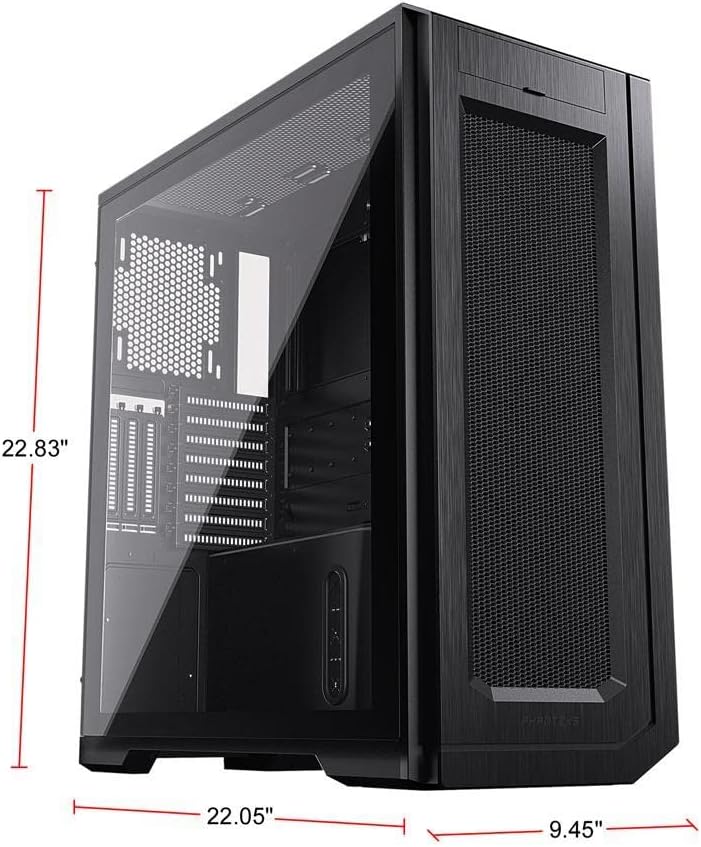
Image: Phanteks Enthoo Pro 2 chassis with key dimensions labeled.
Garantia i Suport
The Phanteks Enthoo Pro 2 chassis is covered by the manufacturer's standard warranty. For detailed warranty terms, technical support, or to purchase additional accessories, please visit the official Phanteks weblloc:


