1. Introducció
The LAFVIN Programming Tank Smart Robot Car Kit is a versatile educational platform designed for learning microcontroller programming. It features an ATMEGA328P-PU main control chip and a TB6612FGN motor drive chip, enabling various functionalities such as tracking, obstacle avoidance, and remote control. This kit supports programming with Mixly blocks and is compatible with Arduino IDE, making it suitable for both beginners and experienced users.
Les característiques clau inclouen:
- Utilizes ATMEGA328P-PU as the main control chip for robust performance.
- Incorporates TB6612FGN as the motor drive chip for efficient movement.
- Supports Mixly blocks for visual programming, simplifying the learning process.
- Compatible with Arduino IDE for advanced programming and customization.
- Includes functions such as tracking, obstacle avoidance, and remote control.
- Features a gravity sensing function for intuitive control.
2. Llista de components
Before beginning assembly, please verify that all components listed below are present in your kit. Refer to the image for visual identification of parts.

Imatge: Més deview of all components included in the LAFVIN Programming Tank Smart Robot Car Kit.
- 1x R3 Controller Board
- 1x cable USB
- 1x Expanding Board
- 2x IR Avoid Module
- 1x Servomotor (SG90)
- 1x Bluetooth Module (HC-06)
- 1x Sensor d'ultrasons
- 1x Ultrasonic Holder
- 1x Battery Case
- 1x Remote (IR Remote Control)
- 1x 5-pin Dupont Cable
- 1x 4-pin Dupont Cable
- 2x 3-pin Dupont Cable
- 1 corretges de velcro
- 1x Acrylic Board
- 1x Metal Board
- 2x Caterpillar Band (Tracks)
- 2x Tank Load-bear Wheel
- 2x Tank Driver Wheel
- 2x Metal Motor
- 2x Alloy Coupler
- 4x Metal Gasket
- 1x tornavís
- 2x clau anglesa
- 1x Screw Bag (containing various screws and nuts)
- 1x CD Tutorial (for software and guides)
3. Muntatge i muntatge
This section provides general guidance for assembling your robot tank. Detailed step-by-step instructions are typically provided in the included CD tutorial and supplementary online resources. It is recommended to review all provided documentation before starting assembly.
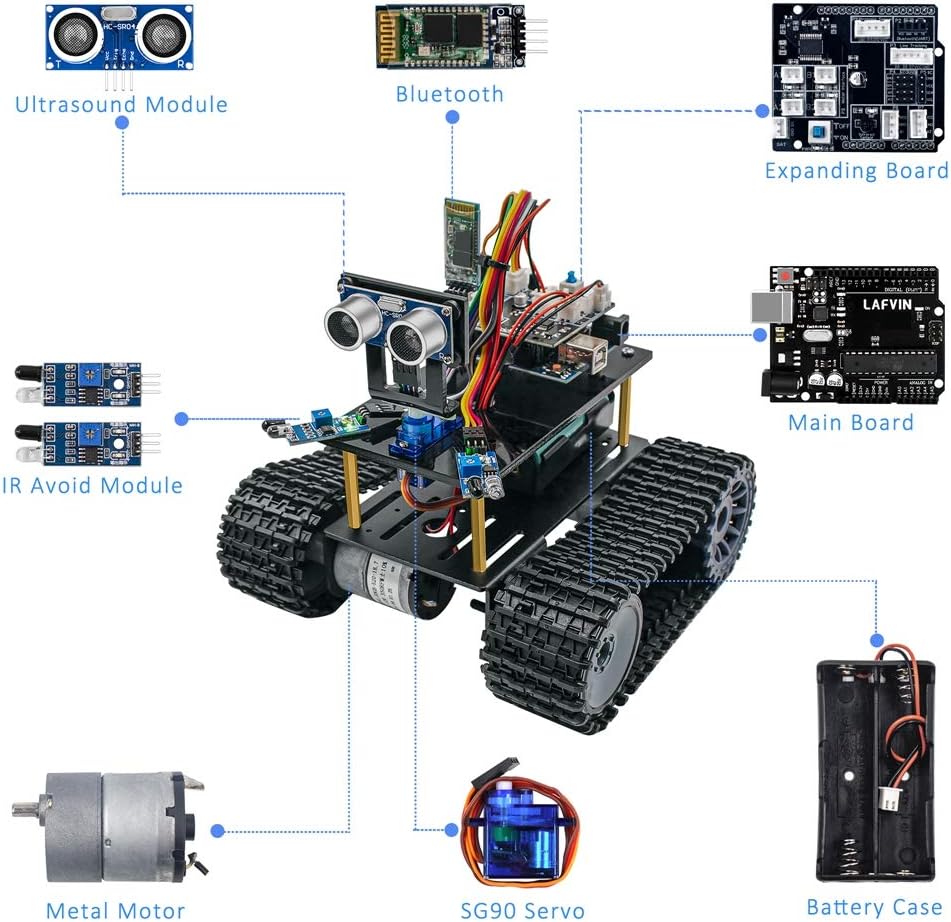
Image: Diagram of the assembled robot tank highlighting key electronic components.
- Muntatge de la base: Attach the metal motors to the metal board. Secure the tank driver wheels and load-bear wheels, then fit the caterpillar bands (tracks).
- Mounting Boards: Secure the acrylic board onto the metal base. Mount the R3 Controller Board and the Expanding Board onto the acrylic board using appropriate standoffs and screws.
- Instal·lació del sensor:
- Attach the Ultrasonic Sensor to its holder and mount it to the front of the robot.
- Install the IR Avoid Modules to the designated positions, typically at the front or sides for obstacle detection.
- Mount the Servo Motor, often used to control the direction of the ultrasonic sensor.
- Module Connections:
- Connect the Bluetooth Module (HC-06) to the Expanding Board using the provided Dupont cables.
- Wire the Ultrasonic Sensor, IR Avoid Modules, and Servo Motor to the Expanding Board as per the wiring diagram in the tutorial.
- Ensure all connections are secure and correctly oriented to prevent damage.
- Font d'alimentació: Install batteries into the Battery Case. Connect the Battery Case to the Expanding Board to provide power to the robot.
- Initial Programming Setup: Connect the R3 Controller Board to your computer using the USB cable. Follow the tutorial to install necessary drivers and the Arduino IDE or Mixly Blocks software. Upload the initial test code to verify all components are functioning.
For a visual guide on installation and features, please refer to the video below:
Video: An official guide demonstrating the installation process and key features of the LAFVIN Programming Tank Smart Robot Car Kit.
4. Instruccions de funcionament
The LAFVIN Tank Robot offers multiple control and operational modes, including app control via Bluetooth, IR remote control, gravity sensor control, and autonomous obstacle avoidance.
4.1. Programming the Robot
The robot supports two primary programming methods:
- Mixly Blocks Coding: This graphical programming environment allows users to drag and drop code blocks to create programs, making it accessible for beginners.
- IDE d'Arduino: For more advanced users, the robot is compatible with the Arduino IDE, allowing for text-based C++ programming and greater control over functionalities.

Image: Illustration of graphical programming (Mixly) and general programming interfaces.
Refer to the included CD tutorial or online resources for detailed programming guides and exampels codis.

Image: Resources available for learning and installation, including a 177-page PDF tutorial.
4.2. App Bluetooth Control
The robot can be controlled wirelessly via a smartphone application using the integrated Bluetooth module (HC-06). Ensure your phone's Bluetooth is enabled and paired with the robot.

Image: Smartphone app interface for Bluetooth control, including gravity sensor functionality.
- Mode de control remot: Use the on-screen directional pad to move the robot forward, backward, turn left, or turn right.
- Control del sensor de gravetat: Tilt your smartphone to control the robot's direction. This mode offers an intuitive way to steer the tank.
4.3. Comandament a distància IR
The kit includes an infrared (IR) remote control for direct command of the robot's movements. Point the remote at the robot's IR receiver for optimal response.

Image: The robot demonstrating obstacle avoidance using its sensors.
- Use the directional buttons to control forward, backward, left, and right movements.
- Specific buttons may be programmed for additional functions, such as activating obstacle avoidance or other modes.
4.4. Autonomous Modes
The robot can be programmed to operate autonomously using its sensors:
- Evitació d'obstacles: Utilizing the Ultrasonic Sensor and IR Avoid Modules, the robot can detect obstacles and navigate around them.
- Line Following: (Implied by "tracking" in features) The robot can be programmed to follow a black line on a light surface using its IR sensors.
5. Manteniment
Regular maintenance ensures the longevity and optimal performance of your LAFVIN Tank Robot.
- Neteja: Keep the robot free from dust and debris. Use a soft, dry cloth to wipe surfaces. Avoid using liquids directly on electronic components.
- Inspecció de la via: Periodically check the caterpillar bands for wear and tear. Ensure they are properly tensioned and free from obstructions.
- Neteja del sensor: Gently clean the surfaces of the Ultrasonic Sensor and IR Avoid Modules to ensure accurate readings. Dust or smudges can impair their functionality.
- Cura de la bateria: Remove batteries if the robot will not be used for an extended period to prevent leakage. Use only recommended battery types.
- Comprovació de la connexió: Ensure all wire connections (Dupont cables) are secure and not loose. Loose connections can lead to erratic behavior or component failure.
- Actualitzacions de programari: Check the LAFVIN official website or community forums for any available firmware or software updates for the R3 Controller Board or programming environments.
6. Solució De Problemes
If you encounter issues with your LAFVIN Tank Robot, refer to the following common troubleshooting steps:
- El robot no s'encén:
- Check battery installation and ensure batteries are fully charged or new.
- Verify the battery case connection to the Expanding Board.
- Ensure the power switch (if present) is in the ON position.
- Els motors no responen:
- Confirm motor wiring to the Expanding Board is correct and secure.
- Check if the motor driver chip (TB6612FGN) is correctly installed and powered.
- Re-upload the motor test code to the R3 Controller Board.
- Problemes de connectivitat Bluetooth:
- Ensure the Bluetooth module (HC-06) is correctly wired and powered.
- Verify Bluetooth is enabled on your smartphone and the robot is discoverable.
- Try restarting both the robot and your smartphone.
- Ensure the correct Bluetooth module is selected in the control application.
- Sensors Not Detecting:
- Check wiring for the Ultrasonic Sensor and IR Avoid Modules.
- Ensure sensor surfaces are clean and unobstructed.
- Verify the sensor code is correctly uploaded and running on the R3 Controller Board.
- Comportament erràtic:
- Loose wiring is a common cause; inspect all connections.
- Interference from other electronic devices might affect performance.
- Re-upload the program to ensure no corruption occurred during transfer.
- Dificultats de muntatge:
- Refer to the detailed video tutorials and PDF manual for visual guidance.
- Ensure you are using the correct screws and tools for each step.
- If parts do not fit, double-check the orientation and ensure you have the correct components for that step.
If problems persist after following these steps, consult the LAFVIN support resources or community forums for further assistance.
7. Especificacions
| Característica | Detall |
|---|---|
| Marca | LAFVIN |
| Número de model | LA033 |
| Xip de control principal | ATMEGA328P-PU (R3 Controller Board) |
| Motor Drive Chip | TB6612FGN |
| Programming Support | Mixly Blocks Coding, Arduino IDE |
| Mètodes de control | App Control (Bluetooth), IR Remote Control, Gravity Sensor Control |
| Mòduls de sensors | Ultrasonic Sensor, IR Avoid Modules |
| Dimensions del paquet | 10.28 x 6.06 x 2.44 polzades |
| Pes de l'article | 1.85 lliures |
| Edat recomanada pel fabricant | 0 - 10 years (Note: Assembly and programming may require adult supervision or older users) |
8. Garantia i Suport
For specific warranty information, please refer to the documentation included with your product or contact LAFVIN customer support directly. General support resources include:
- Included CD Tutorial: Contains detailed guides, code examples, and libraries.
- Recursos en línia: Check the official LAFVIN website or dedicated product pages for updated tutorials, FAQs, and community forums.
- Atenció al client: For technical assistance or inquiries regarding missing/defective parts, please contact the seller or manufacturer through their official channels.
