1. Producte acabatview
The Weiser SmartCode 10 is a commercial-grade electronic lever lock designed for secure and convenient keyless entry. It features an auto-lock function, simple programming, and supports up to 30 customizable user access codes. This lock is ideal for various applications including hotels, motels, office buildings, retail stores, and multi-family housing.

Figure 1.1: Weiser SmartCode 10 Electronic Door Lock (Exterior and Interior)

Figure 1.2: Recommended Uses for SmartCode 10 Commercial Lever
2. Configuració i instal·lació
The Weiser SmartCode 10 lock is designed for easy installation with minimal tools. A screwdriver is typically the only tool required.
2.1. Components inclosos
- Electronic Door Assembly Unit (Interior and Exterior)
- Palanques
- Eina SmartKey
- 2 claus
- Pestillo
- Cargols
- Placa de vaga
- Clau Allen
- Spindle Manual
2.2. Passos d'instal·lació
Refer to the detailed Spindle Manual included in your package for specific, step-by-step installation instructions. General steps include:
- Prepare the door: Ensure the door bore hole and backset are compatible with the lock.
- Instal·leu el pestell i la placa del tancament.
- Assemble the exterior and interior electronic units.
- Connect the cable between the units.
- Secure the lock to the door with the provided screws.
- Instal·leu les palanques.
- Insert the 9V battery (see Section 3.4).
- Perform the door handing process as described in the manual to calibrate the lock.

Figure 2.1: Installed Weiser SmartCode 10 Lock (Interior View)
3. Instruccions de funcionament
3.1. Keyless Entry and Backlit Keypad
The SmartCode 10 allows entry using a personalized code on the keypad. The keypad is backlit and remains lit for 5 seconds after inactivity, ensuring visibility in low-light conditions.
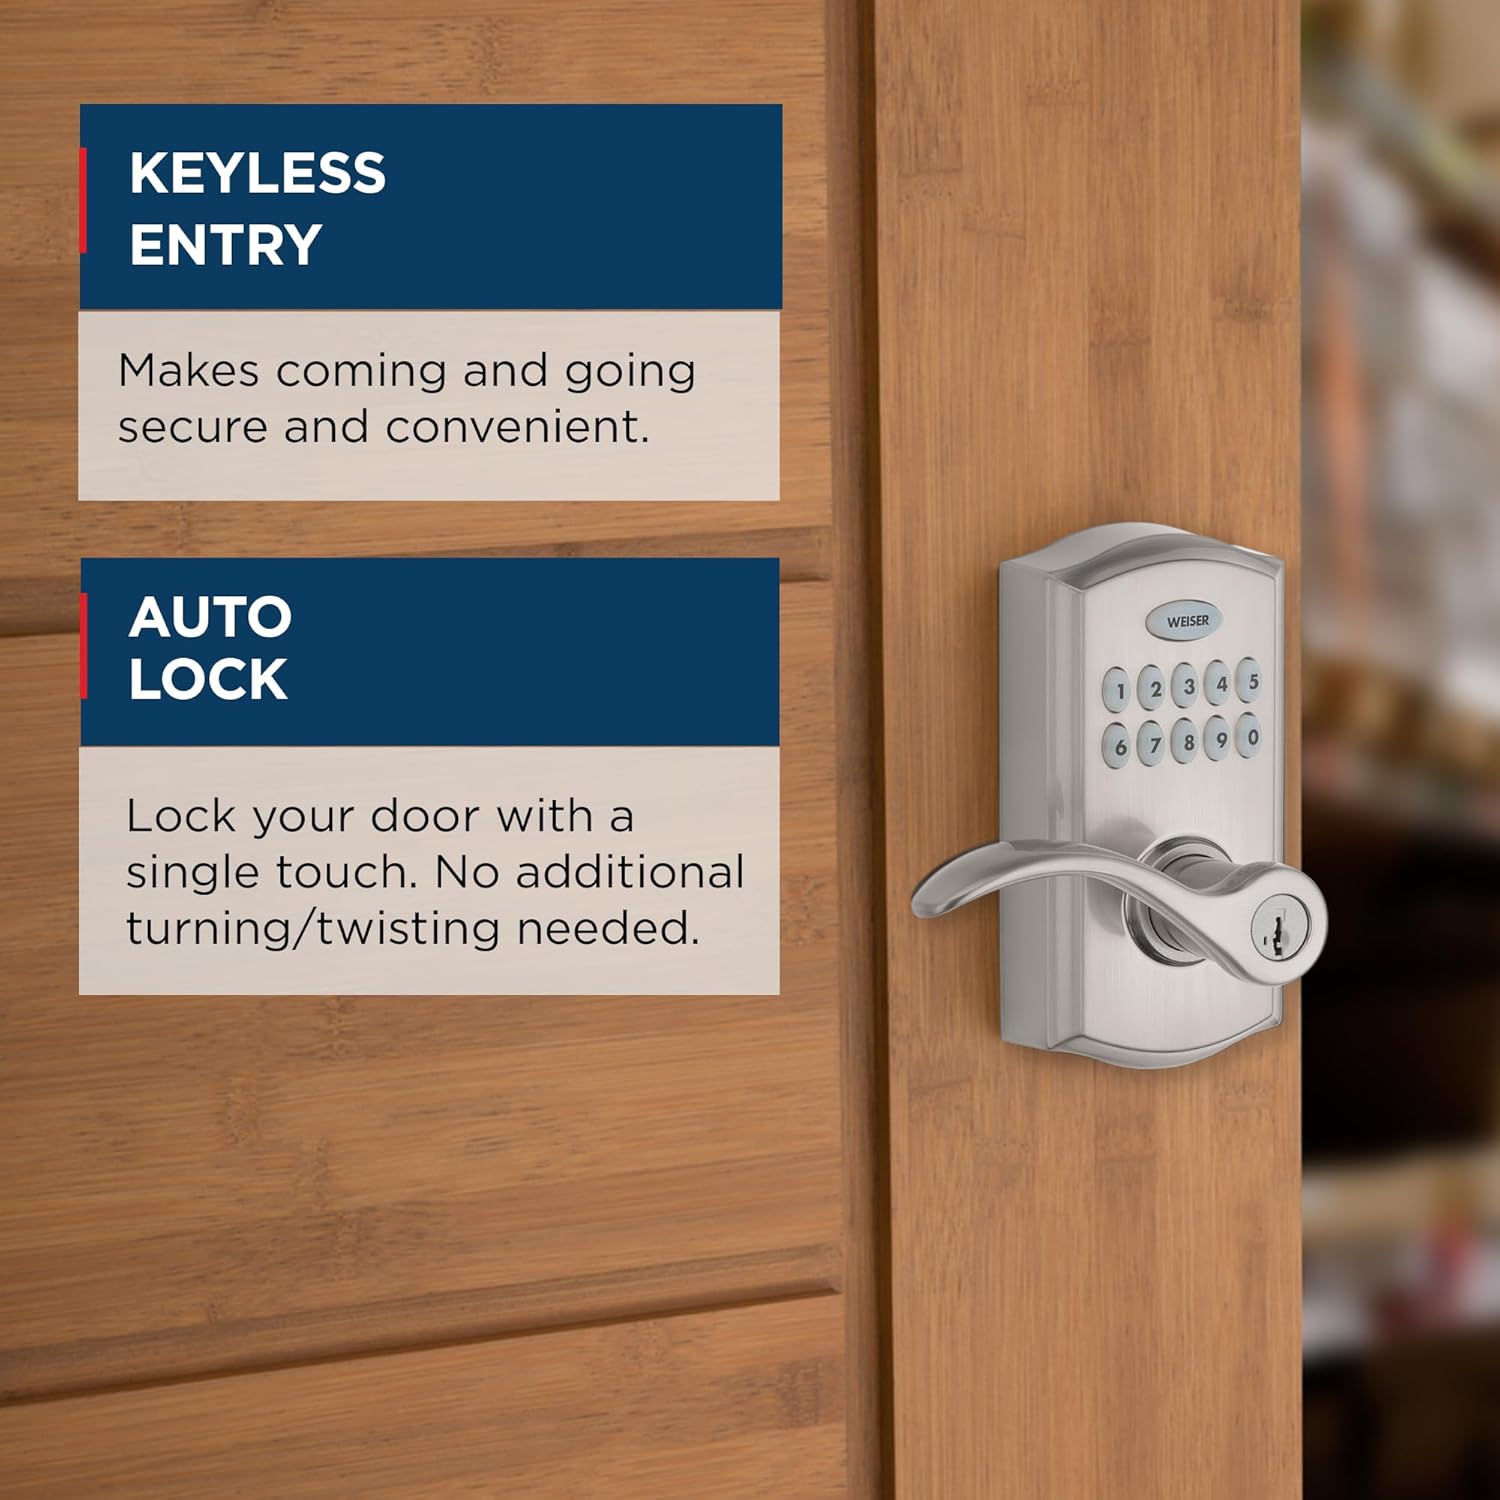
Figure 3.1: Keyless Entry and Auto Lock Features
3.2. User Access Codes
The lock supports up to 30 unique user access codes. These codes can be customized and shared with employees, maintenance personnel, or service providers. Refer to the programming guide in your manual for instructions on adding, deleting, or modifying user codes.

Figure 3.2: Multiple User Access Codes
3.3. Auto-Lock and Passage Mode
The SmartCode 10 features an auto-lock function, which automatically locks the door after entry. The interior turn piece allows you to switch between 'Auto-Lock' and 'Passage Mode'.
- Auto-Lock Mode: The door always locks after entry. A key or code is required for re-entry.
- Mode de pas: The door remains unlocked, allowing free entry without a code or key.
Property managers can disable the passage function, ensuring the unit auto-locks every time and requires a key or code for entry. This is ideal for restrooms or utility closets.

Figure 3.3: Auto-Lock Mode vs. Passage Mode
3.4. Emergency Egress
For safety, the interior lever is always free to allow exit at any time, regardless of the lock's status.

Figure 3.4: Emergency Egress Feature
3.5. SmartKey Re-key Technology
The SmartCode 10 features SmartKey re-key technology, which protects against advanced break-in techniques and allows you to re-key the lock yourself in seconds. This feature makes lost or unreturned keys obsolete.

Figure 3.5: SmartKey Security Overview

Figure 3.6: How to Re-key in Seconds
4. Manteniment
4.1. Substitució de la bateria
The SmartCode 10 operates on a 9V alkaline battery. When the battery is low, the lock will provide an audible and/or visual indicator. To replace the battery:
- Locate the battery cover on the interior assembly of the lock.
- Traieu la tapa de la bateria.
- Carefully remove the old 9V battery.
- Introduïu una pila alcalina nova de 9 V, assegurant-vos de la polaritat correcta.
- Substituïu la tapa de la bateria.
It is recommended to replace the battery annually or when the low battery indicator appears to ensure optimal performance.
4.2. Neteja
Netegeu l'exterior del pany amb un drap suau iamp drap. Eviteu utilitzar netejadors o dissolvents abrasius, ja que poden danyar l'acabat.
5. Solució De Problemes
If you encounter issues with your SmartCode 10 lock, try the following common troubleshooting steps:
- El pany no respon: Comproveu la pila. Si cal, substituïu-la per una pila alcalina nova de 9 V.
- El teclat no s'il·lumina: This usually indicates a low battery. Replace the battery.
- Codes not working: Ensure you are entering the correct code. Try reprogramming the user codes as per the manual. Perform the door handing process again.
- El bloqueig no s'activa/desactiva: Check for any obstructions in the door frame or latch. Ensure the lock is properly aligned and secured to the door. Re-perform the door handing process.
- Unexpected auto-locking: Verify the lock is not in 'Disable Passage Mode' if you intend for it to remain unlocked.
For persistent issues, refer to the detailed troubleshooting section in your Spindle Manual or contact customer support.
6. Especificacions
| Característica | Detall |
|---|---|
| Número de model | 9GED26000-001 |
| Dimensions del producte | 19.56 x 13.46 x 23.11 cm |
| Pes de l'article | 2.13 kg |
| Color | Níquel setinat |
| Estil | Comercial |
| Acabar | Níquel setinat |
| Material | Metall |
| Tipus de bloqueig | Cilíndric |
| Font d'alimentació | 9V Alkaline Battery (Included) |
| Característiques especials | Easy to Install, Auto Lock, SmartKey Technology, Backlit Keypad |
| Codis d'usuari | Fins a 30 |
| País d'origen | Xina |

Figura 6.1: Dimensions del producte
7. Informació de la garantia
The Weiser SmartCode 10 Electronic Door Lock comes with a Garantia mecànica i d'acabats de per vida. This warranty covers defects in material and workmanship for the lifetime of the product, provided it is installed and maintained according to the manufacturer's instructions. For specific terms and conditions, please refer to the warranty documentation included with your product or visit the official Weiser weblloc.
8. Atenció al client
For further assistance, technical support, or warranty claims, please contact Weiser customer service. You can find contact information on the official Weiser weblloc web o a la documentació que s'inclou amb el producte.
Weiser Official Weblloc: www.weiserlock.com


