Introducció
Thank you for choosing the Cerwin-Vega XED3001D 1 Channel XED Series Amplificador. Aquest manual proporciona instruccions detallades per a la instal·lació, el funcionament i el manteniment adequats del vostre amplificador. Llegiu atentament aquest manual abans d'intentar la instal·lació o el funcionament per garantir un rendiment i una seguretat òptims.
Informació de seguretat
Always observe the following safety precautions when installing and operating your ampmés viu:
- Disconnect the vehicle's negative battery terminal before beginning any installation.
- Assegureu-vos que tot el cablejat estigui correctament encaminat i fixat per evitar danys o curtcircuits.
- Feu servir un cablejat del calibre adequat per a les connexions d'alimentació, terra i altaveus, tal com s'especifica en aquest manual.
- No muntis el amplificador en zones exposades a la llum solar directa, a la calor excessiva, a la humitat o a la pols.
- Eviteu col·locar el amplifier near the vehicle's fuel lines, brake lines, or electrical wiring.
- If you are unsure about any part of the installation process, consult a professional car audio installer.
- No intenteu fer el servei amplifier yourself. Refer all servicing to qualified personnel.
Contingut del paquet
Si us plau, comproveu el contingut del vostre amplifier package. It should include:
- Cerwin-Vega XED3001D 1 Channel Ampmés viu
- Maquinari de muntatge (cargols)
- Manual del propietari (aquest document)
- Remote Bass Level Control (if included with your model)
Producte acabatview
The Cerwin-Vega XED3001D is a compact and powerful 1-channel (monoblock) amplifier designed to deliver robust bass performance. It features a durable chassis and essential controls for fine-tuning your audio system.
Ampmés viu Views


Característiques clau
- Compact Monoblock Design
- Filtre de pas baix variable (LPF)
- Filtre subsònic variable
- Augment de baix variable
- High-Level Input Capability
- Remote Bass Level Control Input
Configuració i instal·lació
Una instal·lació correcta és crucial per al rendiment i la longevitat del vostre amplificador. Segueix aquests passos amb atenció.
1. Llista de verificació prèvia a la instal·lació
- Read the entire manual before starting.
- Gather all necessary tools and wiring materials (power wire, ground wire, remote turn-on wire, RCA cables, speaker wire, fuse holder, fuse).
- Desconnecteu el terminal negatiu de la bateria del vehicle.
- Plan your wiring routes to avoid interference and ensure safety.
2. Ubicació de muntatge
Trieu una ubicació de muntatge que sigui:
- Dry and well-ventilated.
- Allunyat de la llum solar directa o de fonts de calor.
- Secure and stable, preventing vibration.
- Accessible per cablejat i ajustos.
Common locations include under a seat, in the trunk, or behind a panel.
3. Connexions de cablejat
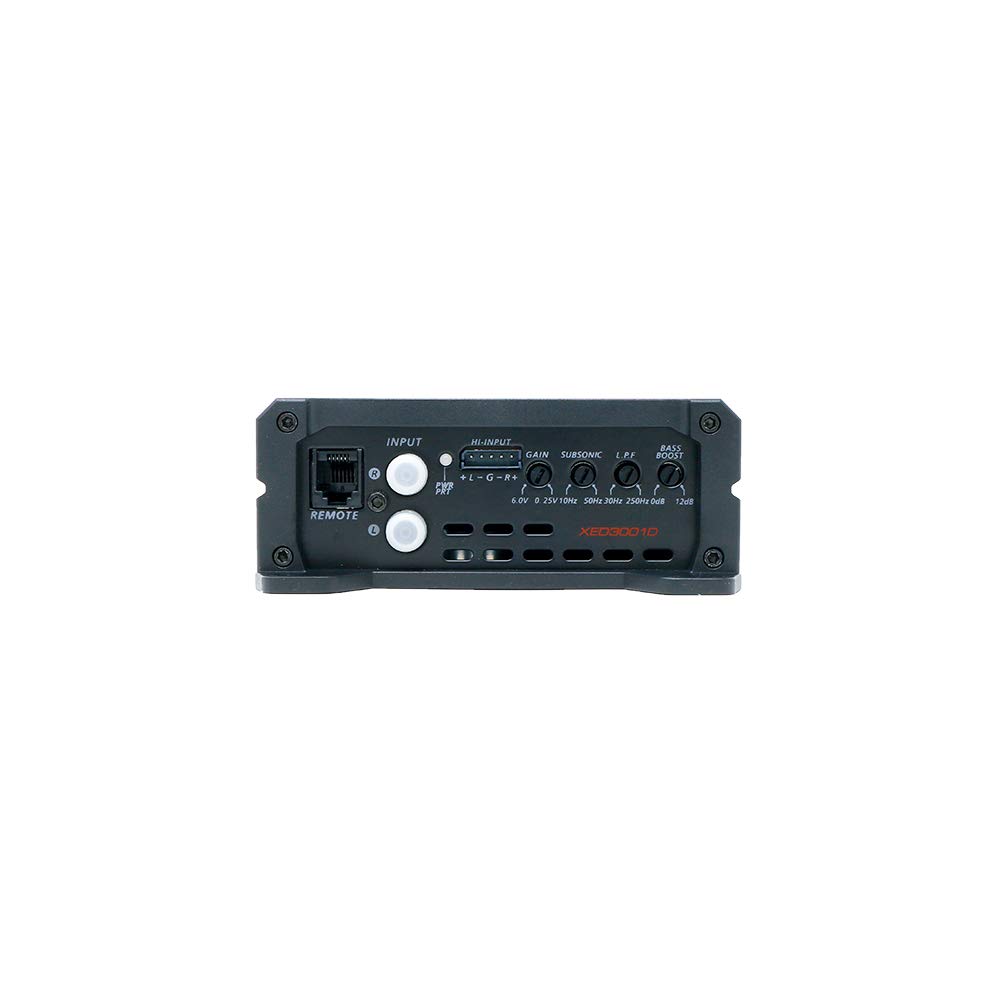
Refer to Figure 4 for the power and speaker output terminals, and Figure 3 for the input terminals.
Power Wiring (GND, REM, +12V)
- GND (terra): Connect a short (less than 3 feet) heavy-gauge wire from the amplifier's GND terminal to a clean, unpainted metal surface of the vehicle's chassis. Ensure a good electrical connection.
- REM (encesa remota): Connect a thin wire from the amplifier's REM terminal to the remote turn-on output of your head unit. This wire turns the ampencén i apaga l'activador amb el teu estèreo.
- +12V (Alimentació): Connect a heavy-gauge wire from the amplifier's +12V terminal directly to the positive terminal of the vehicle's battery. Install an appropriate fuse holder with a fuse (not supplied) within 18 inches of the battery.
Calibre de filferro recomanat: For optimal performance and safety, use 8-gauge power and ground wire for this ampmés viu.
Input Signal Connection (RCA or High-Level)
- Entrada RCA: If your head unit has RCA pre-outs, connect RCA cables from the head unit's subwoofer or full-range output to the amplifier's "INPUT" RCA jacks.
- Entrada d'alt nivell: If your head unit does not have RCA outputs, use the high-level input feature. Connect the speaker wires from your head unit's speaker outputs directly to the amplifier's high-level input connector (if provided, typically a multi-pin connector).
Connexió de sortida d'altaveus
- Connect your subwoofer(s) to the "SPEAKER OUTPUT" terminals. Ensure correct polarity (+ to + and - to -).
- The XED3001D is a monoblock amplifier, designed for a single subwoofer or multiple subwoofers wired to a compatible impedance. Refer to your subwoofer's specifications for proper wiring configurations and impedance matching. The amplifier supports a minimum impedance of 2 Ohms.
Remote Bass Level Control (Optional)
- Si el teu amplifier came with a remote bass level control, connect its cable to the "REMOTE" port on the amplifier's input side (Figure 3). Route the cable to a convenient location for the driver.
Funcionant el Ampmés viu
Once installed, you can adjust the amplifier's settings to optimize sound performance.
Encesa inicial
- After all connections are made and checked, reconnect the vehicle's negative battery terminal.
- Engegueu la unitat principal. El amplifier should power on automatically (indicated by a power LED, if present).
- Comença amb tot amplifier settings at their minimum or flat positions.
Audio Adjustments (Refer to Figure 3)
- Control GAIN: This matches the amplifier's input sensitivity to the output level of your head unit. Start with the gain at minimum. Play a familiar song at about 75% of your head unit's maximum volume. Slowly increase the amplifier's gain until you hear slight distortion, then back off slightly. This is the maximum clean output.
- LPF (filtre de pas baix): This filter allows only frequencies below the set point to pass through to the subwoofer. For subwoofers, a common range is 80Hz-120Hz. Adjust this to blend smoothly with your main speakers.
- Filtre SUBSONIC: This high-pass filter removes extremely low frequencies that are below the audible range or below the tuning frequency of a ported enclosure. This protects the subwoofer from over-excursion and improves sound quality. A common setting is 25Hz-30Hz.
- INTENSIFICACIÓ DELS SONS MÉS GREUS: This control provides an increase in output at a specific low frequency. Use sparingly, as excessive bass boost can lead to distortion and potential damage to your subwoofer.
Manteniment
Your Cerwin-Vega ampEl purificador requereix un manteniment mínim. Seguiu aquestes pautes per garantir la seva longevitat:
- Neteja: Netegeu periòdicament el ampl'exterior del purificador amb un drap suau i sec. No utilitzeu productes químics agressius ni netejadors abrasius.
- Ventilació: Assegureu-vos que el amplifier's heat sink fins are free from dust and debris to allow for proper heat dissipation. Do not block any ventilation openings.
- Connexions: De tant en tant, comproveu totes les connexions del cablejat per assegurar-vos que estiguin ben fixades i que no presentin corrosió.
Resolució de problemes
Si tens problemes amb el teu amplifier, consult the following troubleshooting guide before contacting support.
| Problema | Causa possible | Solució |
|---|---|---|
| Sense alimentació / AmpEl lificador no s'encén |
|
|
| Sense sortida de so |
|
|
| So distorsionat |
|
|
| Amplifier Overheating / Goes into Protect Mode |
|
|
Especificacions
The following are the technical specifications for the Cerwin-Vega XED3001D ampmés viu:
| Característica | Especificació |
|---|---|
| Número de model | XED3001D |
| Marca | CV |
| Nombre de canals | 1 (Monobloc) |
| Voltage | 12 volts (CC) |
| Tipus de muntatge | Muntatge en superfície |
| Potència màxima de sortida | 300 W MÀX |
| Impedància mínima | 2 ohms |
| Data de primera disponibilitat | 29 de gener de 2021 |
Informació de la garantia
Cerwin-Vega products are designed and engineered to the highest standards. For specific warranty terms and conditions, please refer to the warranty card included with your product or visit the official Cerwin-Vega weblloc web. Conserveu el rebut de compra com a comprovant de compra per a qualsevol reclamació de garantia.
Atenció al client
If you have any questions or require further assistance with your Cerwin-Vega XED3001D amplifier, please contact Cerwin-Vega customer support. Contact information can typically be found on the official brand weblloc web o a l'embalatge del producte.
Weblloc: www.cerwinvega.com (Això és un marcador de posició URL, si us plau, verifiqueu el funcionari real weblloc)