1. Introducció
The SINGER Button Sewing Foot is an essential accessory designed to simplify the process of attaching buttons and hook-and-eye closures to fabric. This foot securely holds the button in place, ensuring precise stitching and professional-quality results. It is compatible with a range of SINGER sewing machines and other popular brands, making button sewing faster and more efficient.
This manual provides comprehensive instructions for the proper installation, operation, and care of your Button Sewing Foot.
2. Contingut del paquet
En obrir el paquet, assegureu-vos que hi hagi tots els components:
- SINGER Button Sewing Foot
- Instructional materials (this manual)

Image 2.1: The SINGER Button Sewing Foot, shown both in its retail packaging and as a standalone accessory.
3. Configuració i instal·lació
Follow these steps to properly install the Button Sewing Foot on your sewing machine:
- Apagar: Per seguretat, assegureu-vos que la màquina de cosir estigui apagada i desendollada.
- Raise Needle and Presser Foot Lever: Raise the needle to its highest position and lift the presser foot lever.
- Remove Current Presser Foot: Locate the presser foot release button or lever on your machine (this varies by model). Press it to detach the currently installed presser foot.
- Attach Button Sewing Foot: Position the SINGER Button Sewing Foot directly under the presser foot holder. Align the pin on the foot with the groove on the presser foot holder. Lower the presser foot lever until the foot snaps into place.
- Verificar fitxer adjunt: Gently tug on the foot to ensure it is securely attached.

Image 3.1: The Button Sewing Foot correctly installed on a sewing machine, positioned over fabric.
4. Instruccions de funcionament
The Button Sewing Foot is designed for attaching two-hole and four-hole buttons, as well as hook-and-eye closures.
4.1. Attaching Buttons
- Prepare Fabric: Mark the desired button placement on your fabric.
- Botó de posició: Place the button on the marked spot. Lower the Button Sewing Foot over the button, ensuring the button is centered in the foot's opening. The foot will hold the button securely.
- Select Stitch: Set your sewing machine to a zigzag stitch. Adjust the stitch width so that the needle swings from one hole of the button to the other without hitting the button itself. Adjust stitch length to zero or a very short length, depending on your machine's capabilities for button sewing.
- Lower Feed Dogs: For best results, lower the feed dogs on your sewing machine. Consult your machine's manual for instructions on how to do this. If your machine does not have this feature, you may need to manually guide the fabric carefully.
- Sew Button: Slowly begin sewing, allowing the needle to pass through the buttonholes. Sew 8-10 stitches for a secure attachment.
- Secure Thread: Raise the needle and presser foot. Pull the fabric away, leaving long thread tails. Tie off the threads on the underside of the fabric or use your machine's tie-off function if available.
- For Four-Hole Buttons: Repeat the process for the second pair of holes.
4.2. Attaching Hook-and-Eye Closures
The Button Sewing Foot can also be used for attaching hook-and-eye closures with precision.
- Position Closure: Place the hook or eye component on the fabric where desired.
- Align Foot: Lower the Button Sewing Foot over the loop of the hook or eye.
- Select Stitch: Use a narrow zigzag stitch or a straight stitch, depending on the specific design of the hook or eye and the desired attachment method. Adjust stitch width and length as needed to secure the loops.
- Cosir: Carefully sew around the loops of the hook or eye to secure it to the fabric.
- Secure Thread: Tie off threads as described for button attachment.
5. Manteniment i cura
To ensure the longevity and optimal performance of your SINGER Button Sewing Foot:
- Neteja: After use, gently wipe the foot with a soft, dry cloth to remove any lint or thread residue.
- Emmagatzematge: Store the foot in a dry place, preferably in its original packaging or a dedicated sewing accessory box, to protect it from dust and damage.
- Inspecció: Periodically inspect the foot for any signs of wear or damage. If the foot appears bent or broken, replace it to prevent damage to your sewing machine or fabric.
6. Solució De Problemes
If you encounter issues while using the Button Sewing Foot, consider the following:
- Needle Hitting Button:
- Ensure the stitch width is correctly adjusted for the buttonhole spacing.
- Manually turn the handwheel to check needle clearance before sewing at full speed.
- Button Shifting During Sewing:
- Verify the button is securely seated within the foot's opening.
- Ensure the feed dogs are lowered (if applicable) to prevent fabric movement.
- Loose Stitches:
- Check thread tension settings on your sewing machine.
- Ensure the needle is appropriate for the fabric and thread type.
- Foot Not Attaching Securely:
- Confirm the foot is correctly aligned with the presser foot holder's pin and groove.
- Ensure the presser foot lever is fully lowered to lock the foot in place.
7. Especificacions
| Característica | Detall |
|---|---|
| Número de model | Peu de cosir amb botó |
| Marca | CANTANT |
| Material | Metal (and plastic components) |
| Pes de l'article | 0.598 unces |
| Dimensions del paquet | 6.73 x 2.83 x 0.39 polzades |
| UPC | 037431887900 |
| ASIN | B08W1N7ZRB |
8. Compatibilitat de la màquina
The SINGER Button Sewing Foot is designed to work with a wide range of SINGER sewing machines and is also compatible with many popular brands. Always refer to your sewing machine's manual to confirm compatibility with universal snap-on presser feet.
Compatible SINGER Models:
- Locust Series: 1507, 1507WC, 1525/1725, 1748, 8280, 8280L, 8280 SMART II
- Mercury Series: 1105, 1116, 1120, 1130, 7020
- Promise Series: 1408, 1409, 1412, 1512
- Simple Series: 1732, 2932, 3116, 3221, 3232, 3210, 3223, 3229
- Tradition Series: 2250, 2259, 2263, 2273, 2277, 2282
- Sèrie M: M1500, M1600, M2100, M2200, M2400, M3200, M3300, M3330, M3400, M3500
- Heavy Duty Series: 4411, 4423, 4432, 4452, 5511, 5523, 5532, 44S, HD6380
- Talent Series: 3321, 3323S, 3323
- Brilliance Series: 5400, 5500, 6160, 6180, 6199, 6699
- Sèrie 9900: 9910, 9920, 9940, 9960, 9985, 9980, 9970
- Futura Series: FQ-4, SEQS-6000, SEQS-6700, 5 Futura Quintet, 8500Q, XL-400, XL-420, XL-550, XL-580
- Futura Series (continued): CE100, CE150, CE180, CE200, CE250, CE350, SES1000, SES2000
Other Compatible Brands:
This foot is also compatible with popular brands such as Babylock, Brother, Janome, Pfaff, and more, provided they use a standard snap-on presser foot system.

Image 8.1: Packaging details for the SINGER Button Sewing Foot, showing front and back views with product information and a QR code for additional resources.
For more information and support, scan the QR code on the packaging or visit uqr.to/h2ye.
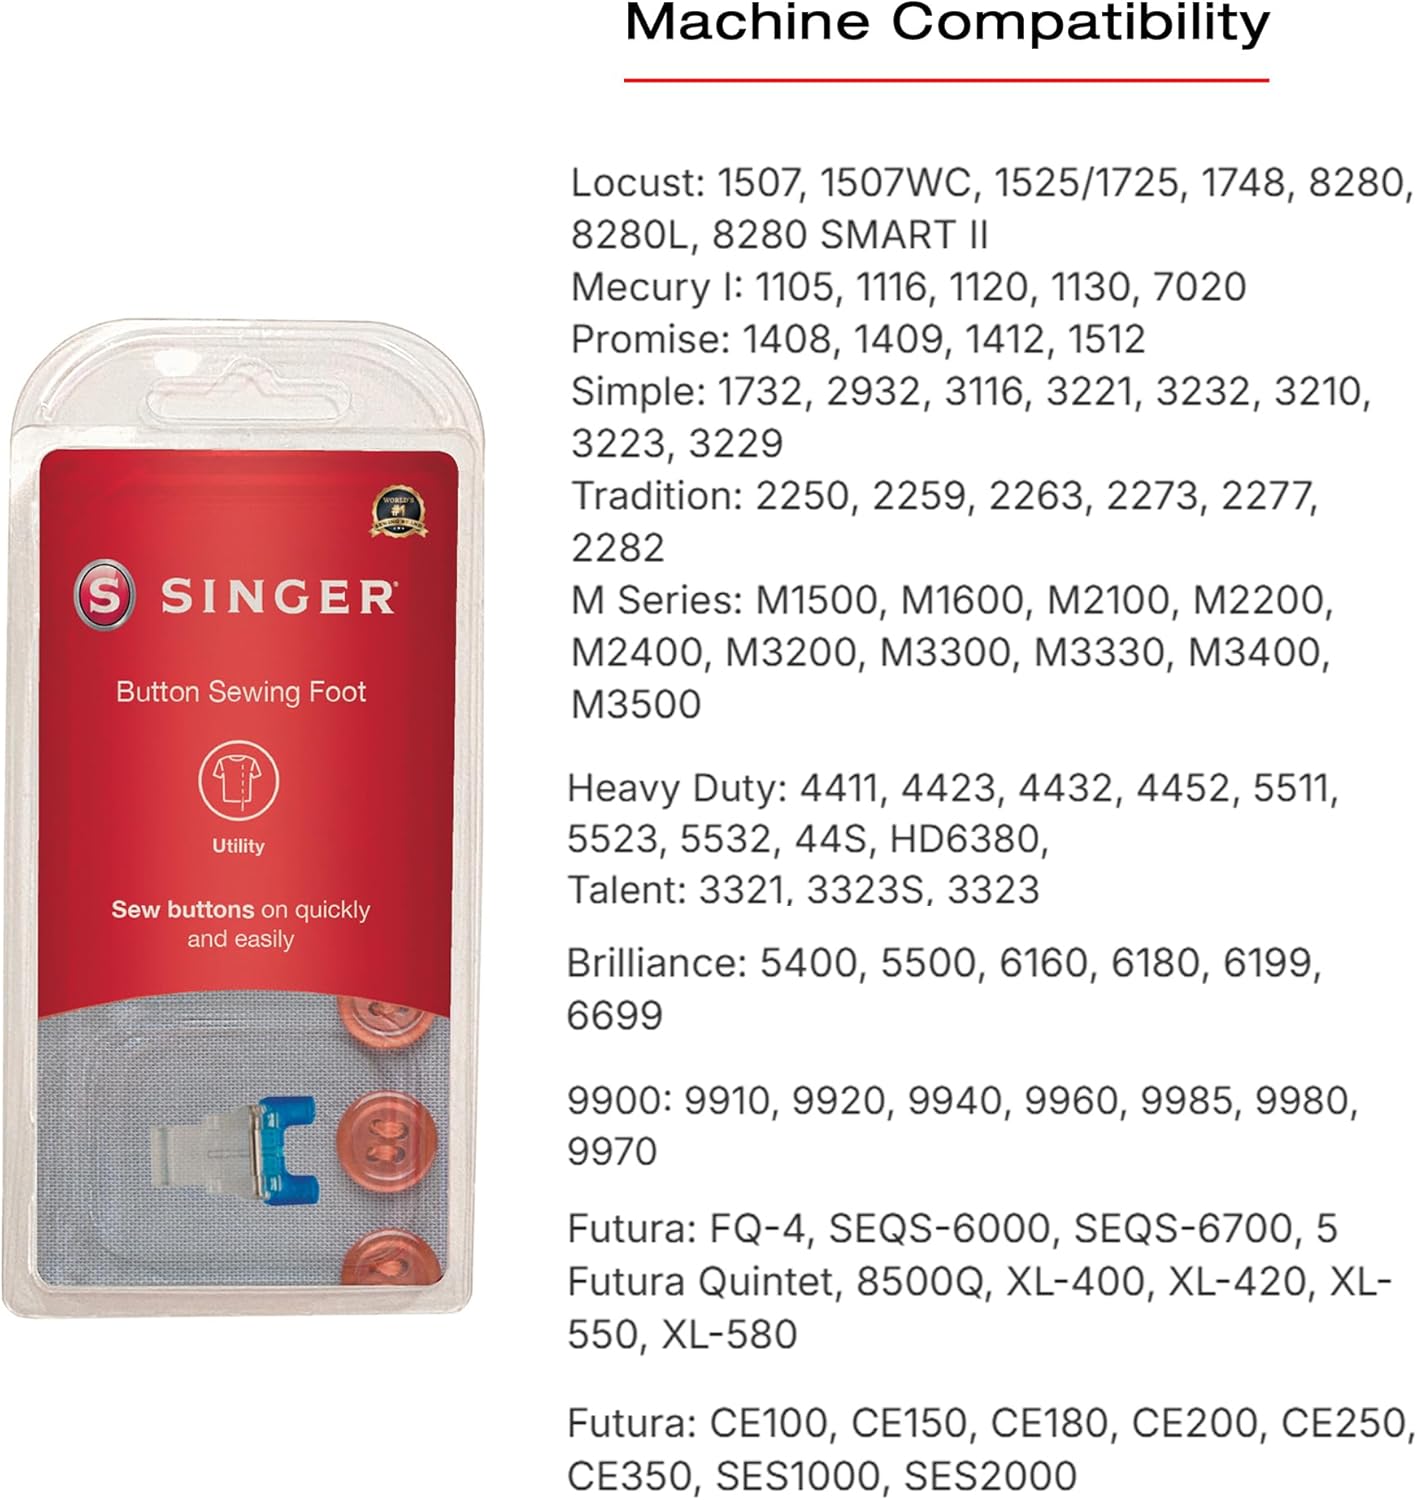
Image 8.2: A detailed list of SINGER sewing machine models compatible with the Button Sewing Foot.

Image 8.3: Information on the Button Sewing Foot's compatibility with other major sewing machine brands.
9. Garantia i Suport
SINGER products are manufactured to high-quality standards. For specific warranty information, please refer to the documentation included with your sewing machine or visit the official SINGER weblloc.
For additional support, product manuals, and resources, visit singer.com/support.
A free Beginner's Machine Class may be available with your purchase. Visit singer.com/my-class per als detalls.


