Producte acabatview
The TERIOS Wireless Pro Controller is designed for full compatibility with Nintendo Switch and Switch Lite gaming consoles. It features an innovative turbo function, motion control, and adjustable vibration intensity for an enhanced gaming experience. This premium joypad offers customizable button programming and a quick re-sync feature for seamless gameplay.

Imatge: Frontal view of the TERIOS Wireless Pro Controller in dark black.
Contingut del paquet
- 1 x TERIOS Wireless Pro Controller
- 1 x cable de càrrega USB (tipus C)
- 1 x Manual d'usuari (aquest document)
Disseny del controlador
Familiarize yourself with the buttons and ports on your TERIOS Pro Controller.

Imatge: Superior i inferior views of the controller with labels for each button and port, including Left Stick, D-Pad, Turbo, Screenshot, Menu, Plus/Minus buttons, Function Buttons, Right Stick, R1/R2, L1/L2, M1/M2, and charge port.
- Palanca esquerre: For directional movement.
- D-Pad: Pad direccional per a una entrada precisa.
- Turbo Button (T): Activates and deactivates turbo function.
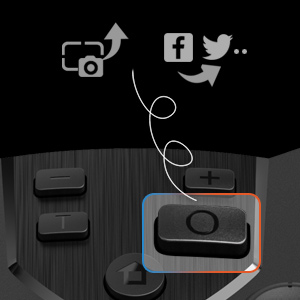
- Botó de captura de pantalla: Fa captures de pantalla durant el joc.
- Home Button (H): Powers on the controller and returns to the console's home screen.
- Botons +/-: Menu navigation and in-game functions.
- Botons A/B/X/Y: Botons d'acció estàndard.
- Stick dret: For camera control or other directional input.
- Botons L1/R1: Botons a l'espatlla.
- Botons L2/R2: Botons de disparador.
- Botons M1/M2: Botons de retrocés programables.
- Port de càrrega: Port USB tipus C per a la càrrega.
- Indicador LED: Shows connection status and charging status.
Configuració
Connecting to Nintendo Switch/Switch Lite
- Pas 1: Engega la teva consola Nintendo Switch.
- Pas 2: On the console, navigate to Configuració del sistema > Mode avió > Controller Connection (Bluetooth), and ensure it is set to ‘On’.
- Pas 3: Aneu a la Controladors setting on your console and select Canvia d'adherència/ordre.
- Pas 4: Premeu i manteniu premut “H” (Home) button on your TERIOS controller until the LED lights begin to flash. Once successfully paired, the player LED(s) corresponding to the controller number will remain lit.
The controller features a One Button Instantly Resync Feature, allowing you to easily wake up your console by pressing the Home button once it has been previously paired.

Image: Illustration of the controller's Home button and its wireless connection capability to the Nintendo Switch.
Carregant el controlador
Connect the supplied USB Type-C cable to the controller's charge port and the other end to a USB power source (e.g., console, wall adapter). The LED indicator will light up during charging. Once fully charged, the LED will turn off.
Video: Demonstrates how to charge the TERIOS Controller (Model T23). Shows connecting the USB-C cable and the LED indicator behavior during charging (LED on) and when fully charged (LED off).
A full charge typically takes 2-3 hours, providing up to 15 hours of usage time and up to 30 days of standby time.

Image: Visual representation of the controller's charging features, highlighting its Type-C port, 2-3 hour charge time, and 800mAh battery capacity.
Instruccions de funcionament
Funció Turbo
The turbo function allows for rapid, repeated input of a button press. This is particularly useful for arcade games and shooter games.
- To activate turbo: Hold the Botó turbo (T) and then press the desired action button (e.g., A, B, X, Y). Release the Turbo button. Now, holding the assigned action button will simulate rapid presses.
- To deactivate turbo: Press the Botó turbo (T) and the assigned action button once more.

Image: Diagram showing the Turbo button and adjustable turbo speeds (5, 12, 20 times/second).
Changing Turbo Speed
- To increase speed: Press the Botó turbo (T) + push the Right Analog Stick up. The speed will cycle through 5 times/second → 12 times/second → 20 times/second.
- To decrease speed: Press the Botó turbo (T) + push the Right Analog Stick down. The speed will cycle through 20 times/second → 12 times/second → 5 times/second.
Ajust de la intensitat de la vibració
The controller offers 4 levels of vibration intensity to customize your gaming feedback.
- To increase intensity: Press the Botó turbo (T) + push the Left Analog Stick up. Intensity will cycle through 0% → 30% → 70% → 100%.
- To decrease intensity: Press the Botó turbo (T) + push the Left Analog Stick down. Intensity will cycle through 100% → 70% → 30% → 0%.

Image: Visual representation of the controller's adjustable vibration feature, showing four levels of intensity (0%, 40%, 70%, 100%).
Control de moviment
The controller features a built-in precise 6-axis gyro linear motion sensor, enabling accurate and timely steering and motion sensing in compatible games. Shake the gamepad to control game characters where supported.

Image: Depiction of the controller's motion control capabilities, with blue lines emanating from the controller to symbolize movement and responsiveness.

Imatge: Primer pla view of an analog stick on the controller, illustrating its 360-degree range of motion.
Programació de botons
The TERIOS wireless gaming controller offers a fully customizable individual button programming experience. This allows for single key, triggered in sequence, and triggered simultaneously modes. You can also disable buttons, change the stick orientation, and swap thumb sticks to suit your play style.
Imatge: Primer pla view of the L1/R1 and L2/R2 shoulder and trigger buttons on the controller.
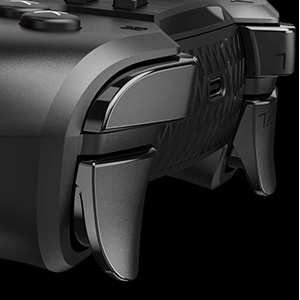
Image: Close-up of the screenshot button on the controller, indicating its function to capture and potentially share game moments.
Manteniment
- Neteja: Feu servir un drap suau i sec per netejar el controlador. Eviteu utilitzar productes químics agressius o materials abrasius.
- Emmagatzematge: Guardeu el controlador en un lloc fresc i sec, allunyat de la llum solar directa i de temperatures extremes.
- Cura de la bateria: To prolong battery life, avoid fully discharging the controller frequently. Charge it regularly, especially if it will be stored for an extended period.
- Cura del cable: Handle the charging cable carefully. Do not bend or twist it excessively.
Resolució de problemes
El controlador no es connecta/s'emparella
- Ensure Bluetooth is enabled on your Nintendo Switch console (System Setting > Airplane Mode > Controller Connection (Bluetooth) > On).
- Make sure the controller is sufficiently charged.
- Try re-pairing the controller by following the "Connecting to Nintendo Switch/Switch Lite" steps.
- If the issue persists, restart both the controller and the Nintendo Switch console.
El controlador no es carrega
- Verify that the USB Type-C cable is securely connected to both the controller and the power source.
- Proveu d'utilitzar un port USB o un adaptador d'alimentació diferent.
- Assegureu-vos que el cable de càrrega no estigui danyat.
- Check the LED indicator on the controller; it should light up when charging. If it does not, the controller or cable may be faulty.
Buttons or Joysticks Unresponsive
- Ensure the controller is properly connected to the console.
- Comproveu si hi ha obstruccions físiques o residus al voltant dels botons o els joysticks.
- Perform a controller calibration through the Nintendo Switch system settings if joystick drift or incorrect input is observed.
Especificacions
| Característica | Detall |
|---|---|
| Marca | TERIOS |
| Model | T23 (Wireless Pro Controller) |
| Tecnologia de connectivitat | Sense fil |
| Dispositius compatibles | Nintendo Switch, Nintendo Switch Lite, IOS, PC |
| Tipus de controlador | Gamepad |
| Color | Negre fosc |
| Pes de l'article | 10.2 unces |
| Dimensions del paquet | 6.77 x 4.8 x 2.72 polzades |
| Font d'alimentació | Funciona amb bateria |
| Bateries | 1 bateria de ions de liti (inclosa) |
| Capacitat de la bateria | 800 mAh |
| Temps de càrrega | 2-3 hores |
| Temps d'ús | Fins a 15 hores |
| Temps d'espera | Fins a 30 dies |
| Sensor de moviment | Built-in 6-axis gyro linear motion sensor |
Garantia i Suport
For any questions, concerns, or technical support regarding your TERIOS Wireless Pro Controller, please contact TERIOS customer service. Refer to the product packaging or the official TERIOS weblloc web per obtenir la informació de contacte més actualitzada.

Imatge: Part posterior view of the controller, displaying a "TECHNICAL SUPPORT" label and a QR code for assistance.


