Instruccions importants de seguretat
Llegiu totes les instruccions abans d'utilitzar aquest aparell. Si no seguiu aquestes instruccions, podeu patir descàrregues elèctriques, incendis o lesions greus.
- No l'utilitzeu a l'aire lliure ni sobre superfícies humides.
- No permetre que s'utilitzi com a joguina. Cal prestar molta atenció quan l'utilitzen nens o a prop dels nens.
- Utilitzeu només com es descriu en aquest manual. Utilitzeu només els accessoris recomanats pel fabricant.
- No l'utilitzeu amb un cable o un endoll danyats. Si l'aparell no funciona com hauria, s'ha caigut, s'ha fet malbé, s'ha deixat a l'exterior o ha caigut a l'aigua, torneu-lo a un centre de servei.
- No estireu ni porteu el cable, no utilitzeu el cable com a nansa, no tanqueu una porta al cable ni estireu el cable per vores o cantonades afilades. No feu passar l'aparell per sobre del cable. Mantingueu el cable lluny de les superfícies escalfades.
- No desconnecteu estirant del cable. Per desconnectar, agafa l'endoll, no el cable.
- No manipuleu l'endoll o l'aparell amb les mans mullades.
- No introduïu cap objecte a les obertures. No utilitzar amb cap obertura bloquejada; mantenir lliure de pols, pelusa, cabells i qualsevol cosa que pugui reduir el flux d'aire.
- Mantingueu els cabells, la roba solta, els dits i totes les parts del cos lluny de les obertures i les parts mòbils.
- No agafeu res que estigui cremant o fumant, com ara cigarrets, llumins o cendres calentes.
- No l'utilitzeu sense el got de pols i/o els filtres al seu lloc.
- Apagueu tots els controls abans de desconnectar.
- Tingueu molta cura quan netegeu les escales.
- No l'utilitzeu per recollir líquids inflamables o combustibles, com ara la gasolina, ni l'utilitzeu en zones on puguin estar presents.
- Emmagatzemeu l’aparell a l’interior.
Contingut del paquet
Your iHome StickVac SV1 package includes the following components:
- Unitat motora principal
- Vareta d’extensió
- Motorized Floor Brush with LED Path Light
- Mini raspall elèctric
- Eina per esquerdes
- Surface Tools (Upholstery Tool, Bristle Brush)
- Kit de muntatge a la paret
- Adaptador d'alimentació

Image: All components included with the iHome StickVac SV1.
Producte acabatview
The iHome StickVac SV1 is a versatile 3-in-1 cordless vacuum cleaner designed for various cleaning tasks. It features a powerful motor, multi-surface brush with LED lights, and a 3-stage HEPA filtration system.

Image: The iHome StickVac SV1 in use as a stick vacuum.
Muntatge i muntatge
Follow these steps to assemble your iHome StickVac SV1:
- Assemble the Stick Vacuum: Insert the extension wand into the main motor unit until it clicks into place. Then, attach the motorized floor brush to the other end of the extension wand, ensuring it locks securely.
- Conversió a aspiradora de mà: To use as a handheld vacuum, detach the extension wand and motorized floor brush from the main motor unit. You can then directly attach accessories like the crevice tool or surface tools to the main motor unit.
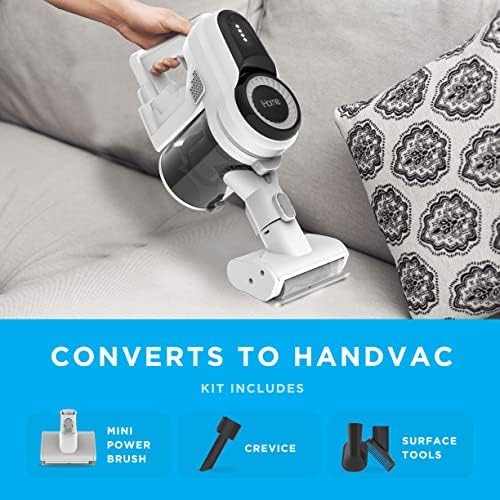
Image: The iHome StickVac SV1 easily converts to a handheld vacuum for versatile cleaning.
Carregant la bateria
The iHome StickVac SV1 is powered by a rechargeable Lithium Ion battery, offering up to 35 minutes of runtime on a single charge. To charge the vacuum:
- Mount the included wall mount kit in a convenient location near a power outlet.
- Place the vacuum onto the wall mount.
- Connect the power adapter to the charging port on the main motor unit and plug it into a wall outlet.
- The battery indicator lights on the main unit will illuminate to show charging status. Ensure the vacuum is fully charged before first use.

Image: The iHome StickVac SV1 charging on its wall mount.
Instruccions de funcionament
Stick Vacuum Mode
For general floor cleaning, attach the extension wand and motorized floor brush. The motorized brush is equipped with LED lights to illuminate dust and debris, making it easier to clean hard floors and carpets.
- Premeu el botó d'encesa per encendre l'aspiradora.
- Select your desired power level (2 power levels available) using the control method on the handle.
- Guide the vacuum across your floor surfaces. The LED lights will help highlight dirt.

Image: The motorized floor brush with LED lights illuminates debris on hard floors.
Handheld Vacuum Mode
For targeted cleaning of upholstery, stairs, or tight spaces, convert the unit to handheld mode and attach the appropriate accessory.
- Detach the extension wand and floor brush.
- Attach the crevice tool for narrow gaps, the upholstery tool for fabric surfaces, or the mini power brush for pet hair.
- Press the power button and clean the desired area.
Video: Demonstrates the iHome StickVac SV1 in various cleaning scenarios, including its conversion to a handheld vacuum and use with different attachments.
Manteniment
Un manteniment regular garanteix un rendiment òptim i allarga la vida útil de l'aspiradora.
Buidant la paperera
The dustbin has a capacity of 0.5 liters and is designed for easy emptying.
- Assegureu-vos que l'aspiradora estigui apagada.
- Locate the dustbin release button on the main motor unit.
- Press the button to release the dustbin.
- Hold the dustbin over a trash receptacle and open the bottom flap to empty debris.
- Close the flap and reattach the dustbin to the main unit until it clicks.
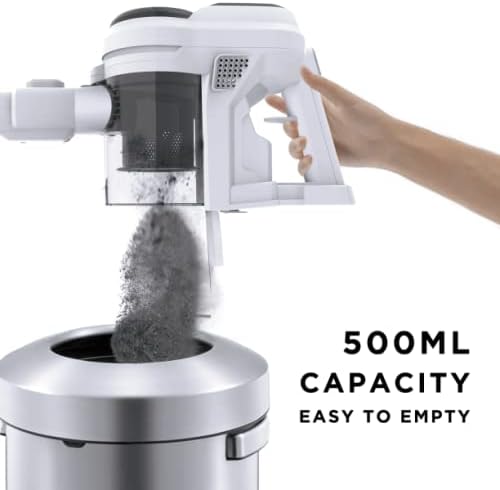
Image: Easy emptying of the 0.5L capacity dustbin.
Neteja dels filtres
The vacuum features a 3-stage HEPA filtration system to capture fine dust particles.
- Remove the dustbin from the main unit.
- Carefully remove the filter components from the dustbin.
- Tap the filters gently over a trash can to remove loose dirt. For a deeper clean, rinse the filters with cold water (do not use detergent).
- Allow filters to air dry completely for at least 24 hours before reassembling. Do not use the vacuum with wet filters.
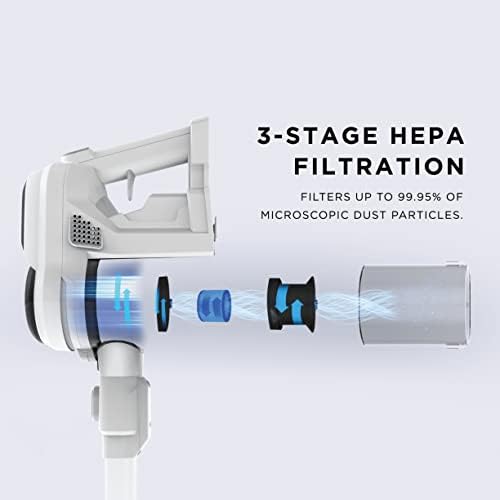
Imatge: Diagrama dels 3-stage HEPA filtration system.
Neteja del rotllo del raspall
Periodically check and clean the brush roll for tangled hair or debris.
- Assegureu-vos que l'aspiradora estigui apagada i desconnectada del carregador.
- Remove the motorized floor brush from the extension wand.
- Locate the brush roll access cover and open it.
- Remove the brush roll and clear any tangled hair or debris using scissors or a brush.
- Torneu a inserir el corró del raspall i tanqueu la coberta d'accés de manera segura.
Resolució de problemes
If you encounter issues with your iHome StickVac SV1, refer to the following common solutions:
| Problema | Causa possible | Solució |
|---|---|---|
| El buit no s'encén | La bateria s’ha esgotat | Carregueu la bateria completament. |
| Baixa potència d'aspiració | Dustbin is full or filters are clogged | Empty the dustbin and clean the filters. |
| Baixa potència d'aspiració | Blockage in the nozzle, wand, or hose | Comproveu i elimineu qualsevol bloqueig. |
| El rotllo de pinzell no gira | Deixalles enredades en un rotlle de raspall | Clean the brush roll as described in the maintenance section. |
| Durada curta de la bateria | Bateria no completament carregada o bateria envellida | Assegureu-vos que la bateria estigui completament carregada. Si el problema persisteix, és possible que calgui substituir-la. |
Especificacions
- Marca: iHome
- Nom del model: StickVac SV1
- Característica especial: HEPA, Lleuger, Portàtil
- Tipus de filtre: Filtre HEPA
- Components inclosos: Crevice Tools, Surface Tools, HandVac
- És sense fil?: Sí
- Capacitat: 0.5 litres
- Wattage: 120 watts
- Usos recomanats per al producte: Carpet, Hard Floor, Hardwood, Home
- Factor de forma: Pal
- Color: Blanc
- Dimensions del producte: 10 cm de llargada x 8 cm d'amplada x 41 cm d'alçada
- Durada de la bateria: 35 minuts
- Pes de l'article: 3 lliures
- Potència del motor: 0.535 cavalls de potència
- Mètode de control: Toca
- Nombre de nivells de potència: 2
- Ús interior/exterior: Interior
- Vacuum Collection Technology: Succió
Garantia i Suport
For warranty information or technical support, please refer to the warranty card included in your product packaging or visit the official iHome weblloc web. Conserveu el rebut de compra com a comprovant de compra per a qualsevol reclamació de garantia.