Introducció
Thank you for choosing the Xgody 3-Channel Dash Cam. This manual provides detailed instructions for the installation, operation, and maintenance of your new dash camera. Please read this manual thoroughly before using the product to ensure proper function and to maximize your user experience. Keep this manual for future reference.
Producte acabatview i què hi ha a la caixa
The Xgody 3-Channel Dash Cam is designed to record video from the front, inside, and rear of your vehicle simultaneously, providing comprehensive coverage. It features high-definition recording, infrared night vision, G-sensor for emergency locking, loop recording, and parking monitoring.
Contingut del paquet:
- Xgody Dash Cam Unit
- posterior View Camera (6M cable)
- Carregador de cotxe
- Cable de dades USB
- Manual d'usuari
- Targeta SD de 64 GB
- Pegatina adhesiva
- Pin de la targeta
- Screws (for rear camera installation)
- 3M Glue Stick Card Line
- Palanca (per al cablejat)

Figure 1: Xgody Dash Cam and Included Accessories
Característiques clau
Three-Channel Recording
The dash cam simultaneously records video from three perspectives: front (1080p), inside (720p), and rear (720p). For clearer internal and external footage, the front and cabin dual-lens cameras can operate independently at 1080p+1080p.

Figure 2: Three-Channel Recording Overview
Infrared (IR) Night Vision
The inside-facing camera is equipped with 4 IR LED lights and an F/2.0 aperture. This technology automatically increases exposure in low-light or dark conditions, ensuring clear video footage of the vehicle's interior. The operating temperature range is -31°F to 167°F (-35°C to 75°C).

Figure 3: Infrared Night Vision in Operation
Enregistrament en bucle
Continuous loop recording automatically overwrites the oldest unlocked video files when the memory card is full. This ensures that recording never stops due to a full card, providing uninterrupted surveillance.

Figura 4: Funcionalitat d'enregistrament en bucle
G-Sensor (Emergency Lock)
The built-in G-sensor detects sudden shocks or collisions. When such an event occurs, the dash camera automatically locks the current video footage, preventing it from being overwritten by loop recording. This ensures critical evidence is preserved.
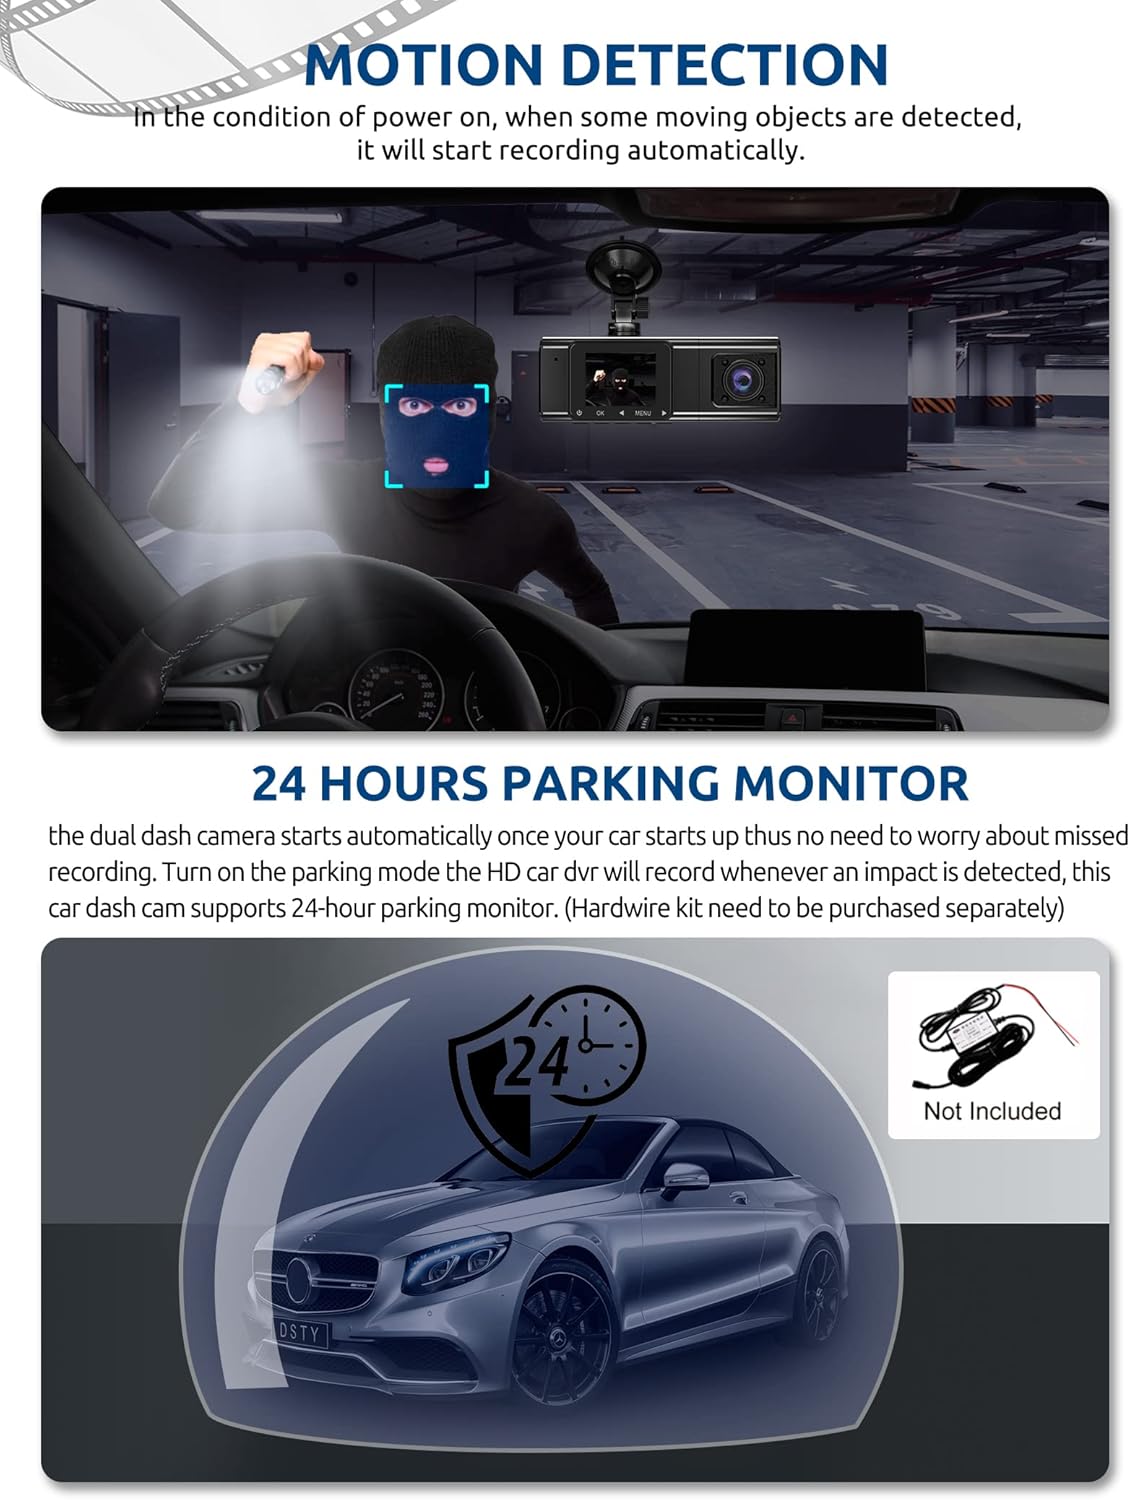
Figure 5: G-Sensor Activating During an Impact
Motion Detection & 24-Hour Parking Mode
In motion detection mode, the video recorder begins recording automatically when it detects movement in front of the camera. For continuous 24-hour surveillance, even when the car is off, the dash cam can be connected to the car battery via a hardwire kit (not included). This enables parking mode, which records when an impact is detected.

Figure 6: Motion Detection and Parking Monitoring
Instruccions de configuració
1. Insert the SD Card
- Localitza la ranura per a la targeta SD al lateral de la càmera del salpicader.
- Insert the provided 64GB SD card with the gold contacts facing the back of the camera until it clicks into place.
- Assegureu-vos que la targeta estigui completament inserida.
2. Muntar la càmera del salpicader
- Netegeu la zona del parabrisa on voleu muntar la càmera del salpicader.
- Fixeu el suport de ventosa a la càmera del salpicader.
- Premeu la ventosa fermament contra el parabrisa i bloquegeu-la al seu lloc. Col·loqueu la càmera per assegurar-vos una visió clara view de la carretera que tens al davant sense obstruir la teva visió de conducció.
3. Instal·leu la càmera posterior
- Connecteu el cable de la càmera posterior a la unitat principal de la càmera del salpicader.
- Route the cable neatly along the vehicle's headliner and trim to the rear of the car. Use the provided crowbar to tuck the cable under panels.
- Mount the rear camera on the rear windshield using the adhesive sticker or screws, ensuring it has a clear view del camí de darrere.
4. Connecteu l'alimentació
- Connecteu el carregador del cotxe a la presa de l'encenedor del vostre vehicle.
- Connect the other end of the car charger cable to the dash cam's power input port.
- The dash cam will typically power on automatically when the vehicle starts and power off when the vehicle is turned off.
Instruccions de funcionament
Encès/Apagat
- Automàtic: The dash cam powers on and starts recording automatically when connected to power and the vehicle ignition is on. It powers off automatically when the ignition is turned off.
- manual: Press and hold the power button for a few seconds to manually turn the device on or off.
Modes d'enregistrament
- Gravació normal: The default mode, continuously recording video in segments.
- Enregistrament d'emergència (sensor G): Automatically activated upon impact, locking the current video file.
- Gravació de detecció de moviment: Records when motion is detected while the vehicle is parked (requires activation in settings).
- Supervisió del pàrquing: Records when an impact is detected while the vehicle is parked (requires hardwire kit and activation in settings).
Navegació pel menú
- Use the 'MENU' button to access settings.
- Use the 'UP' and 'DOWN' arrow buttons to navigate through menu options.
- Premeu el botó "D'acord" per confirmar les seleccions.
- Common settings include video resolution, loop recording duration, G-sensor sensitivity, parking mode, date/time, and language.
Viewing Footage
- Al dispositiu: Enter playback mode via the menu to view recorded videos directly on the dash cam screen.
- A l'ordinador: Remove the SD card from the dash cam and insert it into a computer's card reader. The video files can then be accessed and played using standard media player software.
Manteniment
Formatació de la targeta SD
It is recommended to format the SD card regularly (e.g., once a month) to ensure optimal performance and prevent data corruption. This can typically be done through the dash cam's menu settings. Formatting will erase all data on the card, so back up any important files primer.
Neteja de lents
Periodically clean the lenses of the front, inside, and rear cameras with a soft, lint-free cloth. Avoid using abrasive cleaners that could scratch the lens surface. Clean lenses ensure clear video quality.
Actualitzacions de firmware
Check the official Xgody website periodically for any available firmware updates. Updates can improve performance, add new features, or fix bugs. Follow the instructions provided with the firmware update carefully.
Resolució de problemes
| Problema | Causa possible | Solució |
|---|---|---|
| La càmera del salpicader no s'encén. | Sense font d'alimentació; carregador de cotxe defectuós; connexió fluixa. | Check car charger connection; ensure vehicle's cigarette lighter socket is functional; try a different power source if available. |
| La gravació s'atura o files estan corruptes. | SD card full; SD card error; incompatible SD card. | Format the SD card regularly; use a high-speed (Class 10 or U3) SD card; replace the SD card if issues persist. |
| Screen is unresponsive or distorted. | Extreme temperatures; software glitch. | Allow the device to return to normal operating temperature; perform a factory reset (refer to manual for specific steps); ensure the device is not exposed to direct sunlight for extended periods in hot climates. |
| La qualitat del vídeo és deficient. | Dirty lens; protective film still on lens; incorrect resolution setting. | Clean camera lenses; remove any protective film; check video resolution settings in the menu. |
| El sensor G és massa sensible/no prou sensible. | La configuració de sensibilitat del sensor G és massa alta/baixa. | Adjust G-sensor sensitivity in the dash cam's settings menu. |
Especificacions
| Característica | Especificació |
|---|---|
| Dimensions del producte | 4.25 x 1.77 x 1.57 polzades |
| Pes de l'article | 1.26 lliures |
| Tecnologia de connectivitat | USB, sense fil |
| Resolució de captura de vídeo | 1080p (Front), 720p (Inside), 720p (Rear) |
| Mida de la pantalla | 1.5 polzades |
| Tipus de memòria flash | SD |
| Temperatura de funcionament | -31 °F a 167 °F (-35 °C a 75 °C) |
| Components inclosos | Targeta de memòria (64 GB) |
| Color | Negre |
Garantia i Suport
Xgody provides 18 months of service for this product. If you have any questions or require assistance regarding your Xgody Dash Cam, please contact our customer support. We aim to respond with helpful advice within 24 hours.
For support, please refer to the contact information provided in the packaging or on the official Xgody weblloc.


