1. Introducció
This manual provides detailed instructions for the setup, operation, and maintenance of your Kinhank Super Console X Max. This device integrates three operating systems: EmuELEC 4.3 for retro gaming, Android 9.0 for media and applications, and CoreELEC for a dedicated media center experience. Please read this manual thoroughly to ensure proper use and to maximize your experience with the console.

Image 1.1: The Kinhank Super Console X Max console, along with its accessories including two wireless controllers and a remote control, connected to a television.
2. Contingut del paquet
Verifiqueu que tots els elements que s'enumeren a continuació s'inclouen al vostre paquet:
- Kinhank Super Console X Max Unit
- Wireless Controllers (x2)
- TF Card (pre-installed with EmuELEC/Android)
- 4G CoreELEC Card
- Cable HD
- Adaptador d'alimentació
- Control remot
- Manual d'usuari (imprès)

Image 2.1: Visual representation of all components included in the Kinhank Super Console X Max package.
3. Dispositiu acabatview
3.1. Console Features
The Super Console X Max is powered by an Amlogic S905X3 Quad-Core processor, featuring an ARM Cortex-A55 CPU (up to 2.0GHz) and an ARM Mali-G31 MP2 GPU. It includes 4GB DDR3 RAM and 32GB eMMC storage. The console supports 4K HD and AV output, dual-band 2.4G+5G WiFi, Gigabit Ethernet, and Bluetooth 4.0.
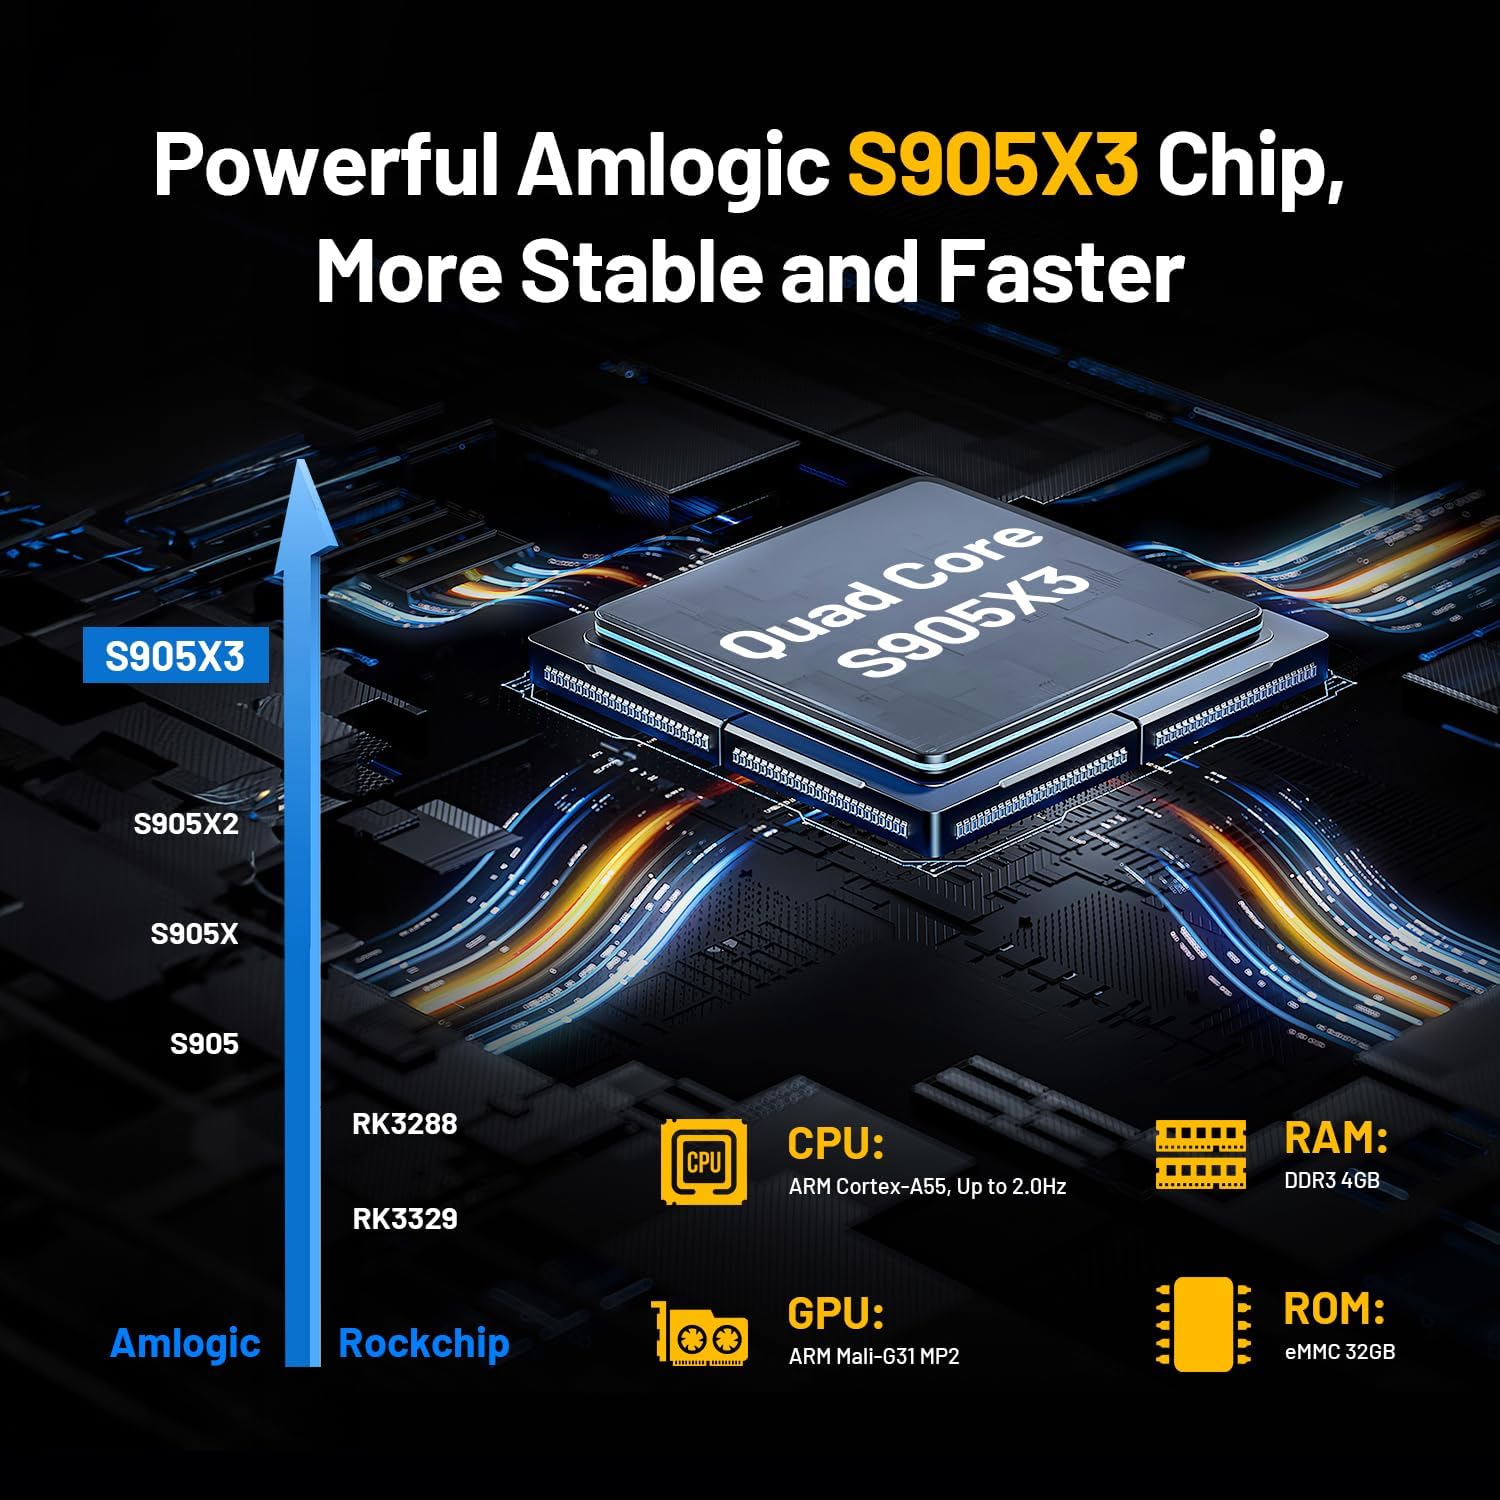
Image 3.1: Detailed specifications of the Amlogic S905X3 processor used in the console.
3.2. Ports i connexions
The console features various ports for connectivity and expansion:
- Ranura per a targetes TF: For inserting the system TF card or additional storage.
- Port DC: Per connectar l'adaptador de corrent.
- SPDIF: Sortida d'àudio digital.
- Sortida AV: Analog video and audio output for older displays.
- Sortida HD: HDMI port for high-definition video and audio.
- Port Ethernet: For wired network connection (Gigabit).
- Port USB 2.0: For connecting peripherals (e.g., controllers, USB drives).
- Port USB 3.0: Per a la transferència de dades d'alta velocitat amb dispositius compatibles.

Imatge 3.2: acabatview of the console's input/output ports and their labels.
4. Instruccions de configuració
4.1. Connexió inicial
- Inseriu la targeta TF: Ensure the main system TF card (pre-installed with EmuELEC/Android) is securely inserted into the TF card slot. If using the CoreELEC card, insert it into the TF card slot.
- Connecta a la pantalla: Connect the HD cable from the console's HD output port to an available HDMI input on your television or monitor. Alternatively, use the AV cable for older displays.
- Connectar l'alimentació: Plug the power adapter into the DC port on the console, then plug the adapter into a wall outlet.
- Connecteu els controladors: Insert the USB dongle for the wireless controllers into one of the USB ports on the console. Ensure the controllers have batteries installed (3 AAA batteries required per controller, not included).
- Encès: The console should power on automatically or can be powered on using the remote control.

Image 4.1: Connection options for video and audio output to different display devices.
4.2. Connexió a la xarxa
The console supports both wired and wireless network connections.
- Connexió per cable: Connect an Ethernet cable from your router to the console's Ethernet port.
- Connexió sense fil: Navigate to the network settings within the Android or EmuELEC interface, select your Wi-Fi network (2.4G or 5G), and enter the password.
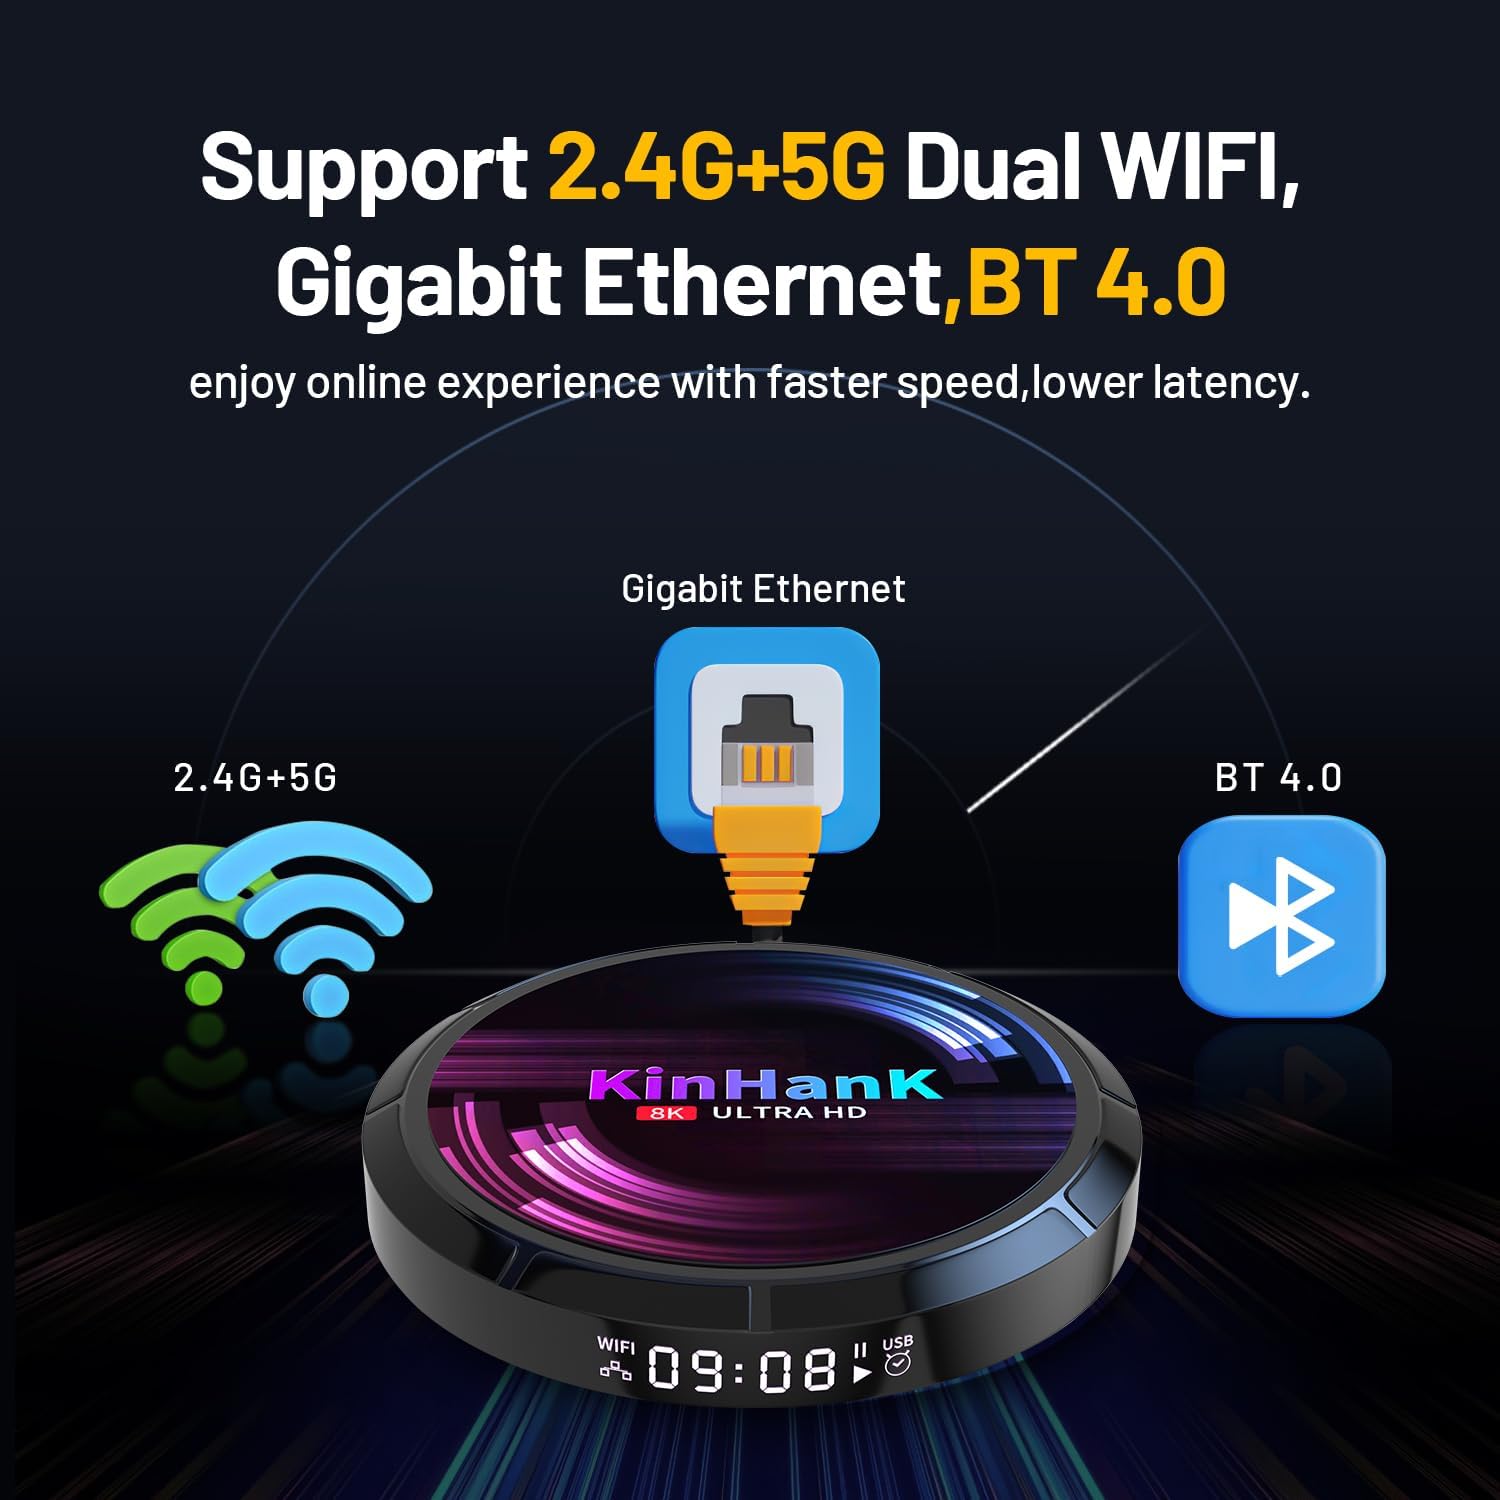
Imatge 4.2: acabatview of the console's network and wireless connectivity features.
5. Instruccions de funcionament
The Super Console X Max features three main operating systems:

Image 5.1: The console supports EmuELEC 4.3, Android TV 9.0, and CoreELEC for diverse functionalities.
5.1. Canvi entre sistemes
The console typically boots into Android 9.0 by default. To switch to EmuELEC or CoreELEC:
- From Android to EmuELEC: Locate the EmuELEC application icon within the Android interface and launch it. The system will reboot into EmuELEC.
- From EmuELEC to Android: In EmuELEC, access the main menu, select 'Quit', then choose 'Reboot to Android'.
- Using CoreELEC: CoreELEC is typically run from a separate TF card. Power off the console, replace the main TF card with the CoreELEC card, then power on.
5.2. EmuELEC (Retro Gaming)
EmuELEC is designed for playing retro video games. Use the wireless controllers for navigation and gameplay.
- Navegació: Use the D-pad or analog stick to browse game systems and titles.
- Selecciona un joc: Press the 'A' button (or equivalent) to select a game.
- Sortida del joc: During gameplay, press 'START' + 'SELECT' simultaneously to open the RetroArch menu, then select 'Quit' or 'Close Content'.
- Save/Load State: Use hotkeys (often 'SELECT' + 'R1' for save, 'SELECT' + 'L1' for load) to save and load game states.
5.3. Android 9.0 (Media & Apps)
Android 9.0 provides access to streaming services, applications, and general media consumption. Use the remote control for navigation.
- Pantalla d'inici: Access installed applications and system settings.
- Instal·lació de l'aplicació: Download and install applications from the pre-installed app store or by sideloading APK files.
- Configuració: Configure network, display, sound, and other system preferences.
5.4. CoreELEC (Media Center)
CoreELEC is a lightweight operating system optimized for media playback, typically used with Kodi. It offers a dedicated media center experience.
- Reproducció multimèdia: Play local media files from USB drives or network shares.
- Complements: Install Kodi add-ons for additional streaming content.
- Configuració: Adjust audio, video, and network settings within the Kodi interface.
6. Manteniment
- Neteja: Use a soft, dry cloth to clean the console and controllers. Avoid liquid cleaners.
- Emmagatzematge: Guardeu la consola en un lloc fresc i sec, allunyat de la llum solar directa i de temperatures extremes.
- Actualitzacions de programari: Periodically check for system updates for Android, EmuELEC, and CoreELEC to ensure optimal performance and access to new features. Follow official update procedures to avoid data loss or system instability.
- SD Card Backup: It is recommended to back up the contents of your system TF card to a computer to prevent data loss in case of card corruption.
7. Solució De Problemes
- Sense energia: Ensure the power adapter is securely connected to the console and a working power outlet. Try a different outlet.
- Sense pantalla: Verify the HD cable is properly connected to both the console and the TV. Ensure the TV input is set to the correct HDMI channel. Try a different HD cable or AV cable.
- Controllers Not Responding: Check if the USB dongle is inserted correctly. Ensure controllers have fresh batteries. Re-pair controllers if necessary (refer to controller-specific instructions).
- Games Not Loading/Running Slowly: Some games may require specific emulator settings. Ensure the TF card is properly inserted and not corrupted. For N64 games, performance can vary; adjusting emulator settings might help.
- Problemes de connexió de xarxa: Check router and modem status. For Wi-Fi, ensure correct password entry and strong signal. For wired, verify Ethernet cable connection.
- El sistema es bloqueja/falla: Power cycle the device by disconnecting and reconnecting the power adapter. If issues persist, consider performing a factory reset (backup data first).
8. Especificacions
| Processador | Amlogic S905X3 Quad-Core (ARM Cortex-A55 up to 2.0GHz) |
| GPU | ARM Mali-G31 MP2 |
| RAM | 4 GB DDR3 |
| Emmagatzematge intern | eMMC de 32 GB |
| Suport per a targetes de memòria | Targeta TF (fins a 256 GB) |
| Sistemes operatius | EmuELEC 4.3, Android 9.0, CoreELEC |
| Sortida de vídeo | HDMI (4K HD), AV Output |
| Sortida d'àudio | HDMI, AV, SPDIF |
| Wi-Fi | 2.4G + 5G Dual-Band |
| Ethernet | Gigabit Ethernet |
| Bluetooth | BT 4.0 |
| Ports USB | 1x USB 2.0, 1x USB 3.0 |
| Font d'alimentació | DC 5V/2A (via included adapter) |
| Dimensions | Approximately 114mm diameter (refer to Image 3.2) |
| Pes | Aproximadament 1.57 lliures (0.71 kg) |
9. Garantia i Suport
For warranty information and technical support, please refer to the documentation included with your product or contact Kinhank customer service through their official channels. Keep your purchase receipt as proof of purchase for warranty claims.


