1. Introducció
Thank you for choosing the DEXTER 1500W SDS Plus Hammer Drill. This manual provides essential information for the safe and effective operation, maintenance, and troubleshooting of your new tool. Please read this manual thoroughly before first use and keep it for future reference.

Figure 1: The DEXTER 1500W SDS Plus Hammer Drill, showcasing its robust design and ergonomic features.
2. Instruccions de seguretat
Seguiu sempre les precaucions de seguretat bàsiques quan utilitzeu eines elèctriques per reduir el risc d'incendi, descàrrega elèctrica i lesions personals.
- Seguretat de l'àrea de treball: Mantingueu la vostra zona de treball neta i ben il·luminada. No feu servir eines elèctriques en atmosferes explosives, com ara en presència de líquids, gasos o pols inflamables.
- Seguretat elèctrica: Els endolls de les eines elèctriques han de coincidir amb la presa de corrent. No modifiqueu mai l'endoll de cap manera. Eviteu el contacte corporal amb superfícies connectades a terra.
- Seguretat personal: Always wear eye protection, hearing protection, and suitable work gloves. Dress properly; do not wear loose clothing or jewelry.
- Ús i cura de l'eina: No forceu l'eina elèctrica. Feu servir l'eina elèctrica adequada per a la vostra aplicació. Desconnecteu l'endoll de la font d'alimentació abans de fer qualsevol ajust, canviar accessoris o guardar eines elèctriques.
3. Producte acabatview i Components
Familiarize yourself with the various parts of your DEXTER Hammer Drill and its included accessories.
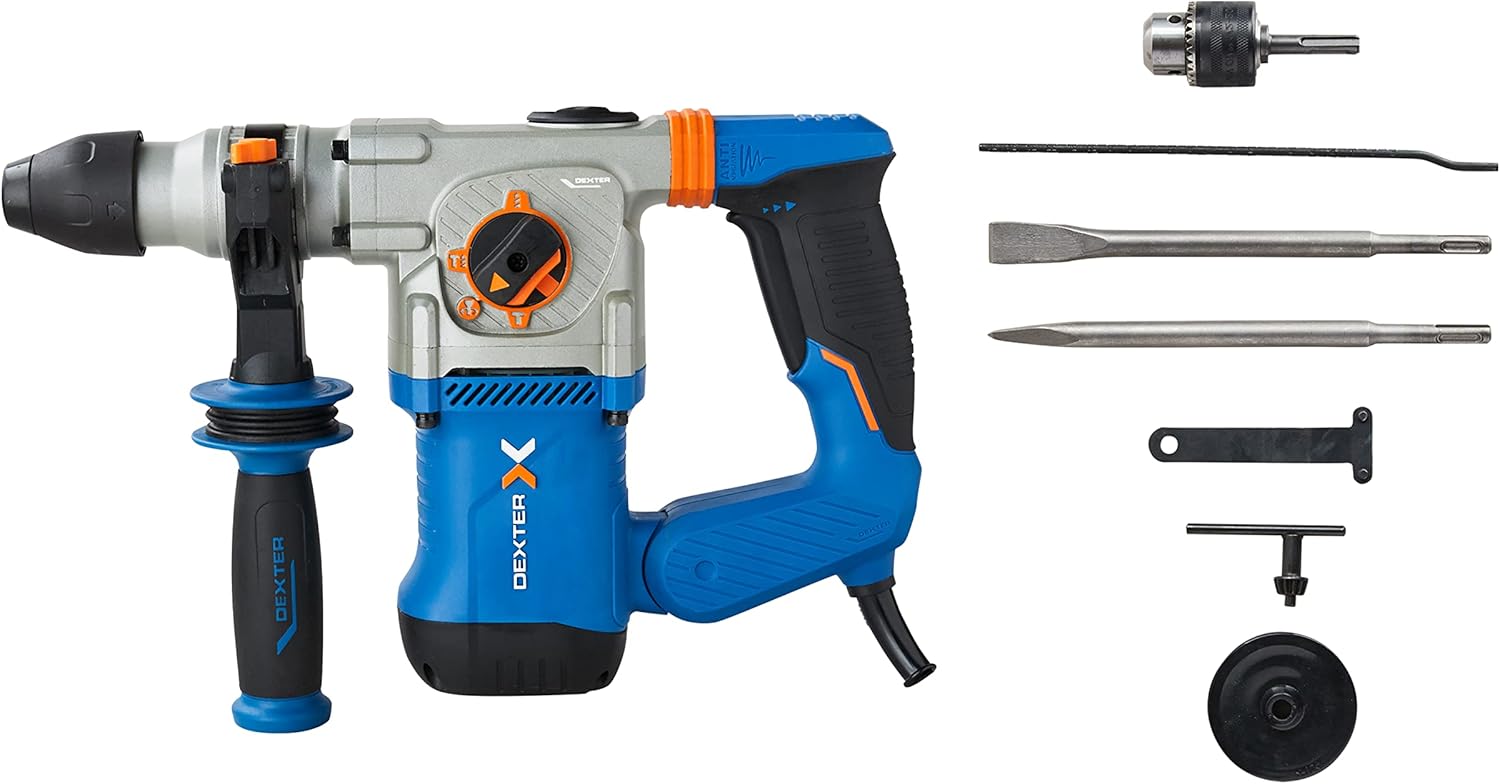
Figure 2: The hammer drill along with its standard accessories, including the SDS Plus chuck, pointed chisel, flat chisel, side handle, key, and depth gauge.
Components clau:
- Mandril SDS Plus: Per a canvis de broques ràpids i segurs.
- Interruptor selector de mode: Allows selection between drilling, hammer drilling, chiseling, and chiseling with free accessory adjustment.
- Activador de velocitat variable: For precise control over drilling and chiseling speed.
- Anti-Vibration Handles: Designed to absorb shocks and reduce user fatigue.
- Mànec lateral: Proporciona un adherència i un control addicionals durant el funcionament.
- Indicador de profunditat: For setting precise drilling depths.
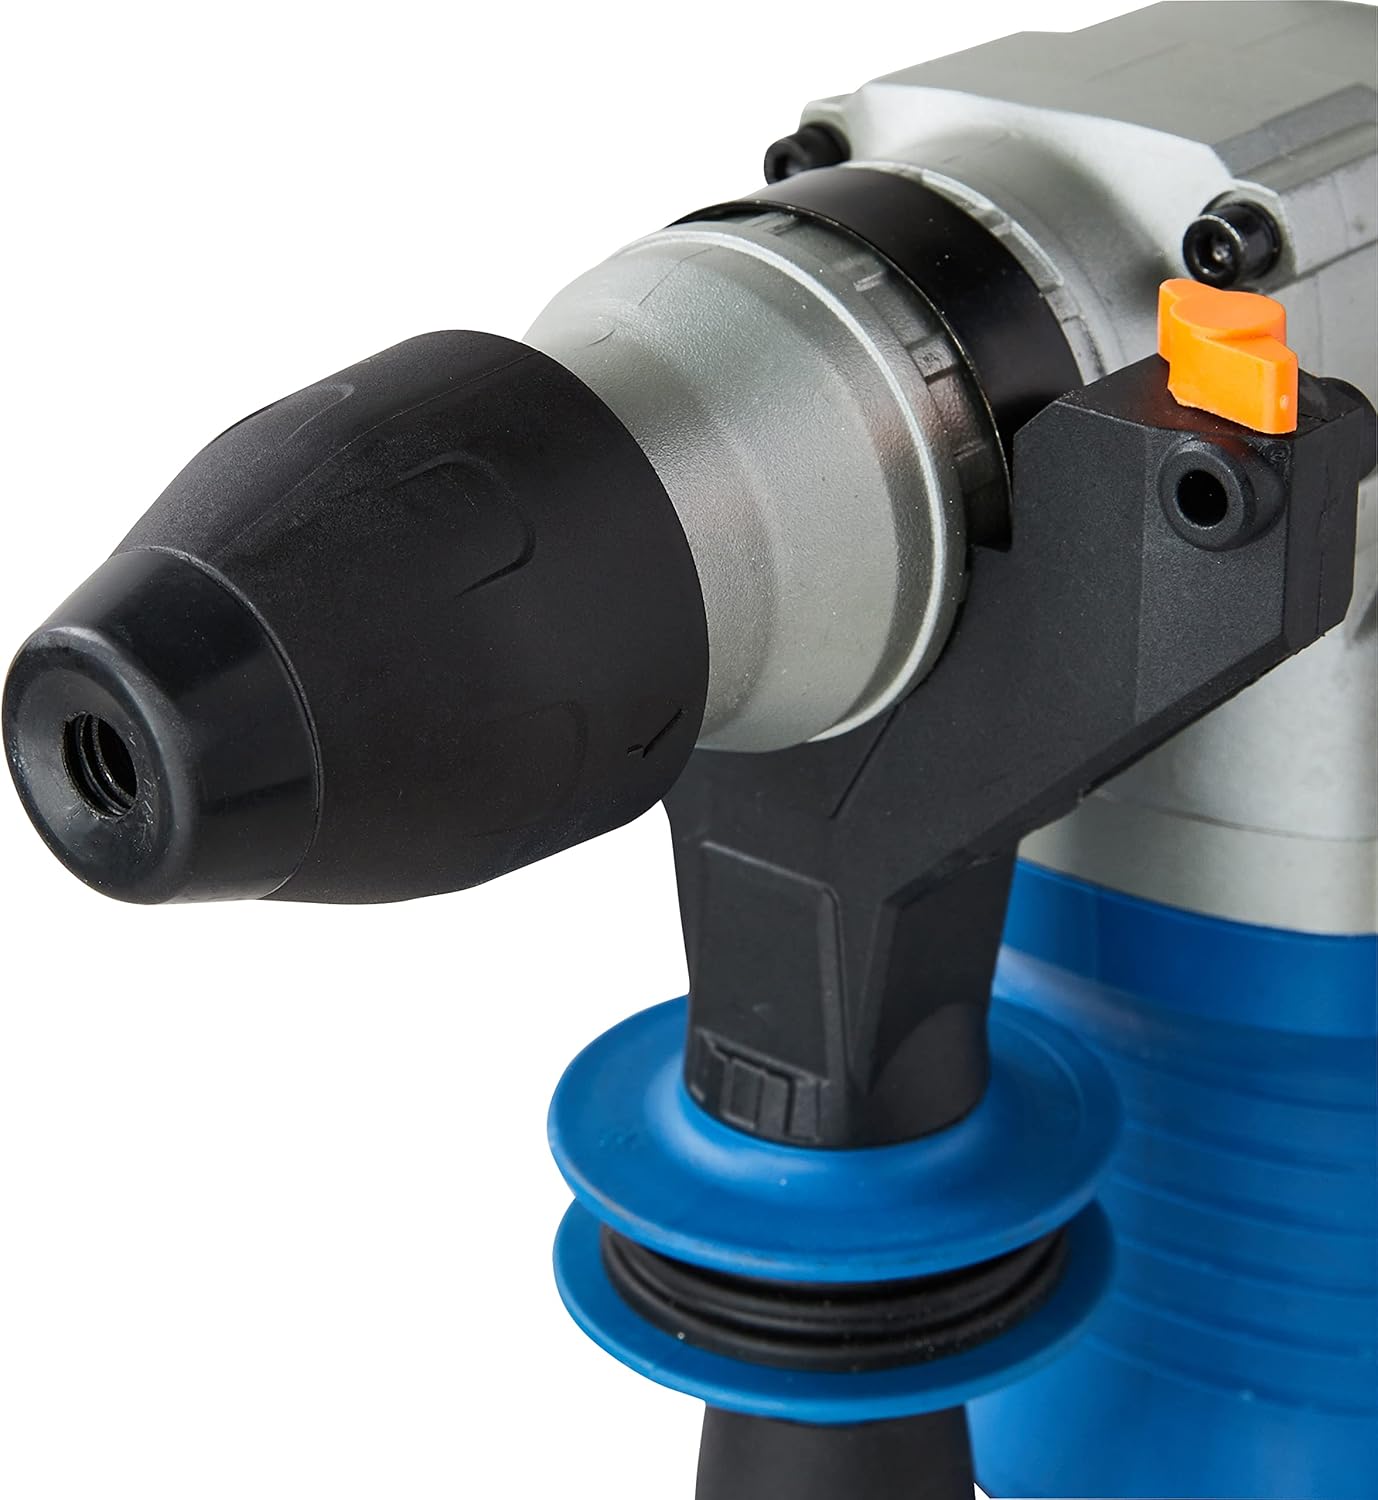
Figura 3: Detallada view of the SDS Plus chuck, designed for quick and secure bit insertion.

Figure 4: Close-up of the mode selector switch, indicating the different operational modes of the hammer drill.

Figura 5: View of the anti-vibration handle, highlighting its design for improved user comfort and reduced fatigue.
4. Configuració
4.1 Fixació de la nansa lateral
- Afloixeu la nansa lateral girant-la en sentit antihorari.
- Slide the handle onto the front of the tool until it is in the desired position.
- Rotate the handle clockwise to tighten and secure it.
4.2 Inserting and Removing SDS Plus Bits
- Netegeu la mànega de la broca SDS Plus.
- Insert the bit into the chuck until it clicks into place. Pull on the bit to ensure it is securely locked.
- Per treure-ho, estireu el collar del mandril i traieu la broca.
4.3 Attaching the Key Chuck (for standard drill bits)
For drilling with standard, non-SDS bits (e.g., for wood or metal), attach the included key chuck adapter to the SDS Plus chuck.
- Insert the key chuck adapter into the SDS Plus chuck as described in 4.2.
- Insert the desired standard drill bit into the key chuck.
- Tighten the key chuck using the provided chuck key to secure the bit.
4.4 Setting the Depth Gauge
- Introduïu el calibre de profunditat al forat del mànec lateral.
- Adjust the gauge to the desired drilling depth.
- Tighten the side handle to secure the depth gauge in place.
5. Funcionament
Your DEXTER Hammer Drill offers four primary functions for various applications.

Figura 6: Mésview of the hammer drill's capabilities, including maximum drilling diameters and power specifications.
5.1 Selecció del mode de funcionament
Rotate the mode selector switch to choose the appropriate function:
- Drilling Mode (Drill Bit Symbol): For drilling in wood (up to 40mm) and metal (up to 13mm). Use with the key chuck and standard drill bits.
- Hammer Drilling Mode (Drill Bit + Hammer Symbol): For drilling in concrete or brick (up to 26mm). Use with SDS Plus drill bits.
- Chiseling Mode (Hammer Symbol): For chiseling applications, such as breaking concrete or removing tiles. The accessory is fixed in position.
- Chiseling with Free Accessory Adjustment (Hammer + Rotating Arrow Symbol): Allows the chisel to rotate freely, useful for adjusting the angle when removing tiles or similar tasks.
5.2 Control de velocitat variable
The trigger features variable speed control. Press the trigger lightly for lower speeds and press harder for higher speeds. This allows for precise control depending on the material and application.
5.3 Funcionament continu
For extended use, the tool can be set to continuous operation. Press the trigger and then engage the lock-on button (if present, typically on the handle). To disengage, press the trigger again.
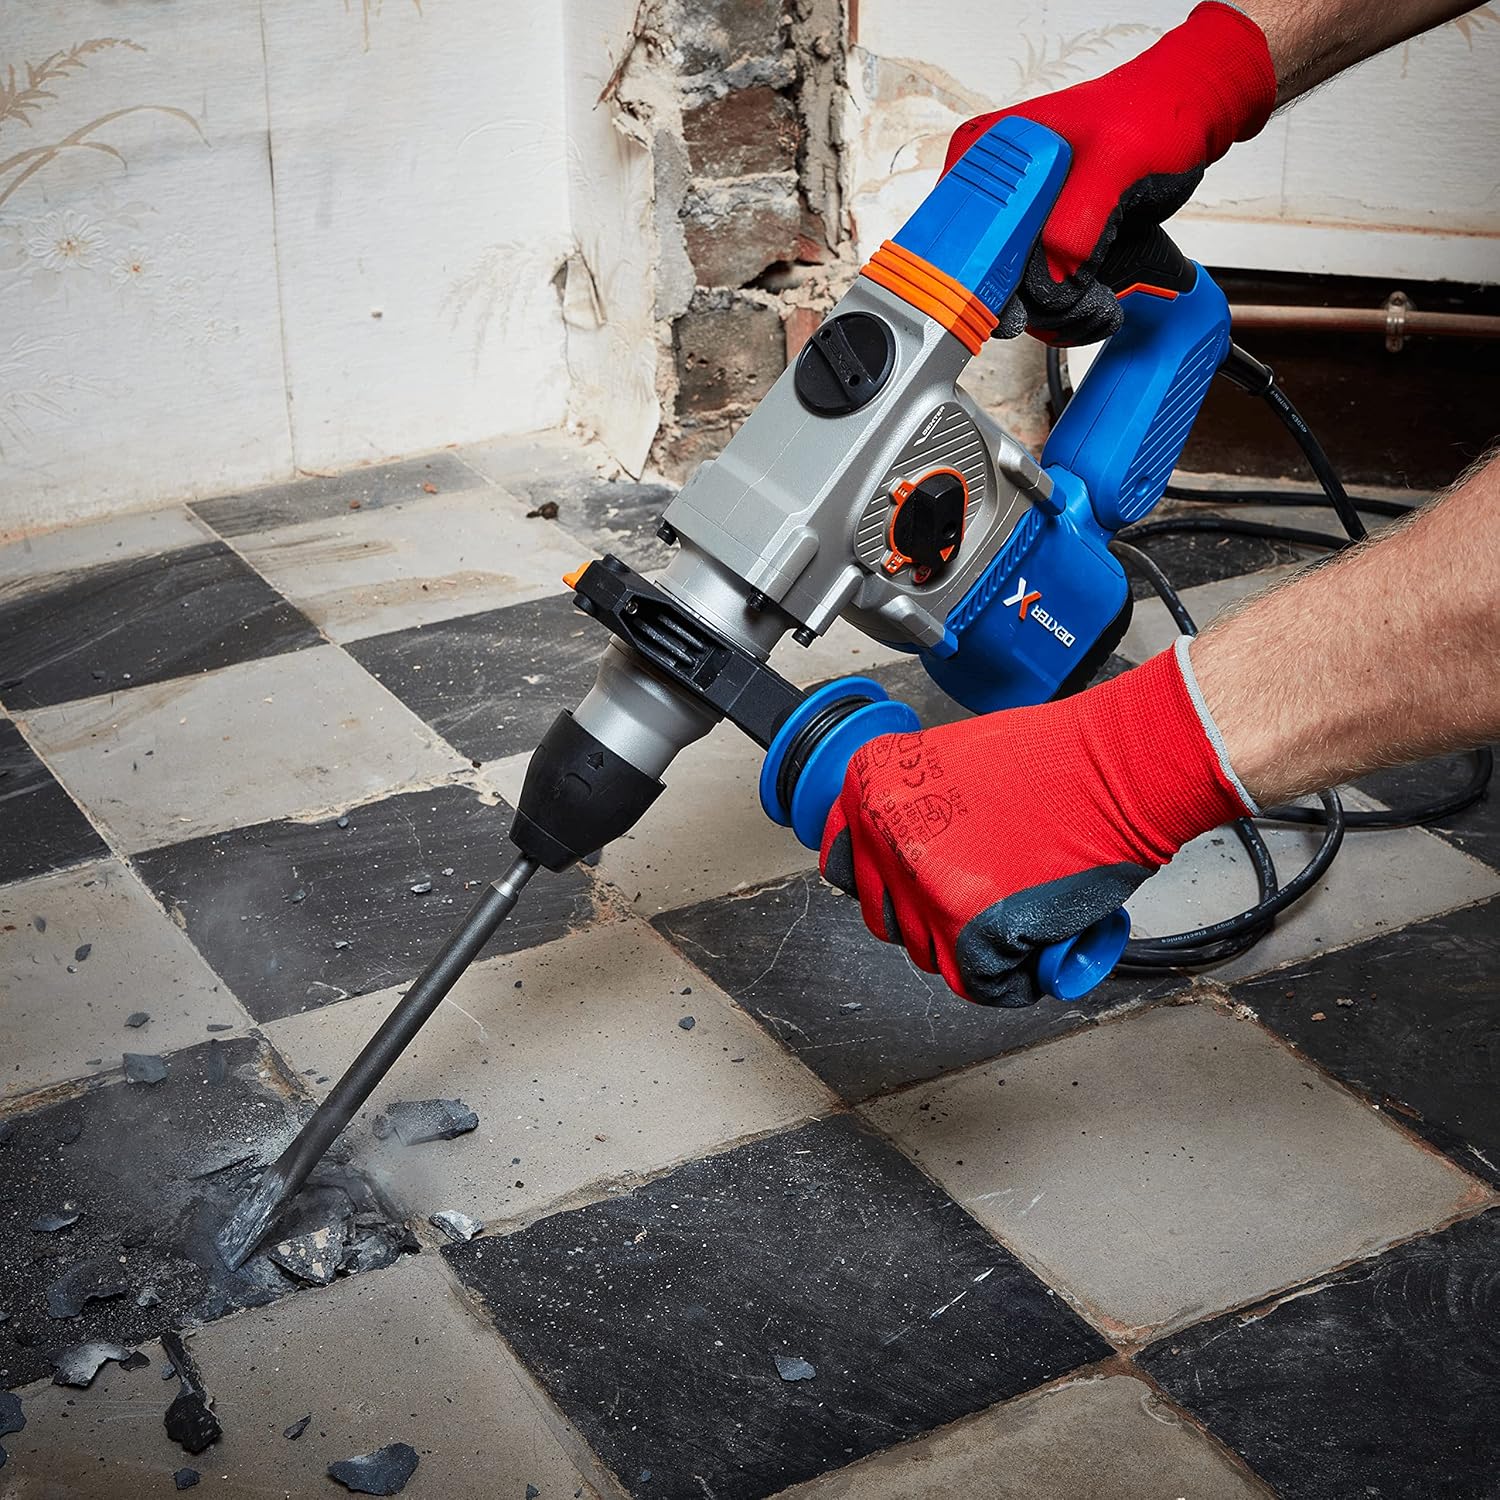
Figure 7: The hammer drill being used to chisel and break up a concrete floor, demonstrating its power in demolition tasks.

Figure 8: An operator using the hammer drill to efficiently remove floor tiles, utilizing the chiseling function.

Figure 9: The hammer drill in action, drilling into a brick wall, showcasing its capability for masonry work.
6. Manteniment
Un manteniment regular garanteix la longevitat i el rendiment òptim de la vostra eina.
- Neteja: Després de cada ús, netegeu l'eina amb un drap suau iamp drap. No utilitzeu productes químics agressius ni netejadors abrasius. Mantingueu les obertures de ventilació netes de pols i deixalles.
- Manteniment del mandril: Periodically clean and lightly lubricate the SDS Plus chuck to ensure smooth bit insertion and removal.
- Escombretes de carbó: If the tool experiences reduced power or excessive sparking, the carbon brushes may need inspection or replacement. This should ideally be done by a qualified service technician.
- Emmagatzematge: Guardeu l'eina en un lloc sec i segur fora de l'abast dels nens.
7. Solució De Problemes
A continuació es mostren problemes comuns i les seves possibles solucions.
| Problema | Causa possible | Solució |
|---|---|---|
| L'eina no s'inicia | Sense font d'alimentació; cable/endoll d'alimentació defectuós | Check power outlet and connections; Inspect power cord for damage. |
| Potència/rendiment reduït | Worn carbon brushes; Overload; Incorrect mode selection | Have carbon brushes checked/replaced; Reduce load; Ensure correct mode is selected. |
| La broca no es bloqueja al mandril | Chuck dirty; Bit shank damaged | Clean chuck and bit shank; Use a new bit if damaged. |
| Vibració excessiva | Damaged bit; Internal issue | Substituïu la broca; si el problema persisteix, busqueu servei professional. |
8. Especificacions
| Característica | Especificació |
|---|---|
| Número de model | 3276007131802 |
| Entrada de potència | 1500 W |
| Energia d'impacte | 5.1 Joules |
| Taxa d'impacte màxima | 4500 bpm |
| Velocitat sense càrrega | 0-850 rpm |
| Tipus Chuck | SDS Plus |
| Capacitat de perforació (fusta) | 40 mm |
| Capacitat de perforació (metall) | 13 mm |
| Drilling Capacity (Concrete/Brick) | 26 mm |
| Voltage | 230 V |
| Dimensions del producte | 12 x 12 x 32 cm |
| Pes de l'article | 8.2 kg |
| Longitud del cable | 4 m |
9. Garantia i Suport
DEXTER products are manufactured to high-quality standards. For warranty information, please refer to the warranty card included with your purchase or contact DEXTER customer support. Keep your proof of purchase for any warranty claims.
For technical assistance, spare parts, or service, please contact your local DEXTER authorized service center or visit the official DEXTER weblloc per obtenir dades de contacte.


