1. Introducció
This manual provides essential information for the safe and efficient operation, maintenance, and troubleshooting of your Profile GE Automatic Espresso Machine + Milk Frother. Please read these instructions thoroughly before first use and retain for future reference.

Image 1.1: The Profile GE Automatic Espresso Machine with a prepared espresso and a latte.
2. Informació de seguretat
Seguiu sempre les precaucions de seguretat bàsiques quan utilitzeu aparells elèctrics per reduir el risc d'incendi, descàrrega elèctrica i lesions a les persones.
- Ensure the appliance is connected to a grounded outlet.
- No submergiu la màquina, el cable o l'endoll en aigua o altres líquids.
- Desconnecteu-lo de la presa de corrent quan no utilitzeu i abans de netejar-lo.
- No feu servir cap aparell amb un cable o un endoll danyats.
- Mantingueu les mans i els cables allunyats de les superfícies calentes.
- Utilitzeu només els accessoris recomanats pel fabricant.
3. Producte acabatview
El Profile GE Automatic Espresso Machine is designed for convenience and quality, featuring an integrated grinder, milk frother, and smart connectivity.
3.1 Components
- Tauler de control: Touch-sensitive buttons for various drink selections and functions.
- Tremuja de mongetes: Stores whole coffee beans for grinding.
- Embassament d'aigua: Dipòsit extraïble per al subministrament d'aigua.
- Broc de cafè: Dispensa cafè preparat.
- Vareta de vapor: Per escumar llet.
- Safata de degoteig: Collects excess liquids.
- Contenidor de mòlt: Recull els mòlts de cafè usats.

Image 3.1: The top control panel with buttons for Espresso, Americano, My Brew, Steam, and Hot Water.

Image 3.2: The integrated bean hopper with whole coffee beans and grind size adjustment knob.

Image 3.3: The removable water reservoir being lifted from the machine.
4. Configuració
4.1 Desembalatge i col·locació inicial
- Traieu amb cura tots els materials d'embalatge.
- Place the machine on a stable, level surface away from heat sources and direct sunlight.
- Assegureu-vos que hi hagi prou espai al voltant de la màquina per a la ventilació i l'accés als components.
4.2 Neteja inicial
Before first use, clean all removable parts with warm water and mild detergent. Rinse thoroughly and dry. Wipe the exterior of the machine with a damp tela.
4.3 Omplir el dipòsit d'aigua
- Remove the water reservoir from the machine (refer to Image 3.3).
- Fill with fresh, cold drinking water up to the MAX line.
- Replace the reservoir securely into the machine.
4.4 Afegir grans de cafè
- Open the lid of the bean hopper (refer to Image 3.2).
- Pour whole coffee beans into the hopper. Do not overfill.
- Tanqueu la tapa amb seguretat.
4.5 Powering On and Initial Rinse
- Connecteu el cable d'alimentació a una presa elèctrica amb connexió a terra.
- Press the power button on the control panel. The machine will perform an initial rinse cycle.
- Col·loqueu un recipient sota el broc del cafè per recollir l'aigua d'esbandida.
4.6 SmartHQ App Connection
For enhanced customization and software updates, connect your espresso machine to the SmartHQ app.
- Download the SmartHQ app from your device's app store.
- Follow the in-app instructions to pair your espresso machine.
- Customize drink preferences, volume, and strength through the app.

Image 4.1: Using the SmartHQ app to control and customize the espresso machine.
5. Instruccions de funcionament
5.1 Elaboració de cafè
The machine offers Espresso, Americano, Lungo, and Hot Water options. The 'My Cup' setting is pre-set to Ristretto and can be adjusted via the SmartHQ app.
- Ensure the water reservoir is filled and the bean hopper contains coffee beans.
- Col·loqueu una tassa sota el broc de cafè.
- Select your desired drink (Espresso, Americano, Lungo, My Cup) from the control panel.
- La màquina moldrà els grans, prepararà i dispensarà el cafè automàticament.

Image 5.1: The espresso machine dispensing a fresh shot of espresso.
5.2 Ajust de la mida de la mòlta
The integrated conical burr grinder allows for 5 levels of grind size adjustment, from coarsest to finest, to optimize flavor extraction.
- Locate the grind size adjustment knob inside the bean hopper (refer to Image 3.2).
- Turn the knob to select your desired grind setting. Finer grinds are suitable for espresso, while coarser grinds are better for longer coffee types.
5.3 Using the Steam Frother
The steam frother creates various milk textures for cappuccinos, lattes, and more.
- Fill the included stainless steel frothing pitcher with cold milk.
- Col·loca la vareta de vapor a la llet.
- Premeu el botó "Vapor" del tauler de control.
- Move the pitcher to achieve desired foam texture.
- Once finished, press the 'Steam' button again to stop.
- Immediately clean the steam wand after each use to prevent milk residue buildup.
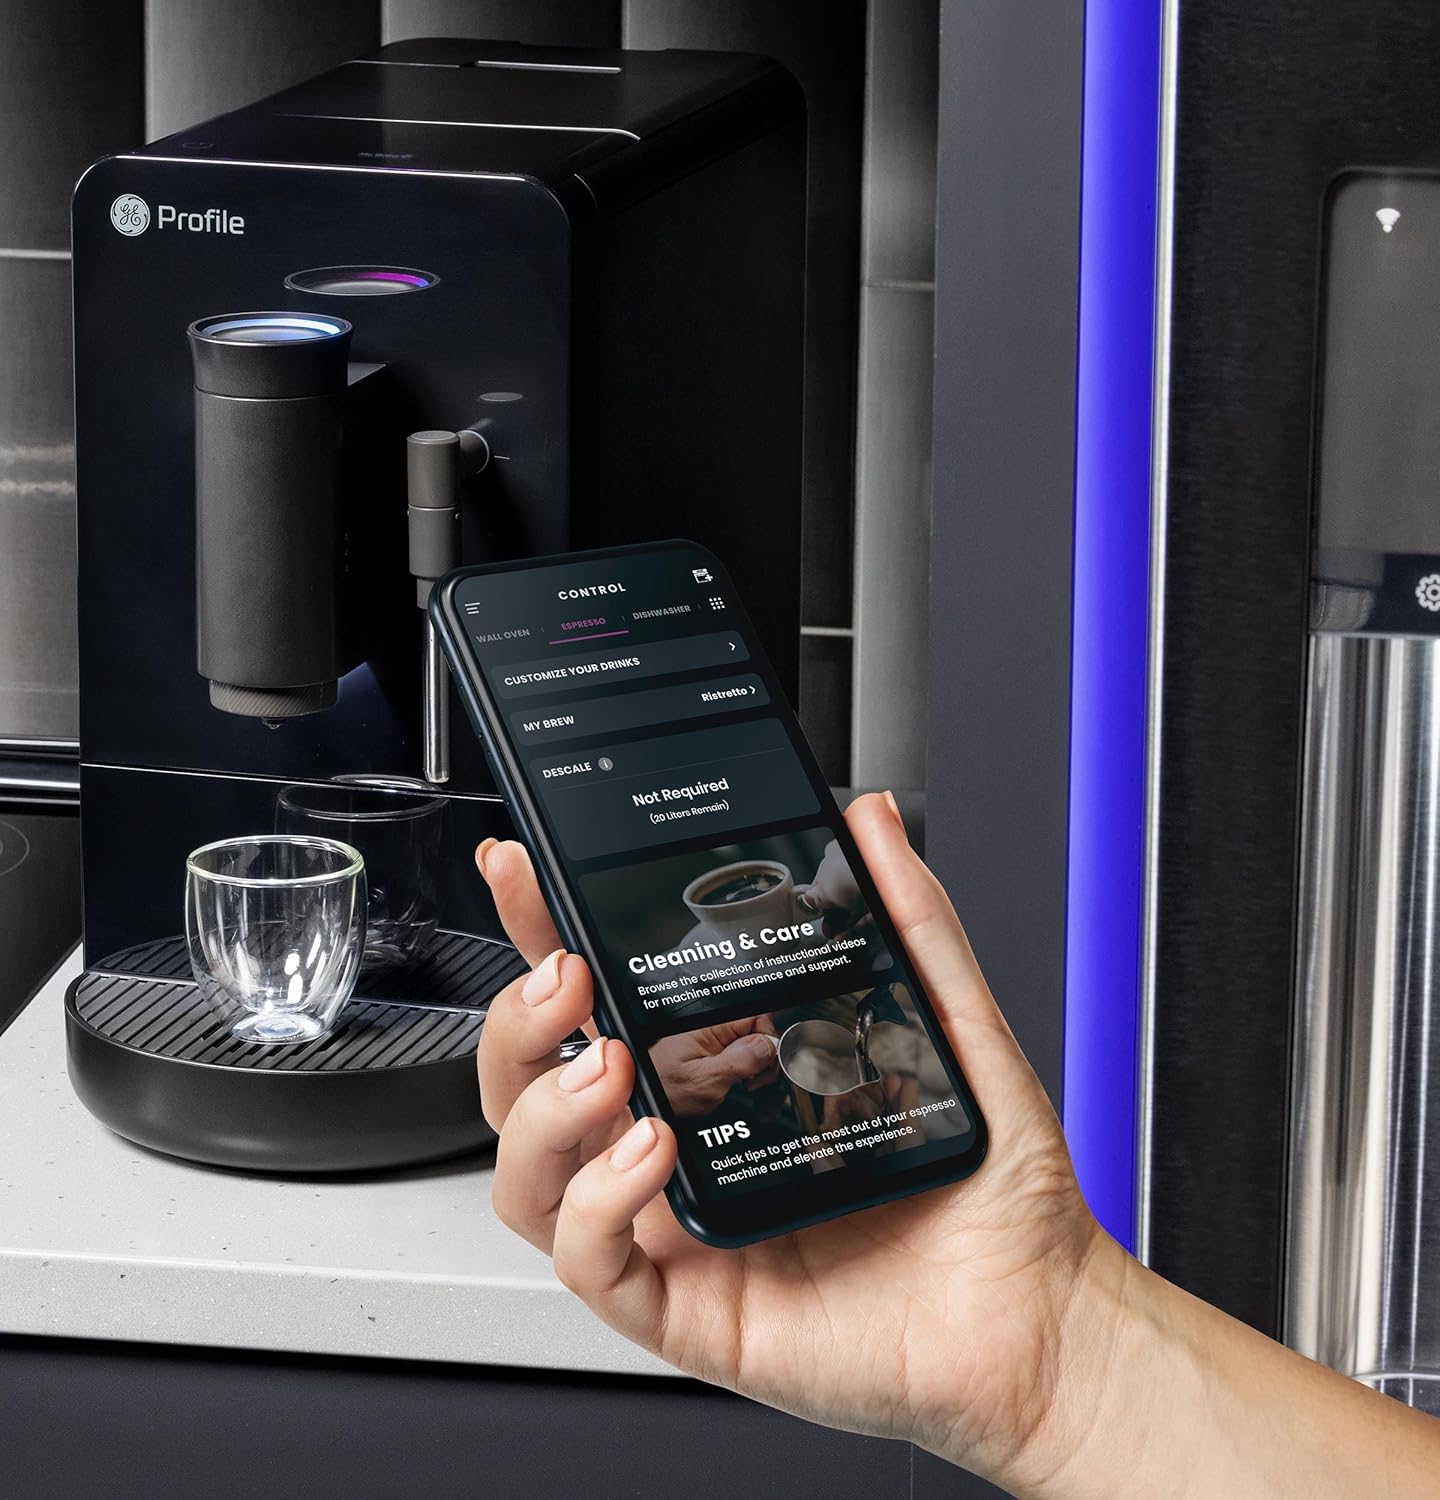
Image 5.2: A hand using the steam wand to froth milk in a stainless steel pitcher.
6. Manteniment
La neteja i el manteniment regulars garanteixen un rendiment òptim i una llarga durada de la teva màquina d'espresso.
6.1 Neteja diària
- Vareta de vapor: Després de cada ús, netegeu la boquilla de vapor amb un aiguaamp cloth. Purge steam briefly to clear any milk residue from the nozzle.
- Safata de degoteig i contenidor de mòlt: Buideu i esbandiu diàriament. La màquina indicarà quan cal buidar el contenidor de mòlt.
- Embassament d'aigua: Esbandir diàriament i tornar a omplir amb aigua fresca.
6.2 Neteja setmanal
- Unitat de preparació: The brew unit is typically removable for rinsing under running water. Refer to the included cleaning kit instructions for detailed steps.
- Tremuja de mongetes: Periodically clean out any oil residue or old beans.
6.3 Descalcificació
The machine will prompt you when descaling is required. Use a descaling solution specifically designed for espresso machines and follow the instructions provided with the descaling agent or in the SmartHQ app.
7. Solució De Problemes
Aquesta secció tracta problemes comuns que podeu trobar amb la vostra màquina d'espresso.
| Problema | Causa possible | Solució |
|---|---|---|
| No coffee dispensed / "Add Beans" message | Bean hopper empty or beans not feeding correctly. | Refill bean hopper. Gently stir beans to ensure they feed into the grinder. |
| El cafè és massa fluix o aquós | Grind size too coarse, insufficient coffee dose, or descaling needed. | Adjust grind size to a finer setting. Check SmartHQ app for strength settings. Perform descaling if prompted. |
| La llet no escuma correctament | Steam wand clogged, milk type unsuitable, or insufficient steam pressure. | Clean steam wand thoroughly. Use fresh, cold milk. Ensure machine is heated to steam temperature. |
| La màquina no s'encén | No connectat, apagadatage, or circuit breaker tripped. | Check power connection. Verify power outlet functionality. Reset circuit breaker if necessary. |
| SmartHQ app connectivity issues | Incorrect Wi-Fi password, network interference, or app bug. | Verify Wi-Fi credentials. Ensure machine is within Wi-Fi range. Restart app and machine. Check for app updates. |
8. Especificacions
- Marca: Profile
- Nom del model: GE Profile Automatic Espresso Machine + Frother
- Número de model de l'article: P7CEBBS6RBB
- Color: Negre
- Dimensions del producte: 7 "P x 16" W x 12.5" H
- Pes de l'article: 16 lliures
- Voltage: 120 V
- Mode de funcionament: Totalment automàtic
- Característiques especials: Built-In Bean Hopper, Built-In Conical Burr Grinder & Adjustable Grind Size, Programmable My Brew Setting, Steam Frother & Frothing Pitcher, WiFi Connected
- Components inclosos: Cleaning Kit, Coffee Bean Container, Espresso Machine, Steam Wand, Milk Pitcher, Water Tank
- Tipus d'entrada de cafè: Mongetes senceres
- Entrada de la interfície humana: Pantalla tàctil

Image 8.1: Product dimensions of the espresso machine.
9. Garantia i Suport
This product is covered by a manufacturer's warranty. For specific warranty details, registration, or technical support, please refer to the warranty card included with your product or visit the official GE Profile website. You may also contact customer service through the SmartHQ app for assistance.


