1. Introducció
This manual provides essential information for the safe and efficient operation, maintenance, and troubleshooting of your Laresar Elite 3 Cordless Vacuum Cleaner. Please read this manual thoroughly before first use and retain it for future reference.
2. Instruccions de seguretat importants
Seguiu sempre les precaucions de seguretat bàsiques quan utilitzeu aparells elèctrics per reduir el risc d'incendi, descàrrega elèctrica o lesions.
- No l'utilitzeu a l'aire lliure ni sobre superfícies humides.
- No permetre que s'utilitzi com a joguina. Cal prestar molta atenció quan l'utilitzen nens o a prop dels nens.
- Feu servir només tal com es descriu en aquest manual. Utilitzeu només els accessoris recomanats pel fabricant.
- No l'utilitzeu amb un cable o un endoll danyats. Si l'aparell no funciona com hauria, s'ha caigut, s'ha fet malbé, s'ha deixat a l'exterior o ha caigut a l'aigua, torneu-lo a un centre de servei.
- No estireu ni porteu el cable, no utilitzeu el cable com a nansa, no tanqueu una porta al cable ni estireu el cable per vores o cantonades afilades. No feu passar l'aparell per sobre del cable. Mantingueu el cable lluny de les superfícies escalfades.
- No desconnecteu estirant del cable. Per desconnectar, agafa l'endoll, no el cable.
- No manipuleu l'endoll o l'aparell amb les mans mullades.
- No introduïu cap objecte a les obertures. No utilitzar amb cap obertura bloquejada; mantenir lliure de pols, pelusses, cabells i qualsevol cosa que pugui reduir el flux d'aire.
- Mantingueu els cabells, la roba solta, els dits i totes les parts del cos lluny de les obertures i les parts mòbils.
- No agafeu res que estigui cremant o fumant, com ara cigarrets, llumins o cendres calentes.
- No l'utilitzeu sense el got de pols i/o els filtres al seu lloc.
- Apagueu tots els controls abans de desconnectar.
- Tingueu molta cura quan netegeu les escales.
- No l'utilitzeu per recollir líquids inflamables o combustibles, com ara la gasolina, ni l'utilitzeu en zones on puguin estar presents.
- Guardeu l'aparell a l'interior. Guardeu-lo després d'usar-lo per evitar accidents.
- Desconnecteu la bateria de l'aparell abans de fer qualsevol ajust, canviar accessoris o emmagatzemar l'aparell.
- Recarregueu només amb el carregador especificat pel fabricant. Un carregador adequat per a un tipus de bateria pot generar un risc d'incendi quan s'utilitza amb un altre paquet de bateries.
- Utilitzeu aparells només amb paquets de bateries específicament designats. L'ús de qualsevol altre paquet de bateries pot crear un risc de lesions i d'incendi.
- Quan no utilitzeu la bateria, manteniu-la lluny d'altres objectes metàl·lics, com ara clips, monedes, claus, claus, cargols o altres objectes metàl·lics petits, que puguin connectar-se d'un terminal a un altre. El curtcircuit entre els terminals de la bateria pot provocar cremades o incendis.
- En condicions abusives, es pot expulsar líquid de la bateria; evitar el contacte. Si es produeix un contacte accidental, esbandiu amb aigua. Si el líquid entra en contacte amb els ulls, també busqueu ajuda mèdica. El líquid expulsat de la bateria pot causar irritació o cremades.
3. Contingut del paquet
Verifiqueu que tots els components que s'enumeren a continuació s'inclouen al paquet. Si falta algun element o hi ha algun malmès, poseu-vos en contacte amb el servei d'atenció al client.

Imatge 3.1: Acabatview of the Laresar Elite 3 Cordless Vacuum Cleaner and its included accessories, such as the main unit, extension wand, floor brush, crevice tool, dusting brush, wall mount, and spare filters.
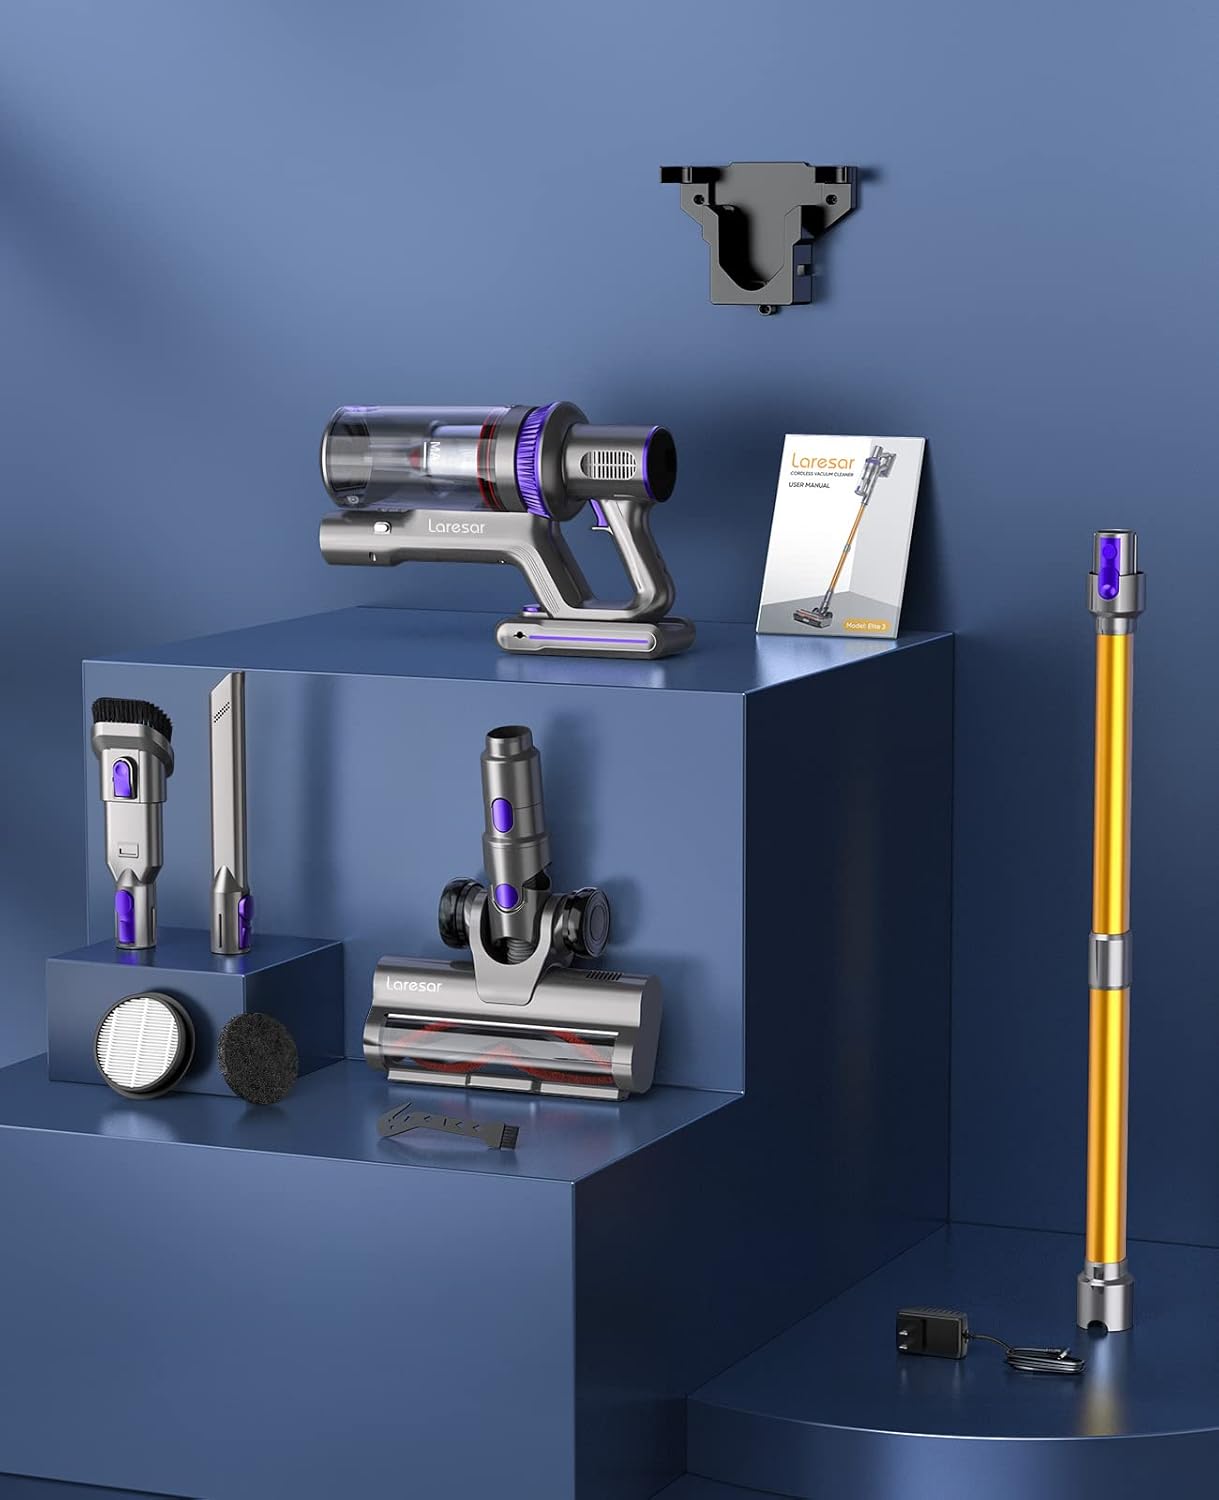
Imatge 3.2: All components of the Laresar Elite 3 vacuum cleaner, including the main motor unit, dustbin, extension tube, motorized floor brush, crevice tool, 2-in-1 brush, wall mount, power adapter, and two filters.
- Main Motor Unit with Dustbin
- Vareta d’extensió
- Raspall de sòl motoritzat amb llums LED
- Eina per esquerdes
- Raspall de pols 2 en 1
- Suport de muntatge a la paret
- Adaptador d'alimentació
- Spare HEPA Filter (2 included)
- Manual d'usuari
4. Muntatge i muntatge
4.1 Muntatge
- Connecteu la vareta d'extensió: Introduïu la vareta d'extensió a la unitat del motor principal fins que encaixi correctament al seu lloc.
- Connecteu el raspall de terra: Connect the motorized floor brush to the other end of the extension wand until it clicks. For direct handheld use, attach accessories directly to the main motor unit.
- Instal·leu el suport de paret (opcional): Choose a suitable location near a power outlet. Secure the wall mount bracket to the wall using the provided screws and anchors.
4.2 Càrrega de la bateria
Before first use, fully charge the battery. The battery is removable and can be charged either while attached to the main unit or separately.
- Connect the power adapter to the charging port on the main unit or directly to the removable battery.
- Connecteu l'adaptador a una presa de corrent.
- The LED display will show the charging status. A full charge typically takes several hours.
5. Instruccions de funcionament
5.1 Engegada/Apagada i Modes de succió

Imatge 5.1: Close-up of the Laresar Elite 3's LED touch display, showing battery percentage, suction mode indicators, and touch controls for adjusting power levels.
- Press the power button on the handle to turn the vacuum on.
- The LED display will illuminate, showing the current battery level and suction mode.
- Touch the screen to cycle through the available suction modes (Eco, Standard, Max) to suit your cleaning needs.
- Premeu el botó d'engegada de nou per apagar l'aspiradora.
5.2 Ús d'adjunts
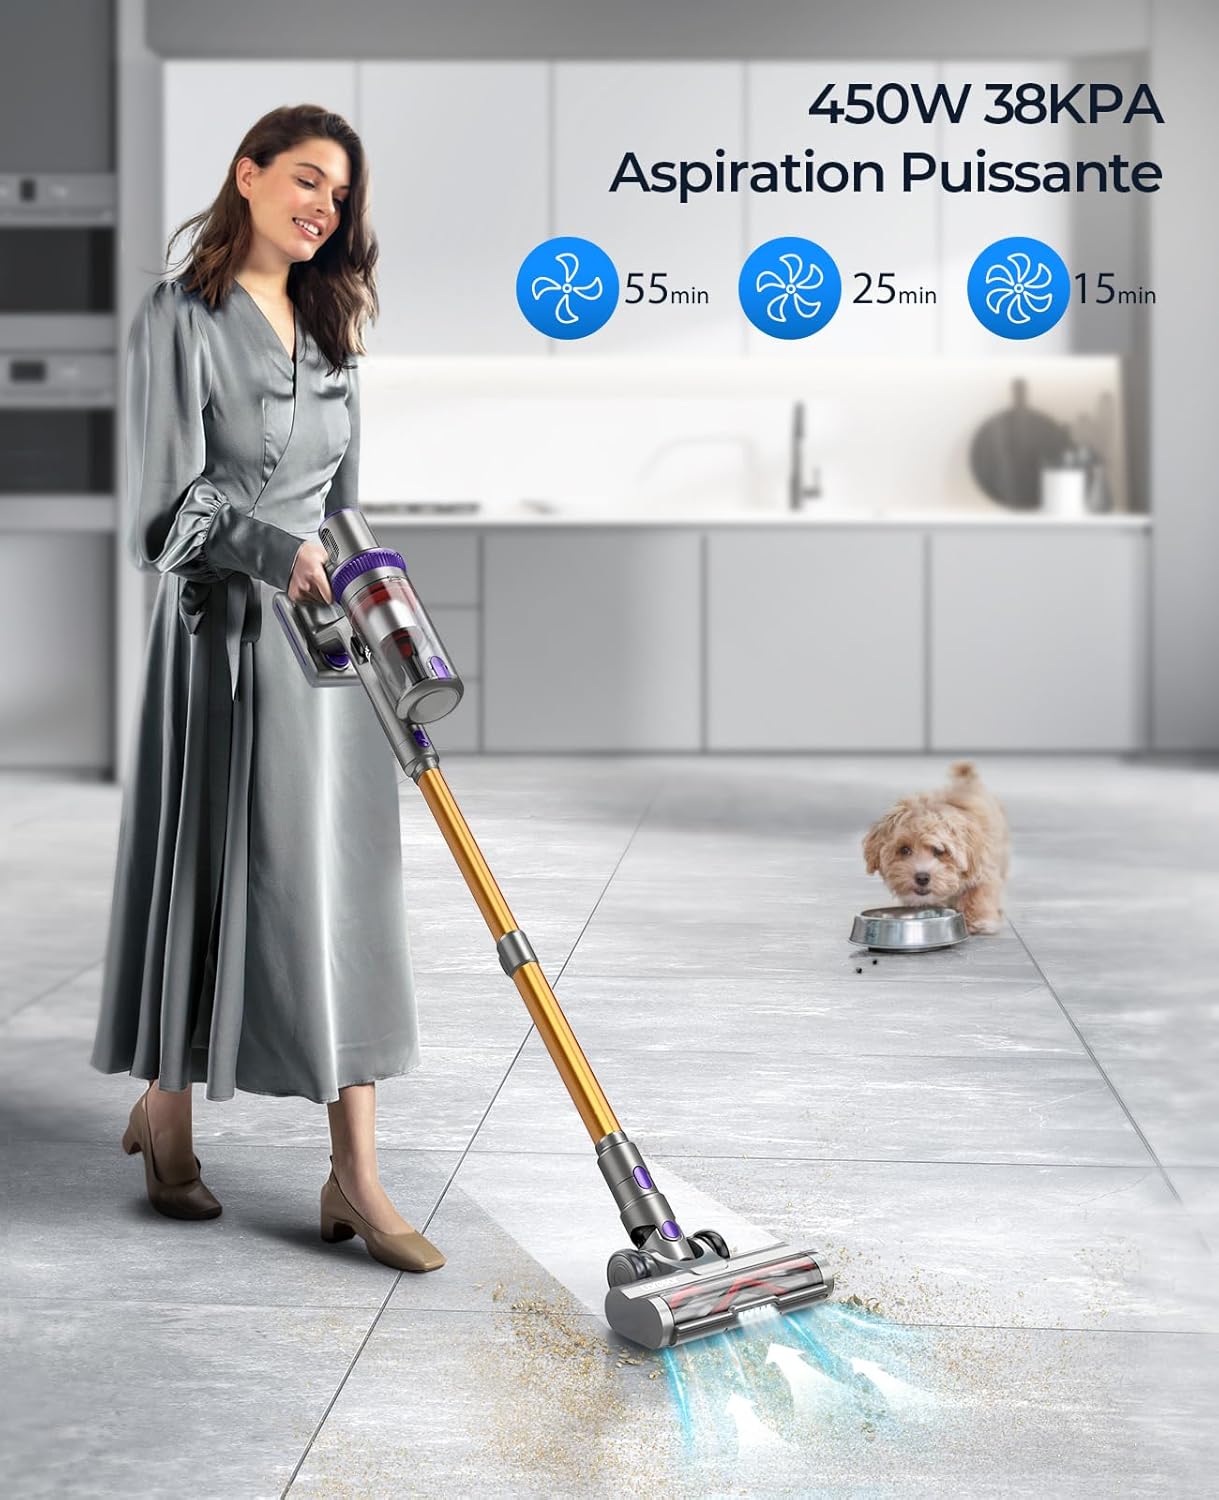
Imatge 5.2: The Laresar Elite 3 cordless vacuum cleaner in action, demonstrating its powerful suction on a tiled floor with visible debris. The LED lights on the floor brush illuminate the cleaning path.
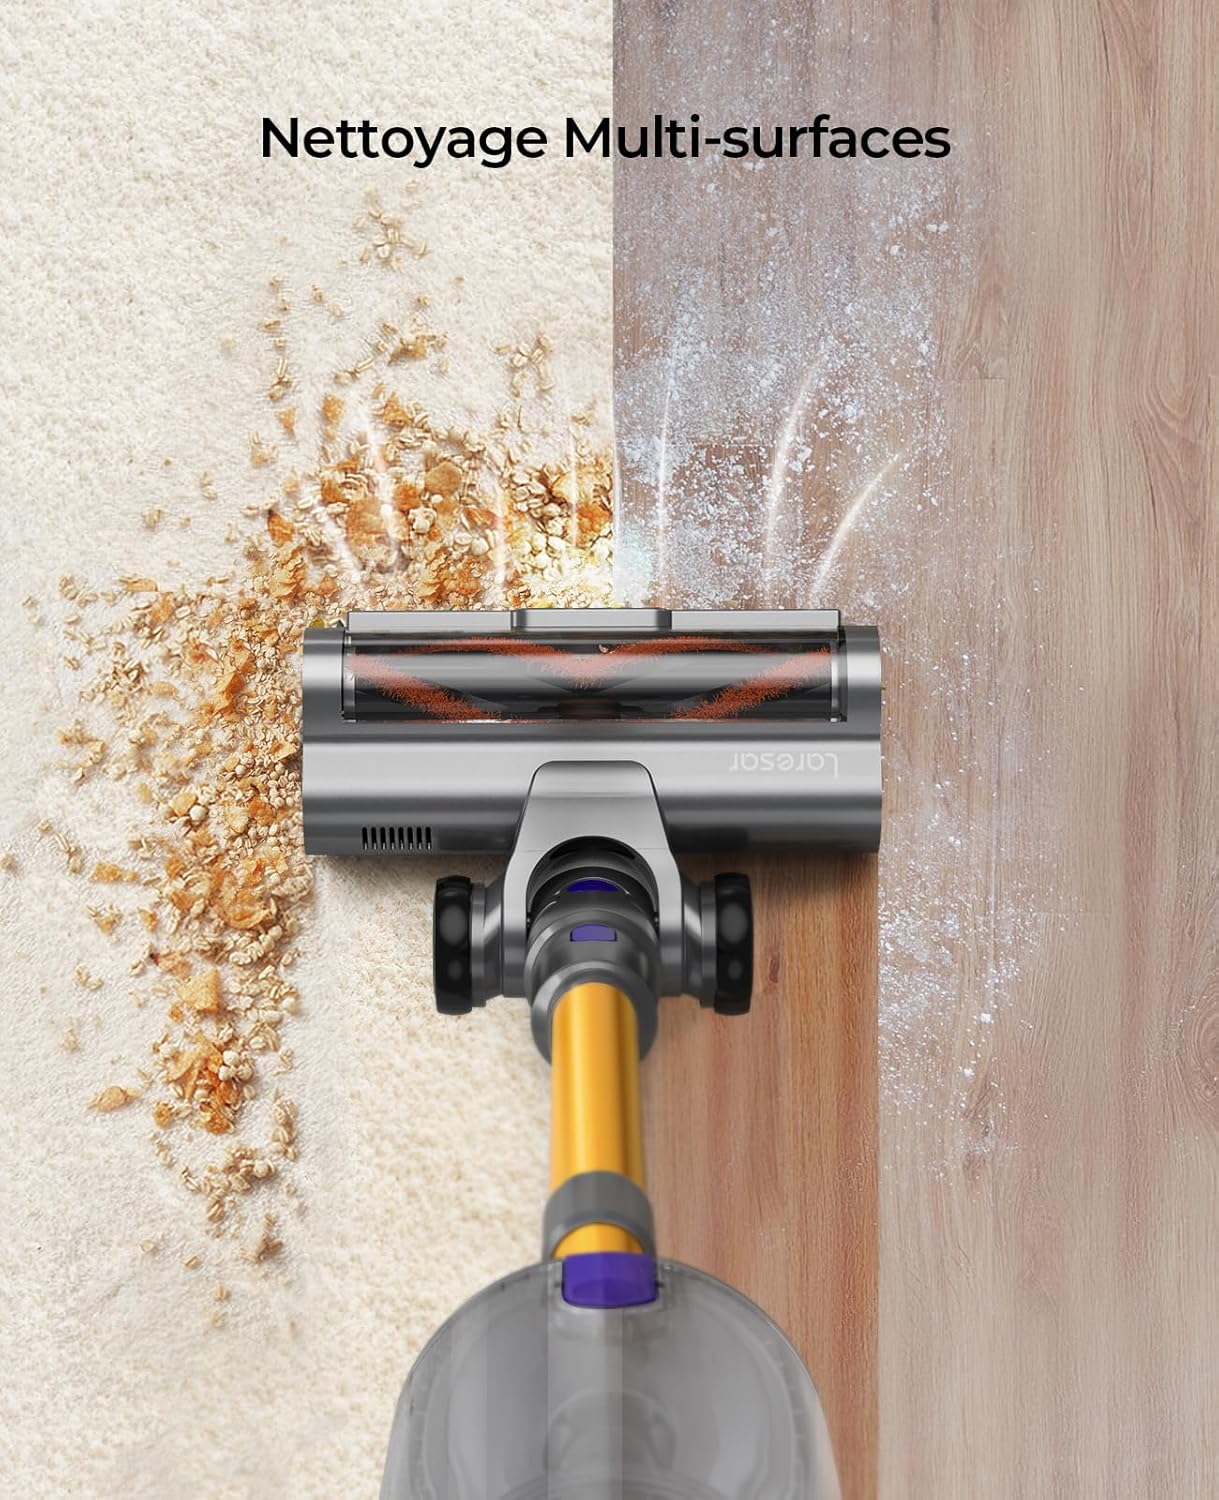
Imatge 5.3: The motorized floor brush of the Laresar Elite 3 vacuum cleaner effectively cleaning both carpeted and hard floor surfaces, highlighting its versatility for multi-surface cleaning.
- Raspall de sòl motoritzat: Ideal for carpets and hard floors. The integrated LED lights help illuminate dust and debris in dark areas.
- Eina per esquerdes: Utilitzeu-lo per a forats estrets, cantonades i vores.
- 2-in-1 Dusting Brush: Suitable for delicate surfaces, upholstery, and car interiors.
6. Manteniment
Un manteniment regular garanteix un rendiment òptim i allarga la vida útil de l'aspiradora.
6.1 Buidar el contenidor d'escombraries

Imatge 6.1: Illustration of how to empty the 1.5L dustbin of the Laresar Elite 3 vacuum cleaner by releasing its contents directly into a waste bin.
- Premeu el botó d'alliberament del contenidor de pols per separar el contenidor de pols de la unitat principal.
- Hold the dustbin over a trash can and press the bottom release latch to open the dustbin flap and empty contents.
- Close the flap and reattach the dustbin to the main unit.
6.2 Neteja de filtres

Imatge 6.2: Diagrama que il·lustra els multi-stage filtration system of the Laresar Elite 3, showing how it separates dirt, eliminates fine dust, and filters particles as small as 0.3 µm.
- The vacuum features a multi-stagsistema de filtració, que inclou un filtre HEPA.
- Twist and pull to remove the filter assembly from the dustbin.
- Toqueu a fons la brutícia solta. Esbandiu els filtres amb aigua freda corrent.
- Allow filters to air dry completely for at least 24 hours before reinserting. Do not use a hairdryer or other heating methods.
- Replace filters every 3-6 months, or as needed, to maintain suction performance.
6.3 Neteja del raspall rotatiu

Imatge 6.3: Close-up of the Laresar Elite 3's V-shaped flexible brush roll, designed to prevent hair entanglement and ensure efficient cleaning.
- To remove the brush roll, unlock the latch on the side of the floor brush head.
- Aixequeu el rotlle del pinzell.
- Remove any tangled hair, threads, or debris using scissors or a cleaning tool.
- Reinsert the brush roll and secure the latch.
7. Solució De Problemes
Consulteu la taula següent per veure els problemes habituals i les seves solucions.
| Problema | Causa possible | Solució |
|---|---|---|
| L'aspiradora no s'encén. | La bateria no està carregada o no està instal·lada correctament. | Assegureu-vos que la bateria estigui completament carregada i ben encaixada al seu lloc. |
| Baixa potència d'aspiració. | Dustbin is full, filters are clogged, or brush roll is obstructed. | Empty dustbin, clean or replace filters, remove obstructions from brush roll and air ducts. |
| El corró del raspall no gira. | Obstruction in brush roll, or brush roll not properly installed. | Remove any tangled hair or debris. Ensure brush roll is correctly seated and locked. |
| La durada de la bateria és curta. | Using Max suction mode frequently, or battery degradation. | Use lower suction modes for general cleaning. Ensure battery is fully charged before use. Contact support if battery performance significantly degrades. |
| LED display shows an error. | Indicates a specific issue (e.g., brush obstruction, air duct blockage). | Refer to the display icon for the specific issue and follow the corresponding maintenance steps (e.g., clean brush, clear blockage). |
8. Especificacions
| Característica | Detall |
|---|---|
| Model | Elit 3 |
| Marca | Laresar |
| Poder | 400 watts |
| Voltage | 25.9 Volts |
| Capacitat de la paperera | 1.5 litres |
| Temps d'execució | Fins a 50 minuts (mode Eco) |
| Nivell de soroll | 72 dB |
| Pes | 3.5 quilos |
| Característiques especials | LED Touch Display, Motorized Floor Brush with LED lights, V-shaped anti-tangle brush, Multi-stage filtració |
| Tipus de bateria | Ió de liti (1 inclòs) |
9. Garantia i atenció al client
The Laresar Elite 3 Cordless Vacuum Cleaner comes with a standard manufacturer's warranty. Please refer to the warranty card included in your package for specific terms and conditions.
For technical assistance, troubleshooting beyond this manual, or warranty claims, please contact Laresar customer support through their official weblloc web o la informació de contacte proporcionada amb la compra.
Nota: Alguns reviews mention an extended warranty offer via QR code. Please check your product packaging for any such offers to register your product and extend your warranty period.


