Introducció
This manual provides instructions for the setup, operation, and maintenance of your RCA RCDC45 Alarm Clock Caddy Charging Station. Please read this manual thoroughly before using the device to ensure proper functionality and safety. This device combines an alarm clock with a convenient storage caddy and USB charging capabilities.
Informació important de seguretat
- Ensure the device is connected to an AC power outlet with the correct voltage.
- Aquest producte està dissenyat només per a ús interior.
- No exposeu el dispositiu a l'aigua, la humitat ni a temperatures extremes.
- No intenteu desmuntar ni modificar el dispositiu. Encarregueu tot el manteniment a personal qualificat.
- Mantingueu el dispositiu allunyat de fonts de calor com ara radiadors, registres de calor, estufes o altres aparells (inclosos amplificadors) que produeixen calor.
Contingut del paquet
- RCA RCDC45 Alarm Clock Caddy Charging Station
- Adaptador de corrent alterna
- CR2032 Battery (for backup)
Característiques del producte
- 1-inch tall / 3.25-inch diagonal red LED display with 4-level brightness control.
- Integrated small device and item organizer with a soft, non-scratch interior floor.
- USB charging port (5V/2A) for compatible devices.
- Alarm clock with 3 separate alarms.
- Displays indoor temperature in either Fahrenheit (°F) or Celsius (°C).
- Battery backup option (CR2032 battery included) to retain time settings during power outages.
Producte acabatview
Familiarize yourself with the various components of your alarm clock caddy.

Figura 1: Frontal View. This image displays the front of the RCA RCDC45 Alarm Clock Caddy, featuring its prominent red LED digital display showing the time 6:18. The device is black with a smooth finish.

Figura 2: posterior View and Controls. The back of the unit features the USB charging port on the left, followed by three control buttons: ABAIX, UP, i SET. These buttons are used for adjusting time, alarms, and other settings.

Figure 3: Storage Caddy in Use. This image illustrates the integrated storage caddy, shown holding a remote control, a pair of eyeglasses, and two pens. The caddy provides a convenient space for organizing small items.

Figure 4: Labeled Features. This diagram highlights the key features of the device, including the large dimmable display, the storage space, the USB charging port, and indicates its dual alarm capability.
Configuració
- Connecteu l'alimentació de CA: Plug the provided AC power adapter into the DC IN jack on the back of the alarm clock, then plug the adapter into a standard wall outlet. The display will light up.
- Install Backup Battery: Open the battery compartment on the bottom of the unit. Insert the CR2032 battery (included) with the correct polarity (+/-). This battery retains time settings during a power outage, though the display will not be active and USB charging will not function without AC power.
Instruccions de funcionament
Establiment de l'hora
- Manteniu premut el botó SET button on the back of the unit for approximately 3 seconds until the hour digits begin to flash.
- Utilitza el UP or ABAIX buttons to adjust the hour. Pay attention to the AM/PM indicator if present.
- Premeu el botó SET button again to confirm the hour and move to the minute setting. The minute digits will flash.
- Utilitza el UP or ABAIX botons per ajustar els minuts.
- Premeu el botó SET button one more time to confirm the minutes and exit time setting mode.
Setting Alarms (Alarm 1, Alarm 2, Alarm 3)
This device supports up to three independent alarms.
- Premeu repetidament el botó SET button (do not hold) until 'AL1' (Alarm 1) appears on the display and the hour digits flash.
- Utilitza el UP or ABAIX buttons to set the desired alarm hour.
- Premeu SET to confirm the hour and move to the minute setting.
- Utilitza el UP or ABAIX buttons to set the desired alarm minutes.
- Premeu SET to confirm the minutes. The display will show 'OFF' or 'ON'. Use UP or ABAIX to toggle the alarm ON or OFF.
- Premeu SET to save Alarm 1 settings.
- Repeat steps 1-6 for 'AL2' (Alarm 2) and 'AL3' (Alarm 3) by pressing SET until the respective alarm indicator appears.
- To stop a sounding alarm, press any button. The alarm will reset for the next day.
Ajust de la brillantor de la pantalla
The display has 4 levels of brightness.
- While the clock is displaying the time, repeatedly press the ABAIX button to cycle through the 4 brightness levels (High, Medium, Low, Off). Select your preferred brightness.
Temperature Display (°F/°C)
The device displays the indoor temperature.
- Per canviar entre Fahrenheit (°F) i Celsius (°C), premeu la tecla UP button while the clock is displaying the time.
Càrrega USB
The integrated USB port allows you to charge compatible devices.
- Locate the USB charging port on the back of the unit.
- Connect your device's USB charging cable to the port.
- Connect the other end of the cable to your device. Charging will begin automatically.
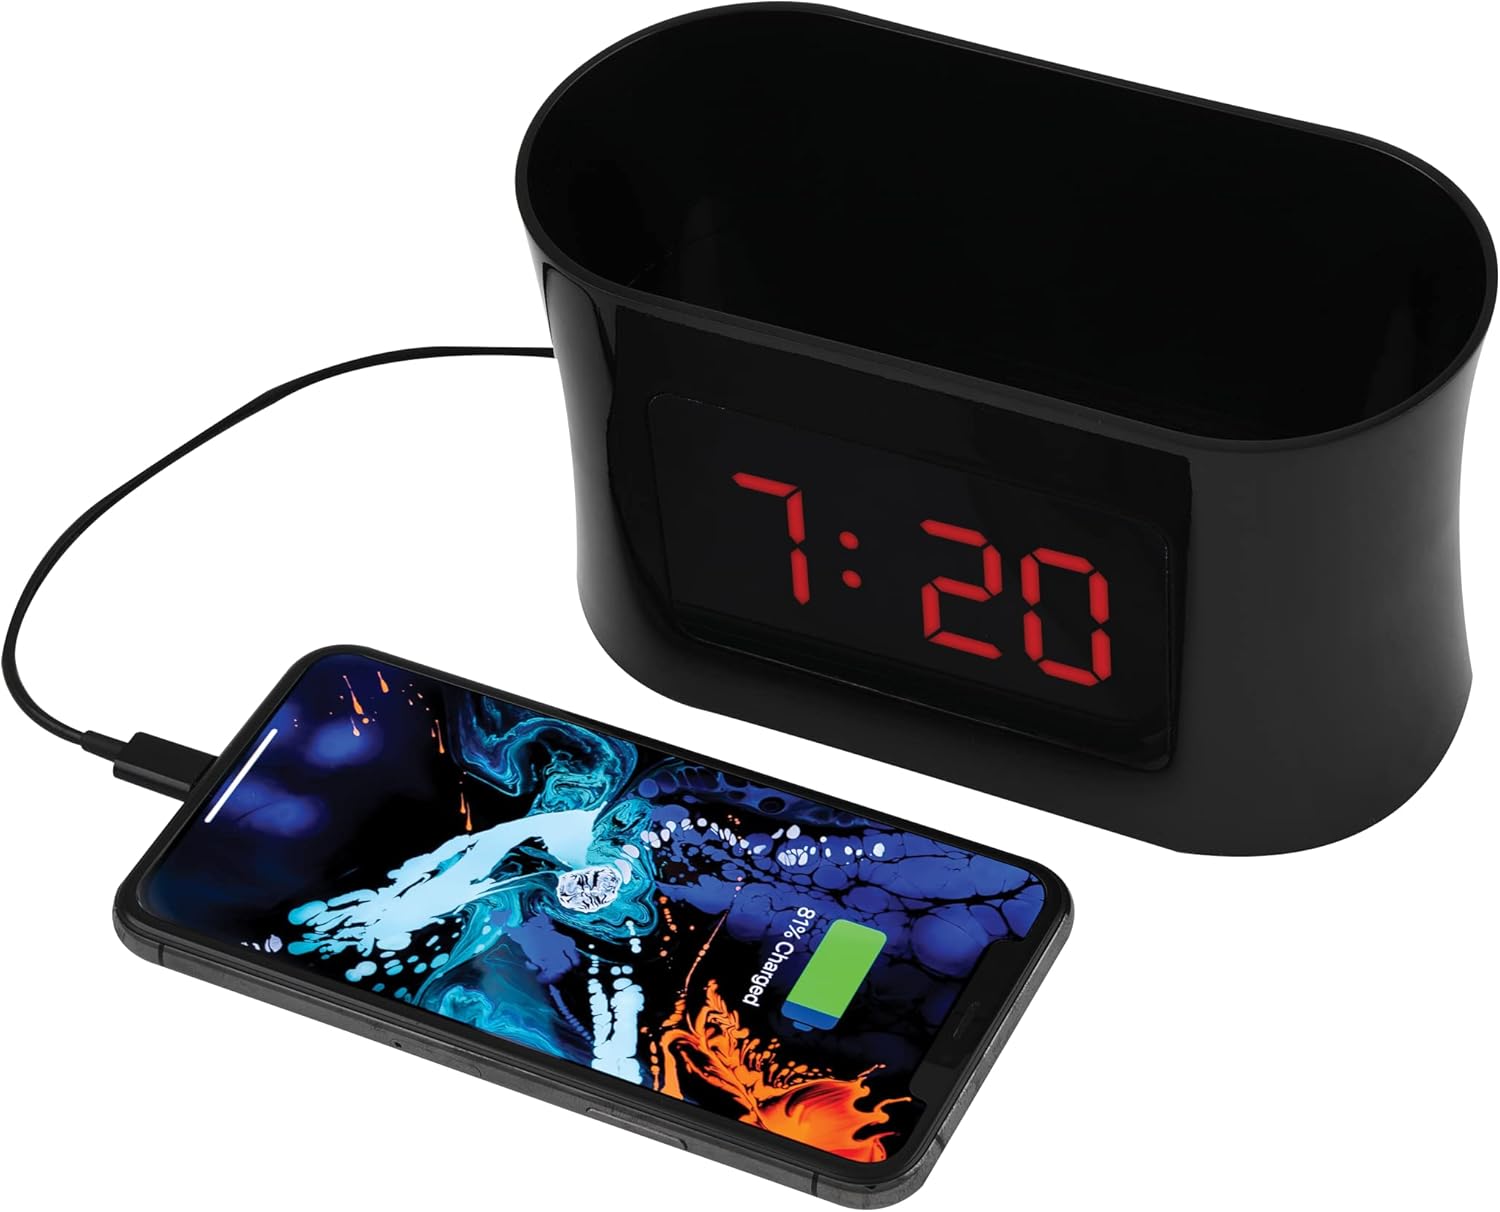
Figure 5: USB Charging. This image shows a smartphone connected to the USB port of the alarm clock caddy, illustrating its charging capability.
Using the Storage Caddy
The top compartment serves as a convenient organizer for small items.
- Place items such as remote controls, eyeglasses, pens, or other small personal devices into the caddy.
- The interior floor is designed with a soft, non-scratch material to protect your belongings.
Manteniment
Cura i Neteja
- Desconnecteu el dispositiu de la presa de corrent abans de netejar-lo.
- Netegeu les superfícies exteriors amb un drap suau i sec.
- No utilitzeu netejadors abrasius, ceres o dissolvents, ja que poden danyar l'acabat.
- Ensure no liquids enter the device's openings.
Resolució de problemes
Refer to the table below for solutions to common issues.
| Problema | Solució |
|---|---|
| Display is blank during a power outage. | The battery backup retains time settings but does not power the display or USB charging port. These functions resume when AC power is restored. |
| Difficulty setting time or alarms. | Assegureu-vos que manteniu premut el botó SET button for 3 seconds to enter time setting mode, or pressing it repeatedly to cycle through alarm settings. Use UP/ABAIX buttons to adjust values. Refer to the 'Operating Instructions' section for detailed steps. |
| La càrrega USB no funciona. | Verify the AC power adapter is securely plugged into both the clock and a working wall outlet. Ensure your device's charging cable is fully inserted into both the clock's USB port and your device. Confirm your device is compatible with 5V/2A charging. |
| Temperature display is incorrect or not showing. | Ensure the device is in a stable indoor environment. If the issue persists, try unplugging and re-plugging the AC adapter to reset the unit. |
Especificacions
| Característica | Detall |
|---|---|
| Marca | RCA |
| Model | RCDC45 |
| Tipus de visualització | LED digital (vermell) |
| Mida de la pantalla | 1-inch tall / 3.25-inch diagonal |
| Control de brillantor | 4 nivells |
| Port de càrrega USB | 5V/2A |
| Alarmes | 3 separate alarms |
| Visualització de la temperatura | Indoor (°F/°C) |
| Font d'alimentació | Alimentat per corrent altern |
| Còpia de seguretat de la bateria | CR2032 (inclòs) |
| Color | Negre |
| Fabricant | Voxx International, Inc |

Figura 6: Dimensions del producte. This image provides the approximate dimensions of the alarm clock caddy, indicating a length of 15.9 cm and a height of 9 cm.
Garantia i Suport
This RCA product is covered by a limited manufacturer's warranty. For specific warranty terms and conditions, please refer to the documentation included with your purchase or contact RCA customer support.
For technical assistance or customer service inquiries, please visit the official RCA website or contact their support line. Contact details are typically found on the product packaging or the manufacturer's weblloc.


