1. Introducció
Thank you for choosing the Karaca BakeXL Bread Maker. This versatile appliance is designed to simplify your baking experience, allowing you to prepare fresh bread, knead dough, make jam, and even yogurt with ease. Your bread maker also comes with a booklet containing 45 different recipes to get you started. Please read this manual thoroughly before first use to ensure safe operation and optimal performance. Keep this manual for future reference.
2. Instruccions de seguretat importants
- Assegureu-vos sempre que l'aparell estigui desendollat abans de netejar-lo o quan no l'utilitzeu.
- No submergiu l'aparell, el cable o l'endoll en aigua o cap altre líquid.
- Mantingueu les mans i els estris allunyats de les parts mòbils durant el funcionament per evitar lesions.
- Do not touch hot surfaces. Use oven mitts when removing the bread pan or handling hot bread.
- Aquest aparell només és per a ús domèstic. No utilitzar a l'aire lliure.
- Ensure the appliance is placed on a stable, heat-resistant surface, away from flammable materials.
- És necessària una supervisió estreta quan qualsevol aparell és utilitzat per o a prop dels nens.
- No feu servir cap aparell amb un cable o un endoll danyats, o després que l'aparell funcioni malament o s'hagi fet malbé de cap manera.
- No utilitzeu accessoris no recomanats pel fabricant, ja que això pot causar lesions.
3. Producte acabatview
Familiarize yourself with the components of your Karaca BakeXL Bread Maker:

Figura 3.1: Exterior view of the Karaca BakeXL Bread Maker. This image shows the sleek black and silver design of the appliance from an angled perspective, highlighting its compact form.

Figura 3.2: Bread Maker with lid open. This view reveals the interior cavity where the bread pan is placed, along with the heating element and the mechanism for the kneading paddles.

Figura 3.3: Bread Maker with the bread pan removed. This image displays the main unit alongside the removable bread pan, illustrating how it detaches for easy cleaning and ingredient loading.
Funcions del tauler de control:

Figura 3.4: Close-up of the control panel. This image provides a clear view of the digital display and various buttons for program selection, loaf size, crust color, and start/stop functions.
- MENÚ: Selects the desired program (e.g., Basic Bread, Whole Wheat, Jam, Yogurt).
- MIDA DEL PAN: Adjusts the loaf weight (e.g., 1000g, 1250g, 1500g).
- COLOR: Sets the crust darkness (Light, Medium, Dark).
- DELAY TIMER (+/-): Sets a delayed start time for baking.
- INICI / PARADA: Initiates or cancels the selected program.
4. Configuració i primer ús
- Unpack the bread maker and all accessories. Remove any packaging materials.
- Netegeu l'exterior de l'aparell amb anunciamp tela.
- Wash the bread pan and kneading paddles with warm, soapy water. Rinse thoroughly and dry completely.
- Insert the kneading paddles onto the shafts at the bottom of the bread pan.
- Place the bread pan into the baking chamber, ensuring it clicks securely into place.
- Position the bread maker on a stable, flat, and heat-resistant surface, ensuring adequate ventilation around the unit.
- For the first use, it is recommended to run the "Bake" program (usually program 12 or similar) for 10 minutes without ingredients to burn off any manufacturing residues. Allow the unit to cool completely afterward.
5. Instruccions de funcionament
General Baking Steps:
- Ensure the kneading paddles are correctly installed in the bread pan.
- Add liquid ingredients first, followed by dry ingredients. Make sure yeast is added last and does not come into direct contact with liquid or salt. Refer to your recipe booklet for precise ingredient order.
- Place the bread pan into the bread maker and close the lid.
- Plug in the appliance. The default program will display.
- Premeu el botó MENÚ button to select your desired program.
- Premeu el botó MIDA DEL PANET button to select the desired loaf weight (e.g., 1000g, 1250g, 1500g).
- Premeu el botó COLOR button to select your preferred crust darkness (Light, Medium, Dark).
- If desired, use the TEMPORIZADOR DE RETARD buttons to set a delayed start.
- Premeu el botó INICI/PARA button to begin the program. The machine will beep, and the timer will start counting down.
- Once the program is complete, the machine will beep multiple times. Unplug the appliance.
- Using oven mitts, carefully remove the bread pan by twisting and lifting it out.
- Invert the pan onto a wire rack to release the bread. If the kneading paddles remain in the bread, remove them carefully with a non-metallic utensil.
- Deixeu refredar el pa sobre una reixeta durant almenys 20-30 minuts abans de tallar-lo.

Figura 5.1: A user selecting settings on the control panel. This image shows a hand pressing one of the control buttons, demonstrating the interactive nature of the bread maker's interface.
Specific Program Notes:
- Bread Programs (Basic, French, Whole Wheat, Sweet, Rapid): These programs handle the entire process from kneading to baking. Follow the recipe booklet for specific ingredient ratios.
- Dough Program: This program kneads and allows the dough to rise, but does not bake it. Ideal for pizza dough, rolls, or pastries that will be baked in a conventional oven.
- Jam Program: Use this program for making homemade jams. Ensure fruits are chopped and sugar is added according to a suitable recipe.
- Yogurt Program: This program maintains a consistent temperature for fermenting yogurt. Follow specific yogurt recipes for best results.
6. Manteniment i Neteja
Regular cleaning ensures the longevity and hygiene of your bread maker.
- Desconnecteu sempre l'aparell i deixeu-lo refredar completament abans de netejar-lo.
- Bread Pan and Kneading Paddles: Remove the bread pan and paddles. Wash them with warm, soapy water using a soft sponge. Do not use abrasive cleaners or metal scouring pads, as this can damage the non-stick coating. Rinse and dry thoroughly.
- Exterior: Netegeu l'exterior de la màquina de fer pa amb un drap suau i sec.amp tela. No utilitzeu productes químics aggressivs ni netejadors abrasius.
- Tapa: La tapa es pot netejar amb anuncisamp cloth. Ensure no water enters the ventilation slots.
- Cambra de cocció: Utilitzeu un suau, damp cloth to wipe the inside of the baking chamber. Remove any crumbs or residue.
- No submergeu mai la unitat principal en aigua ni en cap altre líquid.
7. Solució De Problemes
| Problema | Causa possible | Solució |
|---|---|---|
| El pa no puja. | Expired yeast, incorrect water temperature, too much salt/sugar, yeast in direct contact with liquid/salt. | Check yeast expiry. Use lukewarm water (38-43°C). Ensure ingredients are added in the correct order as per recipe. |
| El pa és massa dens. | Massa farina, massa poc líquid, massa amassat. | Measure ingredients precisely. Ensure correct program is selected. |
| El pa s'esfondra pel mig. | Massa líquid, massa llevat, molta humitat. | Reduce liquid slightly. Ensure correct yeast amount. |
| Kneading paddles stuck in bread. | Ocurrència comuna. | Remove carefully with a non-metallic utensil after bread has cooled. |
| La màquina no arrenca. | Not plugged in, lid not closed properly, program not selected. | Check power connection. Ensure lid is fully closed. Select a program and press START/STOP. |
8. Especificacions
- Marca: ROE
- Número de model: 000001000018219001
- Color: Negre
- Dimensions del producte: 30 cm (profunditat) x 36 cm (amplada) x 46 cm (alçada)
- Pes: 7.22 quilos
- Capacitat: 1500 grams
- Potència/Wattage: 850 watts
- Material: Plàstic
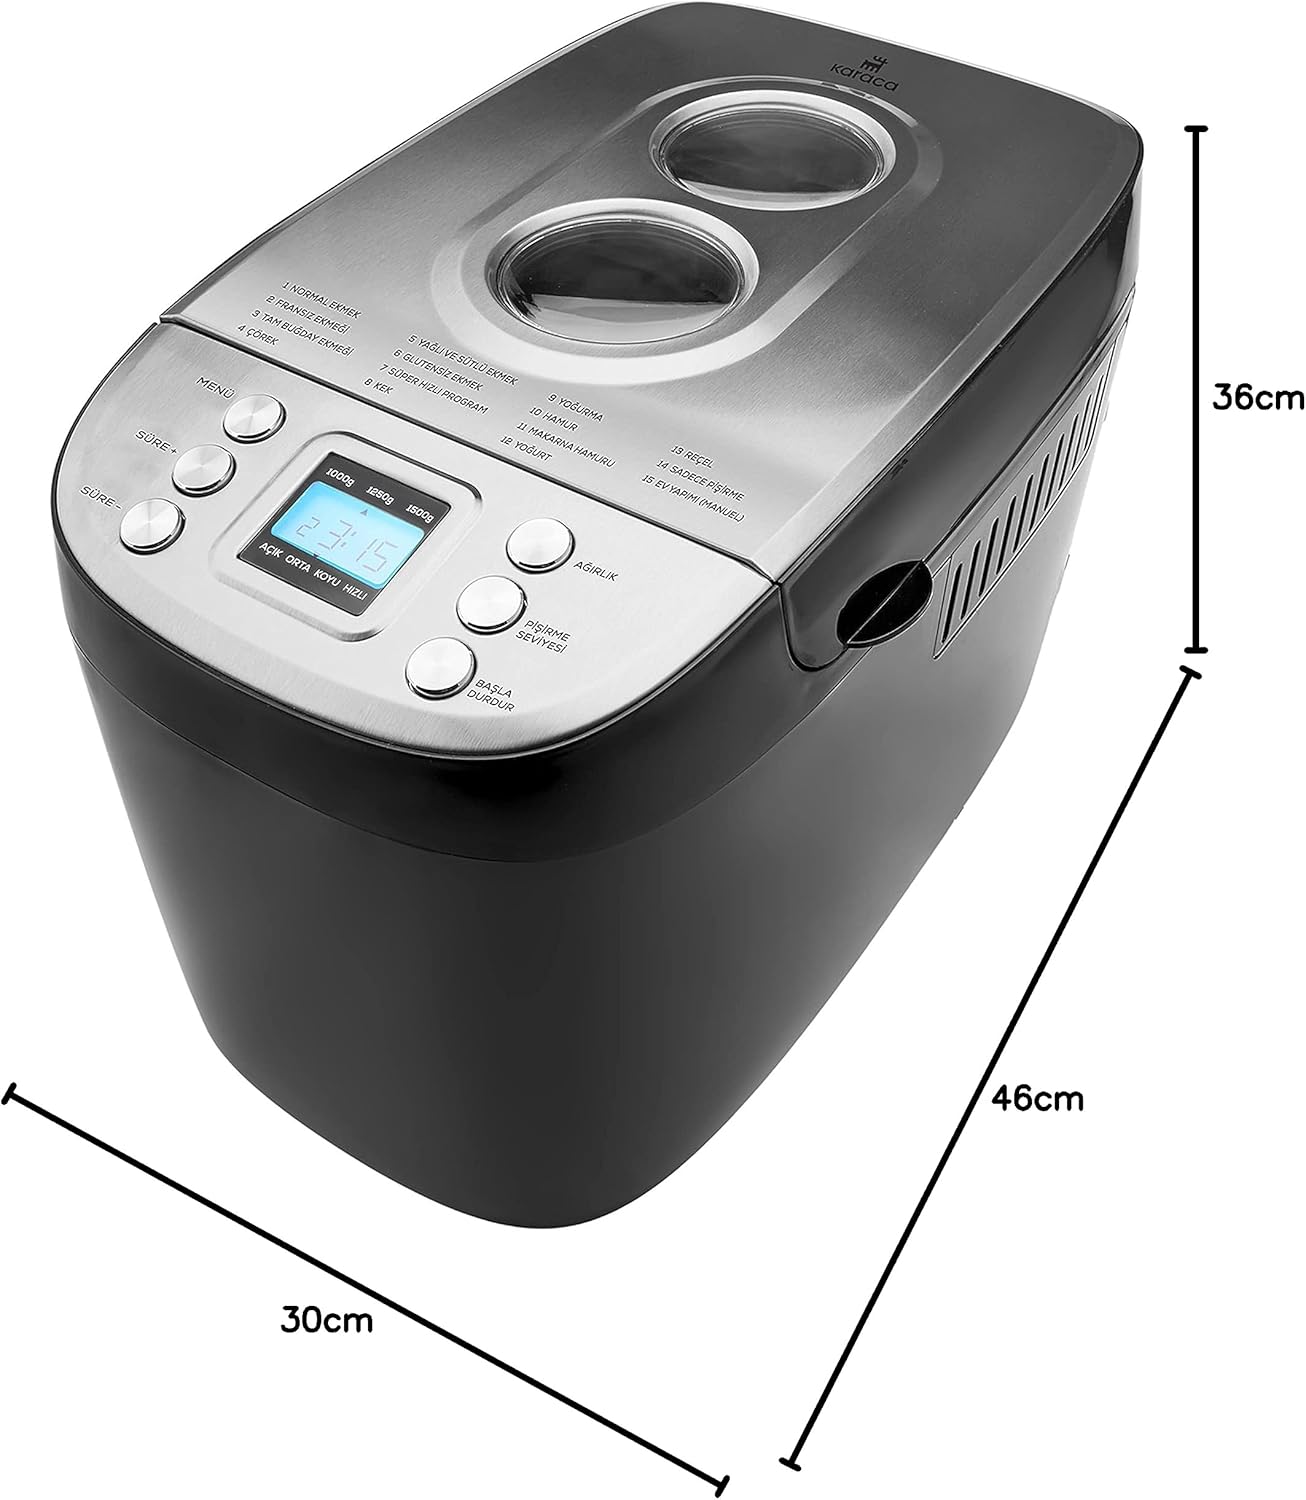
Figura 8.1: Dimensions of the Karaca BakeXL Bread Maker. This image visually represents the depth (30cm), width (36cm), and height (46cm) of the appliance.
9. Garantia i Suport
For warranty information, technical support, or service inquiries, please refer to the warranty card included with your product or visit the official KARACA website. Do not attempt to repair the appliance yourself, as this will void the warranty and may pose safety risks.
Podeu trobar més informació i dades de contacte a KARACA Store on Amazon.


