1. Introducció
Gràcies per la compraasing the DXQ K-1028E Universal Air Conditioner Remote Control. This remote is designed to provide convenient and comprehensive control over a wide range of air conditioning units. Its simple structure, large LCD display, and intelligent features make it an ideal replacement or secondary remote for your AC.
Característiques principals:
- Compatibilitat universal: Controls over 1000 different global air conditioner brands.
- Configuració fàcil: Features a one-button setting for quick configuration.
- Pantalla LCD gran: Provides clear visibility of settings and status.
- Llarga distància de control: Effective range of approximately 8 to 10 meters.
- Disseny humanitzat: Includes built-in clock, ON/OFF timer, and night light functions.
- Baix consum d'energia: Efficient operation for extended battery life.

Image 1.1: Front and angled view of the DXQ K-1028E Universal AC Remote Control.

Image 1.2: The universal remote control demonstrating compatibility with various air conditioning units.
2. Configuració
2.1 Instal·lació de la bateria
El comandament a distància requereix dues (2) piles AAA (no incloses). Segueix aquests passos per instal·lar-les:
- Obriu la tapa del compartiment de la bateria a la part posterior del comandament a distància.
- Introduïu dues piles AAA, assegurant-vos de la polaritat correcta (+ i -) tal com s'indica a l'interior del compartiment.
- Tanqueu bé la tapa del compartiment de la bateria.

Image 2.1: Illustration of battery installation in the remote control.
2.2 Code Setting (Pairing with AC Unit)
There are two methods to set up the remote control with your air conditioner:
Method 1: Manual Code Input
- Turn on your air conditioner manually.
- Refer to the "Applicable Brand and Code List" (Image 2.2) to find the 3-digit code(s) for your AC brand.
- Manteniu premut el botó SET button on the remote control until the 3-digit code on the LCD display starts flashing.
- Utilitza el Temperatura + or Temperatura - buttons to adjust the code until your brand's code appears.
- Un cop es mostri el codi correcte, premeu la tecla OK button to confirm. The code will stop flashing.
- Test the remote control by pressing the ON/OFF button. If the AC unit responds, the setup is complete. If not, try the next code for your brand or proceed to Method 2.
Method 2: Automatic Code Search
- Ensure your air conditioner is turned on manually.
- Point the remote control towards the AC unit.
- Manteniu premut el botó SET button for approximately 6 seconds until the 3-digit code on the LCD display starts flashing and automatically cycles through codes.
- Observe your AC unit. When the AC unit responds (e.g., turns off, changes mode, or makes a sound), immediately release the SET botó.
- Premeu el botó OK botó per confirmar el codi.
- Test the remote control by pressing various function buttons. If the AC unit responds correctly, the setup is complete. If not, repeat the automatic search process.
Nota: For some popular brands, the remote may work directly after battery installation without needing to set a code.

Image 2.2: Applicable Brand and Code List for the K-1028E remote.
3. Instruccions de funcionament
3.1 Remote Control Layout and Functions
Familiarize yourself with the buttons and display on your K-1028E remote control:
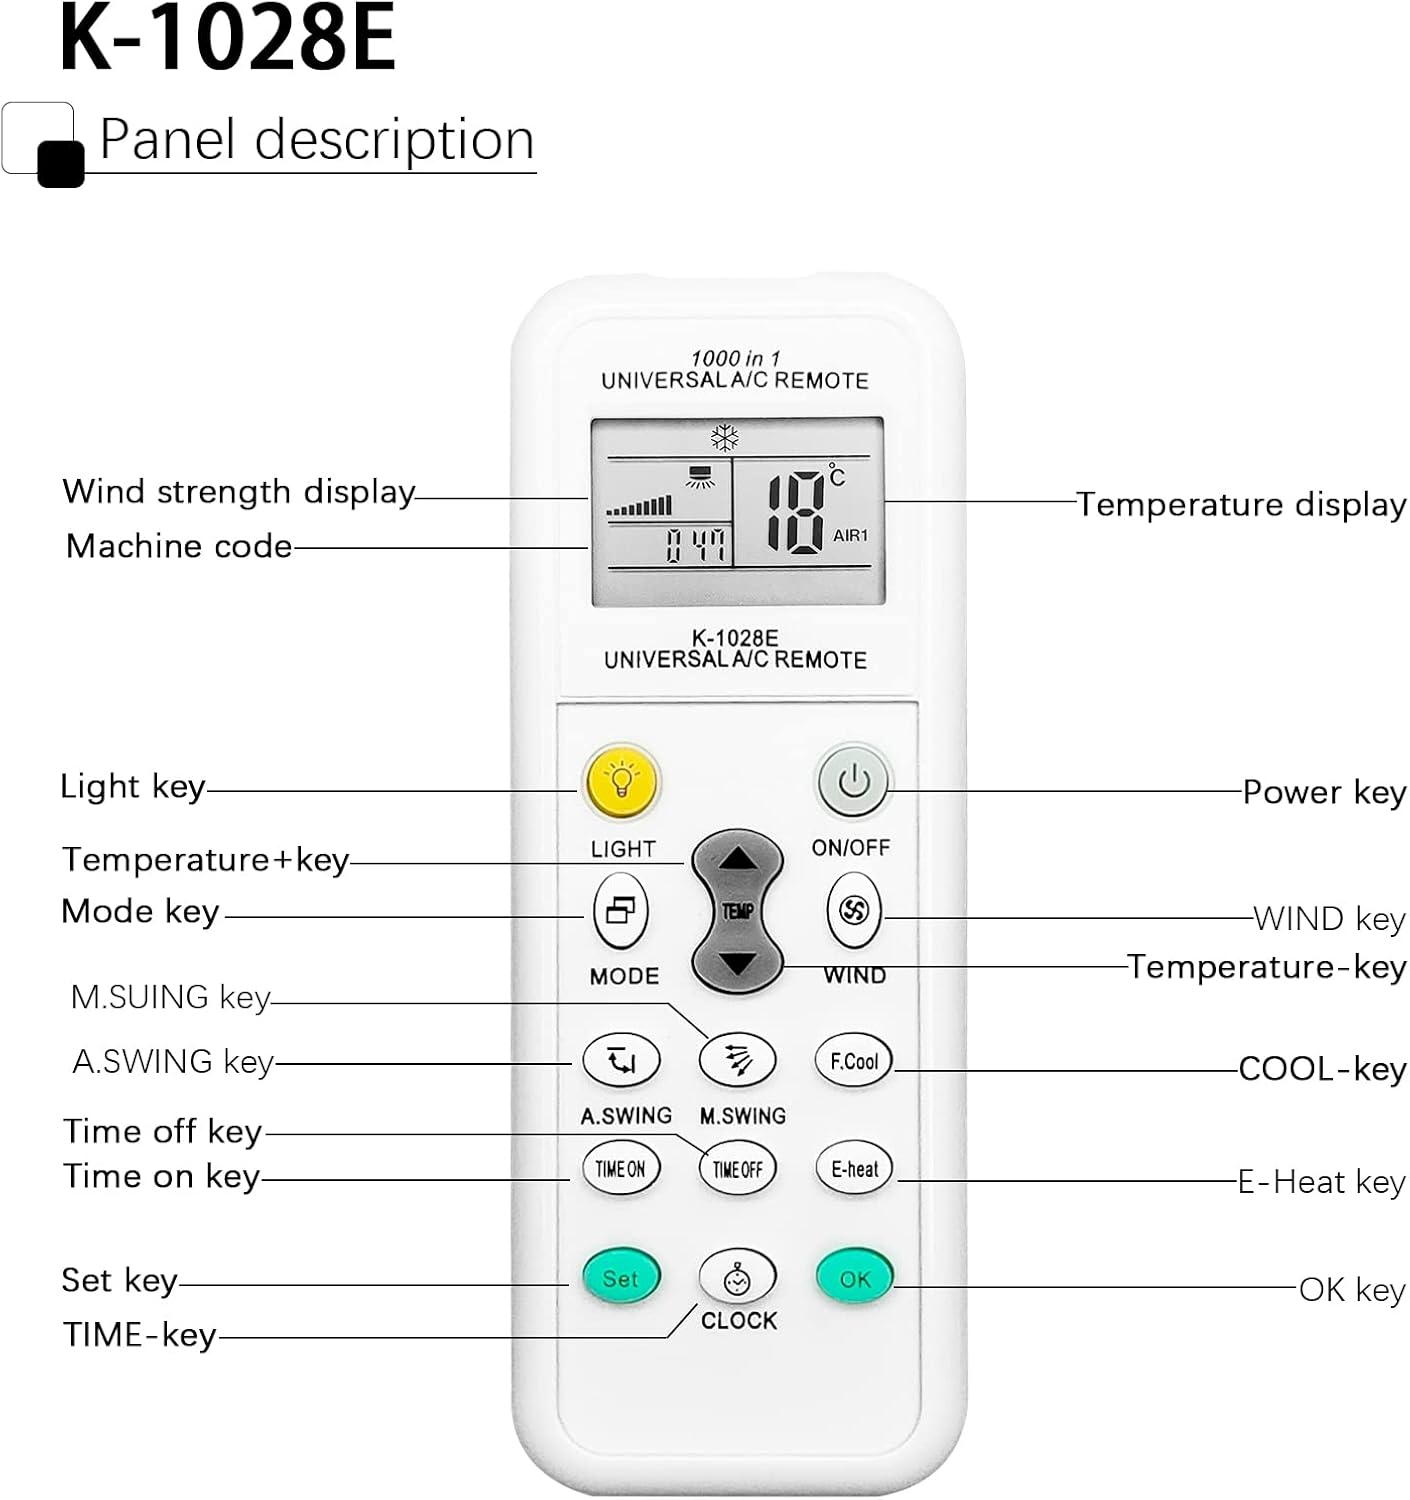
Image 3.1: Panel Description of the K-1028E Universal AC Remote.
- Pantalla LCD: Shows temperature, mode, fan speed, timer status, and machine code.
- LIGHT Key: Activates the built-in night light function.
- Tecla ON/OFF: Encén o apaga la unitat de CA.
- Tecla MODE: Canvia pels modes de funcionament (per exemple, Refrigeració, Calefacció, Ventilador, Deshidratació, Automàtic).
- TEMP + / TEMP - Keys: Ajusta la configuració de temperatura.
- WIND Key: Ajusta la velocitat del ventilador (Automàtic, Baixa, Mitjana, Alta).
- A.SWING / M.SWING Keys: Controls the vertical (A.SWING) and horizontal (M.SWING) swing of the air deflector.
- F.Cool Key: Activates the fast cool mode (if supported by AC).
- E-Heat Key: Activates the electric heat mode (if supported by AC).
- TIME ON / TIME OFF Keys: Sets the automatic power-on or power-off timer.
- CLOCK Key: Estableix l'hora actual.
- Clau SET: Used for code setting (as described in Section 2.2).
- Tecla D'acord: Confirma la configuració.
3.2 Funcionament bàsic
- Encès/apagat: Premeu el botó ON/OFF botó.
- Seleccioneu el mode: Premeu el botó MODE button repeatedly to cycle through available modes (e.g., Cool, Heat, Fan, Dry, Auto). The selected mode will be displayed on the LCD.
- Ajustar la temperatura: Utilitza el TEMP + or TEMP - botons per configurar la temperatura desitjada.
- Ajustar la velocitat del ventilador: Premeu el botó VENT per anar canviant les opcions de velocitat del ventilador.
- Control de la direcció del flux d'aire: Ús A.SWING i M.SWING buttons to adjust the louver direction.

Image 3.2: Remote control effective distance and available operating modes.
3.3 Funcions del temporitzador
The remote control allows you to set a timer for the AC unit to automatically turn on or off.
- Configuració de l'hora actual: Premeu el botó RELOJ button. The time display will flash. Use TEMP + or TEMP - per ajustar l'hora i, a continuació, premeu RELOJ again to adjust minutes. Press OK per confirmar.
- Setting ON Timer: Premeu el botó TEMPS ACTIVAT button. The time display will flash. Use TEMP + or TEMP - to set the desired power-on time. Press OK per confirmar.
- Setting OFF Timer: Premeu el botó TEMPS LLIURE button. The time display will flash. Use TEMP + or TEMP - to set the desired power-off time. Press OK per confirmar.
- Canceling Timer: Premeu el corresponent TEMPS ACTIVAT or TEMPS LLIURE de nou el botó i, a continuació, premeu OK.

Image 3.3: The remote's time switch function for automated operation.
4. Manteniment
4.1 Substitució de la bateria
When the remote control's display becomes dim or the remote becomes unresponsive, it's time to replace the batteries. Follow the battery installation steps in Section 2.1.
- Substituïu sempre les dues bateries al mateix temps.
- No barregeu piles velles i noves, o diferents tipus de piles.
- Traieu les piles si no heu d'utilitzar el comandament a distància durant un període prolongat per evitar fuites.
- Eliminar les bateries usades de manera responsable d'acord amb la normativa local.
4.2 Neteja
Per netejar el comandament a distància, feu servir un drap suau i sec. No utilitzeu netejadors líquids, esprais ni materials abrasius, ja que poden danyar la superfície o els components interns del comandament a distància.
5. Solució De Problemes
| Problema | Causa possible | Solució |
|---|---|---|
| Remote does not work or AC does not respond. | Incorrect code setting; Dead or weak batteries; Obstruction between remote and AC unit; Remote not pointed correctly. | Re-perform code setting (Section 2.2); Replace batteries; Remove any obstructions; Ensure remote is pointed directly at the AC unit's receiver. |
| Limited control distance. | Weak batteries; Obstruction; Interference. | Replace batteries; Ensure clear line of sight to AC unit; Avoid strong light sources or other infrared devices. |
| Algunes funcions no funcionen. | AC unit does not support the function; Incorrect code. | Not all AC units support every function (e.g., F.Cool, E-Heat). Verify if your AC unit has this feature. Try another code for your brand (if available). |
| La pantalla LCD està tènue o en blanc. | Bateries baixes. | Substituïu les piles. |
6. Especificacions
| Característica | Especificació |
|---|---|
| Marca | DXQ |
| Número de model | K-1028E |
| Color | Blanc |
| Tecnologia de connectivitat | infrarojos |
| Dispositius compatibles | Aire condicionat |
| Interval màxim | 10 metres (aprox. 33 peus) |
| Nombre de botons | 20 |
| Font d'alimentació | 2 piles AAA (no incloses) |
| Pes de l'article | 30 grams |
7. Garantia i Suport
7.1 Informació de la garantia
Specific warranty information for this product is not available in the provided documentation. Please refer to the seller or manufacturer's weblloc web per obtenir més informació sobre la cobertura i els termes de la garantia.
7.2 Atenció al client
If you encounter any issues or have questions not covered in this manual, please contact the seller or manufacturer's customer support. Keep your purchase receipt or order details handy for faster service.


