1. Introducció i informació de seguretat
This instruction manual provides important information for the safe operation, assembly, maintenance, and troubleshooting of your Arebos 500W Bench Drill Press. Read and understand all instructions before using the tool. Keep this manual for future reference.
Advertències generals de seguretat per a eines elèctriques
- Seguretat de l'àrea de treball: Mantingueu la zona de treball neta i ben il·luminada. Les zones desordenades o fosques conviden als accidents. No feu servir eines elèctriques en atmosferes explosives, com ara en presència de líquids, gasos o pols inflamables.
- Seguretat elèctrica: Els endolls de les eines elèctriques han de coincidir amb la presa de corrent. No modifiqueu mai l'endoll de cap manera. Eviteu el contacte corporal amb superfícies connectades a terra.
- Seguretat personal: Porteu sempre protecció ocular. Feu servir protecció auditiva quan feu servir eines sorolloses. Vestiu-vos correctament; eviteu roba ampla o joies. Assegureu-vos els cabells llargs.
- Ús i cura de l'eina: No forceu l'eina elèctrica. Feu servir l'eina elèctrica adequada per a la vostra aplicació. Desconnecteu l'endoll de la font d'alimentació abans de fer qualsevol ajust, canviar accessoris o guardar eines elèctriques.
- Specific Drill Press Safety: Always secure the workpiece firmly using the provided vise or clamps. Never hold the workpiece by hand. Ensure the drill bit is securely tightened in the chuck.
2. Producte acabatview
The Arebos 500W Bench Drill Press is designed for precise drilling in various materials such as wood, metal, and plastics. It features a powerful motor, an integrated laser for accurate positioning, and an adjustable work table.

Figura 2.1: Mésview of the Arebos 500W Bench Drill Press with its main components and the included vise.
Característiques principals:
- Potent motor de 500 W: Proporciona ample power for drilling through various materials.
- Integrated Positioning Laser: Ensures precise alignment of the drill bit with the workpiece.
- 13mm Geared Chuck: Offers strong and stable grip for drill bits.
- 5 velocitats variables: Adjustable speeds from 550 to 2500 RPM for optimal drilling performance across different materials.
- Adjustable Work Table: Can be adjusted in height and tilted from 0-45 degrees for angled drilling.
- Construcció robusta de ferro colat: Ensures durability, stability, and resistance to torsion.
- Included Vise: For securely clamping small workpieces.

Figure 2.2: The drill press highlighting its 500W motor, adjustable table, and 5-speed capability.
3. Muntatge i muntatge
The Arebos Bench Drill Press requires some assembly before first use. Follow these steps carefully.
3.1 Desembalatge i comprovació de components
Carefully remove all components from the packaging. Verify that all parts are present and undamaged. Refer to the parts list in your packaging for a complete inventory.
3.2 Passos de muntatge
- Muntatge de la base i la columna: Securely attach the column to the base using the provided fasteners. Ensure it is stable and upright.
- Headstock Installation: Mount the headstock onto the top of the column. Tighten all securing bolts.
- Work Table Attachment: Slide the work table assembly onto the column and secure it at a comfortable working height.
- Instal·lació del mandril: Insert the 13mm geared chuck onto the spindle. Use a rubber mallet to gently tap it into place, ensuring a firm fit.
- Instal·lació del mànec: Attach the feed handles to the headstock.
- Vise Attachment: The included vise can be bolted onto the work table. A 13mm spanner (not provided) may be required for tightening.
- Laser Battery Installation: The integrated laser requires batteries. Locate the laser switch compartment, typically by pressing a plastic catch at the bottom to open it, and insert the required batteries.

Figura 3.1: Detallada views of the chuck, laser mechanism, and the belt drive system for speed adjustment.
4. Funcionament
Follow these instructions for safe and effective operation of your drill press.
4.1 Basic Drilling Procedure
- Seleccioneu la broca: Choose the appropriate drill bit for your material and desired hole size. Insert it into the 13mm chuck and tighten securely using the chuck key.
- Adjust Work Table: Adjust the work table height to ensure the drill bit can pass through the workpiece without hitting the base. Secure the table firmly.
- Peça de treball segura: Place the workpiece on the work table. Use the included vise or other clamps to firmly secure the workpiece. Never hold the workpiece by hand.
- Activa el làser: Turn on the integrated laser to project crosshairs onto the workpiece, indicating the drill point. Adjust the workpiece position until the laser crosshairs align with your desired drilling location.
- Establir velocitat: Adjust the drilling speed according to the material and drill bit size (refer to Section 4.2).
- Començar la perforació: Turn on the drill press. Slowly lower the drill bit into the workpiece using the feed handles. Apply steady, even pressure.
- Complete Drilling: Once the hole is drilled, retract the drill bit from the workpiece. Turn off the drill press.

Figure 4.1: The drill press actively drilling into a metal workpiece, held securely by the vise.

Figure 4.2: The integrated laser guiding the drill bit for accurate hole placement.
4.2 Ajust de velocitat
The drill press offers 5 variable speeds (550, 900, 1300, 1800, 2500 RPM) by adjusting the belt position on the motor and spindle pulleys. To change speeds:
- Ensure the drill press is unplugged from the power source.
- Open the belt housing cover located on top of the headstock.
- Loosen the motor tensioning bolt to slacken the belt.
- Move the belt to the desired pulley combination for the required speed. Refer to the speed chart inside the belt housing cover.
- Re-tension the belt by tightening the motor tensioning bolt. The belt should be taut but not overly tight.
- Close the belt housing cover.
4.3 Work Table Adjustment
The work table can be adjusted for height and tilt.
- Ajust d'alçada: Loosen the table locking handle on the column. Use the crank handle to raise or lower the table to the desired height. Re-tighten the locking handle.
- Ajust d'inclinació: Loosen the tilt locking bolt beneath the table. Tilt the table to the desired angle (0-45 degrees). Re-tighten the tilt locking bolt.

Figure 4.3: The drill press with its work table adjusted to a different height, holding a workpiece with the vise.
5. Manteniment
Un manteniment regular garanteix la longevitat i el rendiment òptim del vostre trepant de columna.
- Neteja: After each use, clean the drill press to remove dust, chips, and debris. Use a brush or vacuum cleaner. Do not use solvents that may damage plastic parts.
- Lubricació: Periodically apply a light machine oil to moving parts such as the column, spindle, and feed mechanism to ensure smooth operation.
- Inspecció del cinturó: Regularly check the drive belt for wear, cracks, or damage. Replace if necessary. Ensure proper belt tension.
- Manteniment del mandril: Keep the chuck jaws clean and free of debris. Apply a small amount of lubricant to the chuck key mechanism if it becomes stiff.
- Cable elèctric: Inspect the power cord for any signs of damage. Do not use the tool if the cord is damaged.
6. Solució De Problemes
Aquesta secció tracta els problemes habituals que podeu trobar amb el vostre trepant de columna.
| Problema | Causa possible | Solució |
|---|---|---|
| La premsa de perforació no arrenca | Sense subministrament d'alimentació; Interruptor defectuós; Sobrecàrrega del motor. | Check power connection and circuit breaker; Inspect switch; Allow motor to cool. |
| Vibracions o sorolls excessius | Components solts; Corretja desgastada; Broca desequilibrada. | Tighten all fasteners; Inspect and replace belt; Use a balanced drill bit. |
| Inaccurate drilling / Drill bit wobbles | Loose chuck; Bent drill bit; Spindle runout. | Ensure chuck is tightly secured; Replace bent drill bit; Contact service if spindle is damaged. |
| El làser no funciona | Dead batteries; Loose connection. | Replace laser batteries (in switch compartment); Check connections. |
7. Especificacions
Technical data for the Arebos 500W Bench Drill Press.
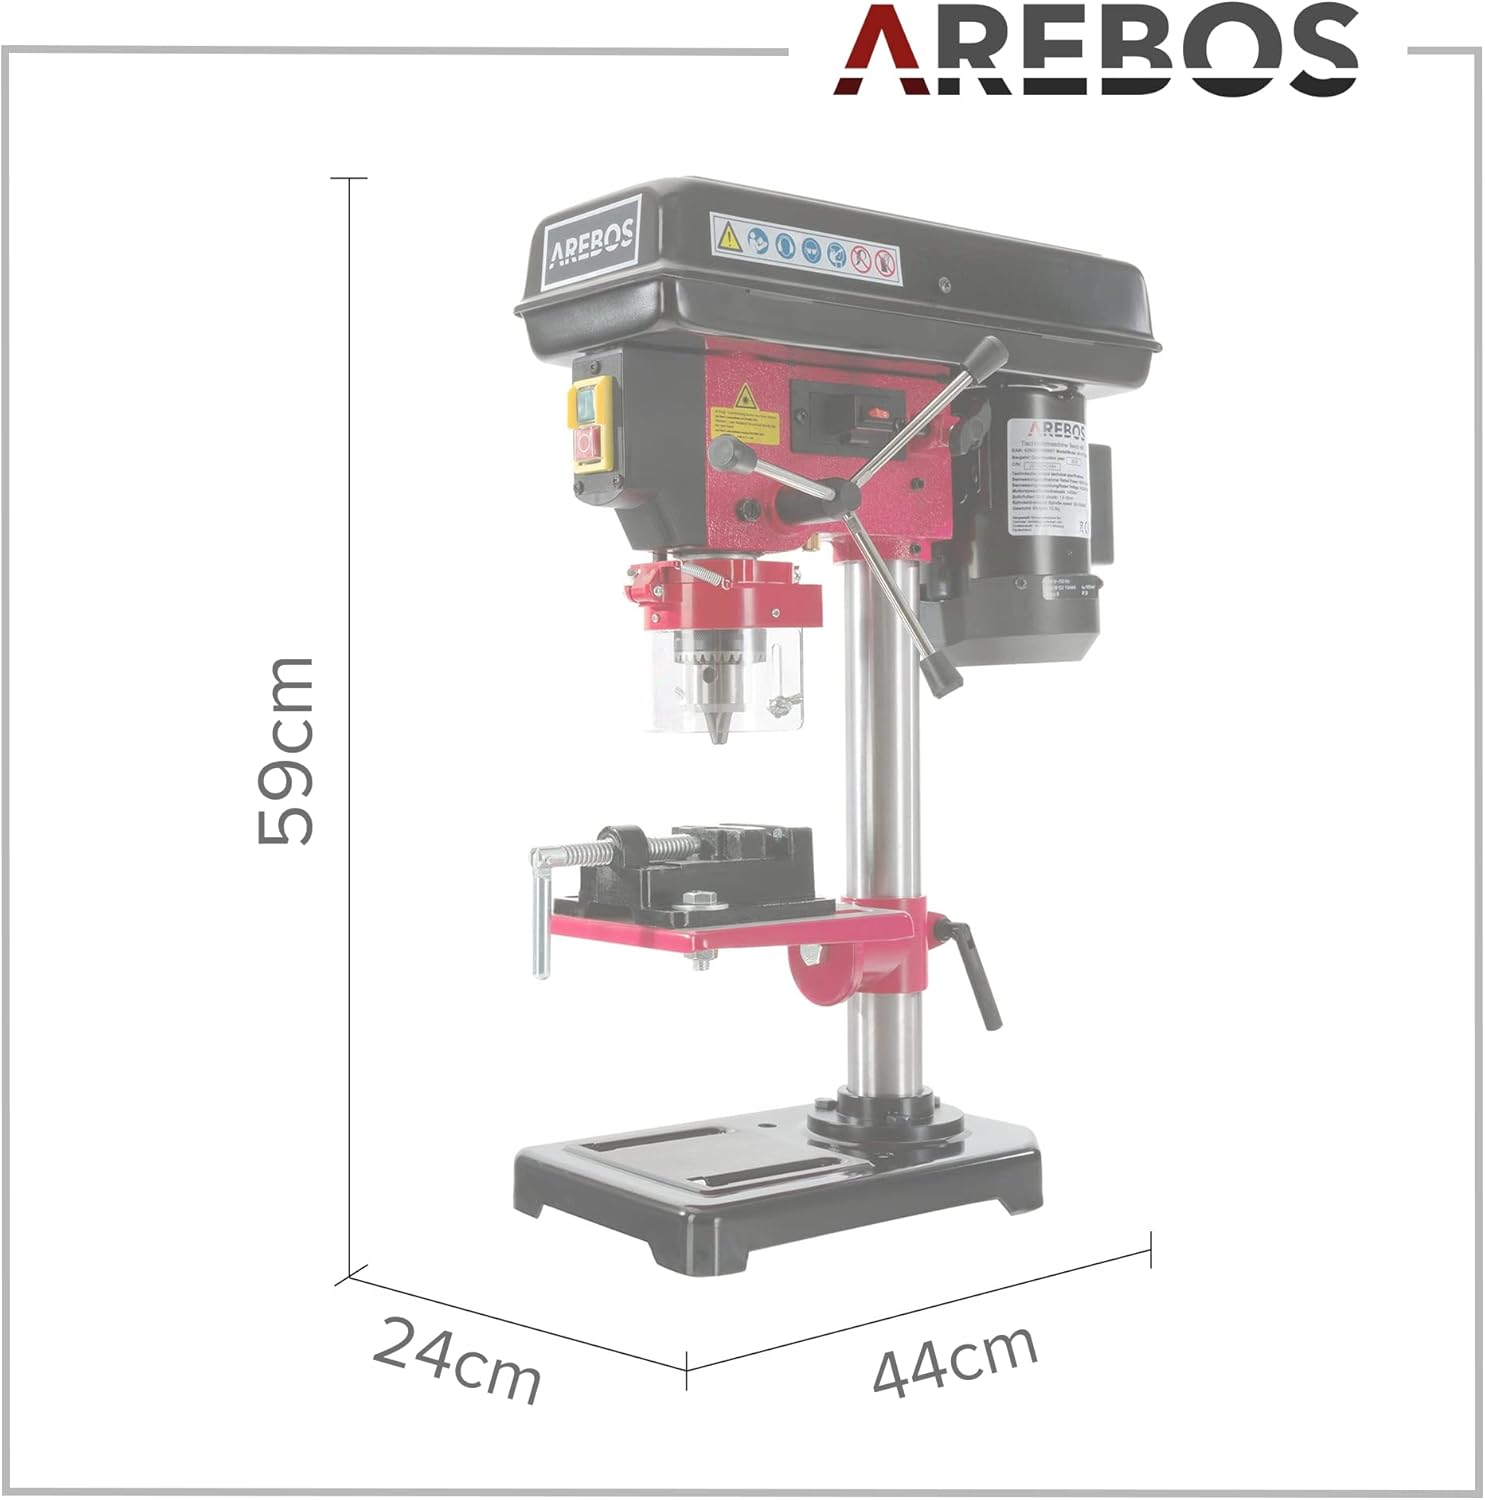
Figure 7.1: Overall dimensions of the Arebos Bench Drill Press.
| Especificació | Valor |
|---|---|
| Marca | Arebos |
| Model | 500W Bench Drill Press |
| Poder | 500 watts |
| Voltage | Not specified (typically 230V for EU market) |
| Ampfuria | 14 A |
| Nombre de velocitats | 5 |
| Interval de velocitat | 550 - 2500 rpm |
| Mida del mandril | 13 mm |
| Angle d'inclinació de la taula | 0-45° |
| Material | Ferro colat |
| Dimensions (L x A x A) | 44 x 24 x 59 cm |
| Longitud del cable | 1.5 metres |
| Components inclosos | Vise |
| Fabricant | Canbolat Vertriebs GmbH |
| País d'origen | Xina |
8. Garantia i Suport
For warranty information, technical support, or spare parts inquiries, please contact the manufacturer or your point of purchase. Keep your purchase receipt as proof of purchase.
Manufacturer: Canbolat Vertriebs GmbH


