1. Introducció
Thank you for choosing the RELIFE RL-062A Manual Glue Gun. This manual provides essential information for the proper setup, operation, and maintenance of your device. Please read these instructions carefully before use to ensure safe and efficient application of various liquid materials.
2. Producte acabatview
The RELIFE RL-062A is a manual glue gun designed for precise and smooth application of various liquids, such as syringe oil, solder paste, UV solder mask oil, and structural adhesives. Its ergonomic design ensures comfortable use, and the durable push rod mechanism provides consistent performance.
Característiques principals:
- Ergonomic design for comfortable handling during extended use.
- Enables precise and smooth application of liquid materials.
- Lightweight construction for ease of use and storage.
- Includes two different size needles (1.2mm and 0.8mm) to accommodate various liquid viscosities and application needs.
- Durable push rod design ensures a long operational lifespan.

Figure 1: RELIFE RL-062A Manual Glue Gun. This image shows the overall design of the blue manual glue gun with the RELIFE RL-062A branding visible on its side.

Figure 2: Needle Booster features. This image highlights the key benefits of the glue gun, including smooth and even force application, time-saving operation, comfortable handling, and the inclusion of two different needle specifications.
3. Instruccions de configuració
Follow these steps to properly set up your RELIFE RL-062A Manual Glue Gun for use.
- Prepare the Push Rod: First, push up the buckle located at the end of the glue gun. Insert the push rod from the front to install it, ensuring the card slot is pushed upward.
- Insert the Glue Cartridge: Align the end of the rubber cylinder (glue cartridge) with the card slot on the glue gun. Press down, lift the buckle, and then push the push rod into the needle cylinder of the cartridge.
- Install the Needle: Remove the barrel seal from the glue cartridge and securely install one of the provided needles (1.2mm or 0.8mm) onto the cartridge tip.

Figure 3: Step-by-step setup and operation. This image illustrates the four main steps: 1. Installing the push rod, 2. Inserting the glue cartridge, 3. Attaching the needle, and 4. Adjusting grip for use.
4. Funcionament
Once the glue gun is set up with the desired liquid cartridge and needle, you can begin application.
- Adjust Holding Posture: Hold the glue gun comfortably in your hand. The ergonomic design allows for a natural grip.
- Aplicar pressió: Gently squeeze the trigger to dispense the liquid. The push rod mechanism ensures a smooth and even flow. Adjust pressure as needed for the desired amount and flow rate.
- Aplicació precisa: Utilize the fine needle tip for precise application on small components or intricate areas.

Figure 4: Comfortable grip and cartridge fitting. This image demonstrates the ergonomic design for comfortable holding and shows how the glue cartridge fits into the device, along with the two different needle sizes.
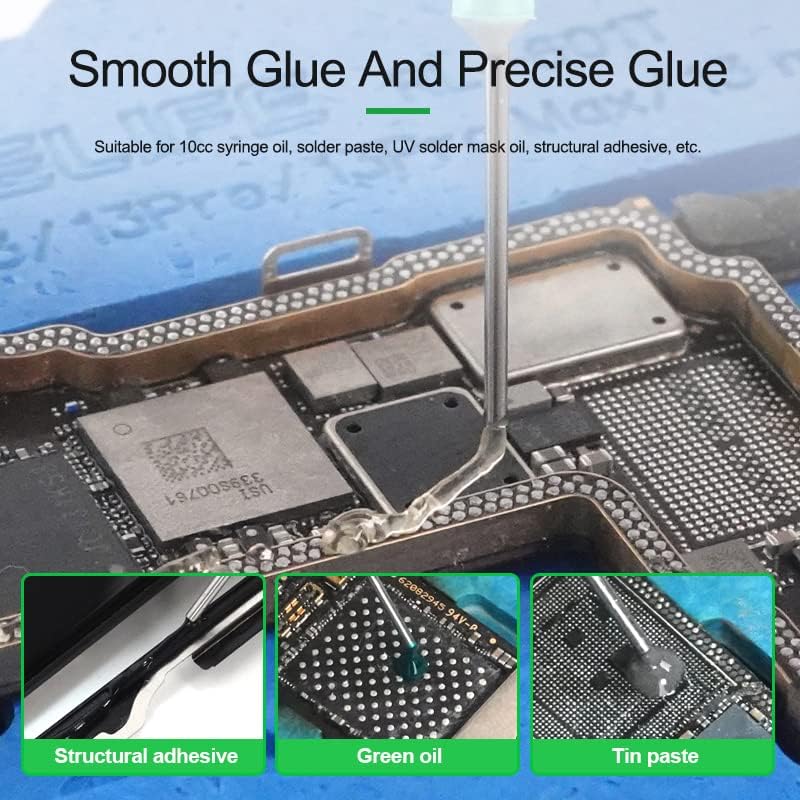
Figura 5: Examples of smooth and precise application. This image illustrates the glue gun's capability for applying various materials like structural adhesive, green oil, and tin paste with precision on electronic components.
5. Manteniment
Proper maintenance ensures the longevity and optimal performance of your RELIFE RL-062A Manual Glue Gun.
- Neteja del broquet: After each use, especially when changing materials or storing the gun, clean any residual material from the needle tip to prevent clogging. Use an appropriate solvent if necessary, depending on the material used.
- Emmagatzematge: Store the glue gun in a clean, dry place away from direct sunlight and extreme temperatures. Remove any loaded cartridges before long-term storage.
- Inspecció: Periodically inspect the push rod and trigger mechanism for any signs of wear or damage. Ensure the buckle operates smoothly.
6. Solució De Problemes
If you encounter issues with your glue gun, consider the following common solutions:
- No Material Dispensing:
- Check if the cartridge is properly seated and the push rod is engaged.
- Ensure the needle tip is not clogged. Clean if necessary.
- Verify that the material in the cartridge is not solidified or expired.
- Uneven Flow:
- Ensure the needle is securely attached and not partially blocked.
- Apply consistent pressure to the trigger.
7. Especificacions
| Característica | Detall |
|---|---|
| Número de model | RL-062A |
| Dimensions | 13.5 x 5 x 5 cm |
| Pes de l'article | 150 g (0.15 quilograms) |
| Font d'alimentació | Manual |
| Needle Tip Sizes | 1.2mm, 0.8mm (included) |
| Material compatible | Fabric, Paper, Plastic, Wood (and various liquid adhesives/pastes) |
| Color | Blau |
8. Garantia i Suport
For information regarding warranty coverage or technical support, please refer to the documentation provided with your purchase or contact the retailer where the product was acquired.


