1. Introducció
The QNAP TVS-h474-PT-8G-US is a high-performance 4-bay desktop Network Attached Storage (NAS) solution designed for small to medium-sized businesses (SMBs). It features an Intel Pentium Gold dual-core processor and 8GB DDR4 RAM, providing a secure, reliable, and efficient platform for data storage, sharing, and management. This manual provides essential information for setting up, operating, and maintaining your NAS device.
Característiques principals:
- Intel Pentium Gold G7400 2-core/4-thread 3.7 GHz processor and 8GB DDR4 RAM (up to 64GB)
- Dual M.2 PCIe Gen3x2 NVMe SSD slots for cache acceleration or SSD storage pools
- Dual 2.5GbE (2.5G/1G/100M) ports for accelerated file sharing and large file transferències
- Multiple USB 3.2 Gen 2 ports (Type-A & Type-C) with up to 10Gb/s transfer speeds
- 4K media playback and real-time transcoding via HDMI 1.4b (4K @30Hz) output
- PCIe Gen 4 expandability for 10/25GbE connectivity
- Business-class backup center supporting cloud data and VM backup/restore
2. Contingut del paquet
Verifiqueu que tots els elements siguin presents al paquet:
- QNAP TVS-h474-PT-8G-US NAS Unit
- Adaptador d'alimentació
- Cable d'alimentació
- Cable Ethernet (Cat 5e)
- Hard Drive Screws
- Drive Bay Keys
- Guia d'instal·lació ràpida
- Informació de la garantia
3. Producte acabatview
The QNAP TVS-h474-PT-8G-US features a compact and robust design, integrating seamlessly into various environments. Below are visual representations of the device's exterior and internal components.

Imatge 3.1: Davant view of the QNAP TVS-h474-PT-8G-US NAS, showing the four drive bays, status indicators, USB port, and power button.
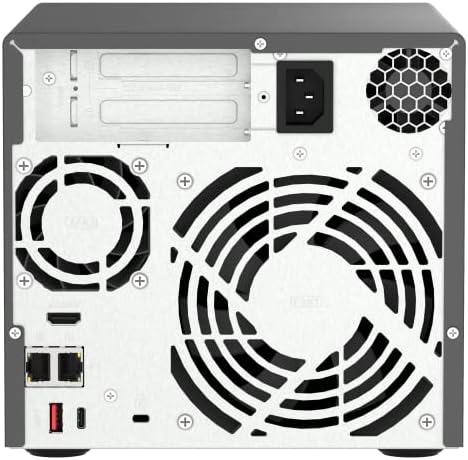
Imatge 3.2: posterior view of the QNAP TVS-h474-PT-8G-US NAS, highlighting the dual 2.5GbE ports, USB ports, HDMI output, and cooling fan.

Imatge 3.3: Interna view of the QNAP TVS-h474-PT-8G-US NAS, showing the motherboard, CPU heatsink, and fan assembly.
Vídeo 3.1: Un producte oficial acabatview presentació de vídeoasing the QNAP TVS-h474-PT-8G-US NAS from various angles, highlighting its design and key features.
4. Instal·lació de maquinari
Instal·lació de discs durs:
- Unlock and Remove Drive Tray: Use the provided key to unlock the desired drive bay. Press the release latch and pull the drive tray out of the NAS unit.
- Instal·leu el disc dur: Place your 3.5-inch or 2.5-inch SATA hard drive (HDD) or solid-state drive (SSD) into the drive tray. Secure it with the provided screws. For 3.5-inch HDDs, typically no screws are needed as the tray's side clips will hold it in place. For 2.5-inch drives, use the smaller screws.
- Insert Drive Tray: Carefully slide the loaded drive tray back into the empty bay until it clicks into place. Ensure it is fully seated.
- Lock Drive Tray (Optional): Use the key to lock the drive tray for added security.
Vídeo 4.1: A demonstration of installing hard drives into a 4-bay NAS, showing the tool-free installation process for 3.5-inch drives and securing 2.5-inch drives with screws.
Vídeo 4.2: This video illustrates the process of installing hard drives into the NAS bays, emphasizing the ease of hot-swapping drives if needed.
5. Configuració inicial
Connecting the NAS:
- Connecteu el cable de xarxa: Connect one end of the provided Ethernet cable to a 2.5GbE port on the rear of the NAS and the other end to your router or network switch.
- Connectar l'alimentació: Connect the power adapter to the DC-in port on the rear of the NAS, then plug the power cord into an electrical outlet.
- Encès: Press the power button on the front panel of the NAS. The system will begin booting up.
Software Installation (QTS Smart Installation):
Once the NAS is powered on and connected to your network, you can proceed with the software installation using the QTS Smart Installation system. This process typically involves:
- Accessing the NAS via a web navegador en un ordinador connectat a la mateixa xarxa.
- Following on-screen prompts to initialize disks, set up RAID configurations, and create user accounts.
- Updating the firmware to the latest available version for optimal performance and security.
Vídeo 5.1: A video demonstrating the QTS Smart Installation system, guiding users through the initial setup process and firmware updates.
6. Funcionament del NAS
The QNAP TVS-h474-PT-8G-US runs on the QTS operating system, providing a user-friendly interface for managing your data and applications.
File Management and Sharing:
- Utilitza el File Station application to browse, upload, download, and manage files al vostre NAS.
- Create shared folders and set user permissions for collaborative work.
- Utilize the dual 2.5GbE ports for high-speed file transfers across your network.
Multimedia Streaming:
The NAS supports 4K media playback and real-time transcoding. Connect a display via the HDMI 1.4b port (4K @30Hz) to enjoy multimedia content directly from your NAS.
Còpia de seguretat i recuperació:
Leverage the built-in backup center to protect your data. This includes support for backing up cloud data and virtual machines (VMs), ensuring data integrity and availability.
USB Quick Copy:
The front USB 3.2 Gen 2 port features a quick copy button, allowing you to rapidly back up data from external USB devices to your NAS with a single press.
7. Manteniment
Regular maintenance ensures the longevity and optimal performance of your QNAP NAS.
- Actualitzacions de firmware: Regularly check for and install the latest firmware updates through the QTS interface to benefit from new features, security patches, and performance improvements.
- Comprovació de l'estat del disc: Monitor the health of your hard drives using the Storage & Snapshots application in QTS. Replace failing drives promptly.
- Neteja: Keep the NAS unit clean and free from dust. Ensure ventilation areas and fans are not obstructed to prevent overheating.
- Còpia de seguretat de dades: Implement a robust backup strategy, including local and offsite backups, to protect against data loss.
8. Solució De Problemes
If you encounter issues with your QNAP TVS-h474-PT-8G-US NAS, refer to the following common troubleshooting steps:
- Sense energia: Ensure the power cord is securely connected to both the NAS and the electrical outlet. Check if the power adapter is functioning correctly.
- Problemes de connectivitat de xarxa: Verify that the Ethernet cable is properly connected to the NAS and your router/switch. Check network settings in QTS and ensure the NAS has a valid IP address.
- Unitat no detectada: Ensure hard drives are correctly installed in their trays and fully seated in the bays. Check drive health in QTS.
- Rendiment lent: Check network bandwidth, CPU/RAM usage in QTS. Consider adding SSD cache or upgrading RAM if performance bottlenecks persist.
- El sistema no arrenca: If the system does not boot, try restarting the NAS. If the issue persists, consult the QNAP support weblloc o contacteu amb l'assistència tècnica.
9. Especificacions
| Característica | Especificació |
|---|---|
| Marca | QNAP |
| Número de model | TVS-h474-PT-8G-US |
| Processador | Intel Pentium Gold G7400 2-core/4-thread 3.7 GHz |
| Memòria | 8 GB de RAM DDR4 (ampliable fins a 64 GB) |
| Drive Bays | 4 x 3.5-inch/2.5-inch SATA HDD/SSD |
| Ranures SSD M.2 | 2 x M.2 PCIe Gen3x2 NVMe SSD slots |
| Ports Ethernet | 2 x 2.5GbE (2.5G/1G/100M) |
| Ports USB | Multiple USB 3.2 Gen 2 (Type-A & Type-C) |
| Sortida HDMI | 1 x HDMI 1.4b (4K @30Hz) |
| Expansió PCIe | PCIe Gen 4 slot |
| Dimensions (LxWxH) | 17 x 12 x 16 polzades |
| Pes de l'article | 14 lliures |
| Material | Metall |
10. Garantia i Suport
Each QNAP product comes with a complete service warranty that guarantees excellent service and peace of mind. For additional coverage, you can purchase the QNAP Extended Warranty Service.
- Garantia estàndard: Refer to the included warranty information for details on the standard coverage period.
- Garantia ampliada: To be eligible for a warranty extension, register your QNAP product within 9 months after purchase. Purchasing the extension can stretch your warranty coverage up to 5 years.
- Assistència en línia: Visit the official QNAP support website for FAQs, knowledge base articles, and to create a support ticket.
Vídeo 10.1: This video highlights the QNAP Warranty Service, explaining how to check warranty status and extend coverage for your product.


