1. Informació de seguretat
Read all instructions carefully before beginning installation. If you are unfamiliar with electrical wiring, consult a qualified electrician. This product is ETL Listed, ensuring compliance with safety standards.
- Assegureu-vos que l'alimentació estigui apagada a l'interruptor automàtic abans de la instal·lació o el manteniment.
- Tot el cablejat ha de complir amb els codis elèctrics nacionals i locals.
- L'estructura de muntatge ha de ser capaç de suportar el pes del ventilador (aproximadament 7.83 kg).
- No feu funcionar el ventilador amb les pales danyades.
- Eviteu col·locar objectes al camí de les pales del ventilador.
2. Contingut i components del paquet
Verifiqueu que tots els components siguin presents abans de continuar amb la instal·lació.

Figura 2.1: Explotat view showing key components like the fast installation terminal, sloped ceiling mounting bracket, acrylic lampshade, and integrated LED light module.
Components típics:
- Muntatge de la carcassa del motor
- Pales de ventilador (5 pales reversibles)
- Downrod i Canopy
- Suport de muntatge
- Kit de llum LED integrat
- Acrílic Lampombra
- Comandament a distància i receptor
- Paquet de maquinari (cargols, volanderes, femelles de cable)
3. Instal·lació i configuració
3.1 Opcions de muntatge
This fan supports both standard downrod mounting and angled (sloped) ceiling mounting up to 15 degrees.
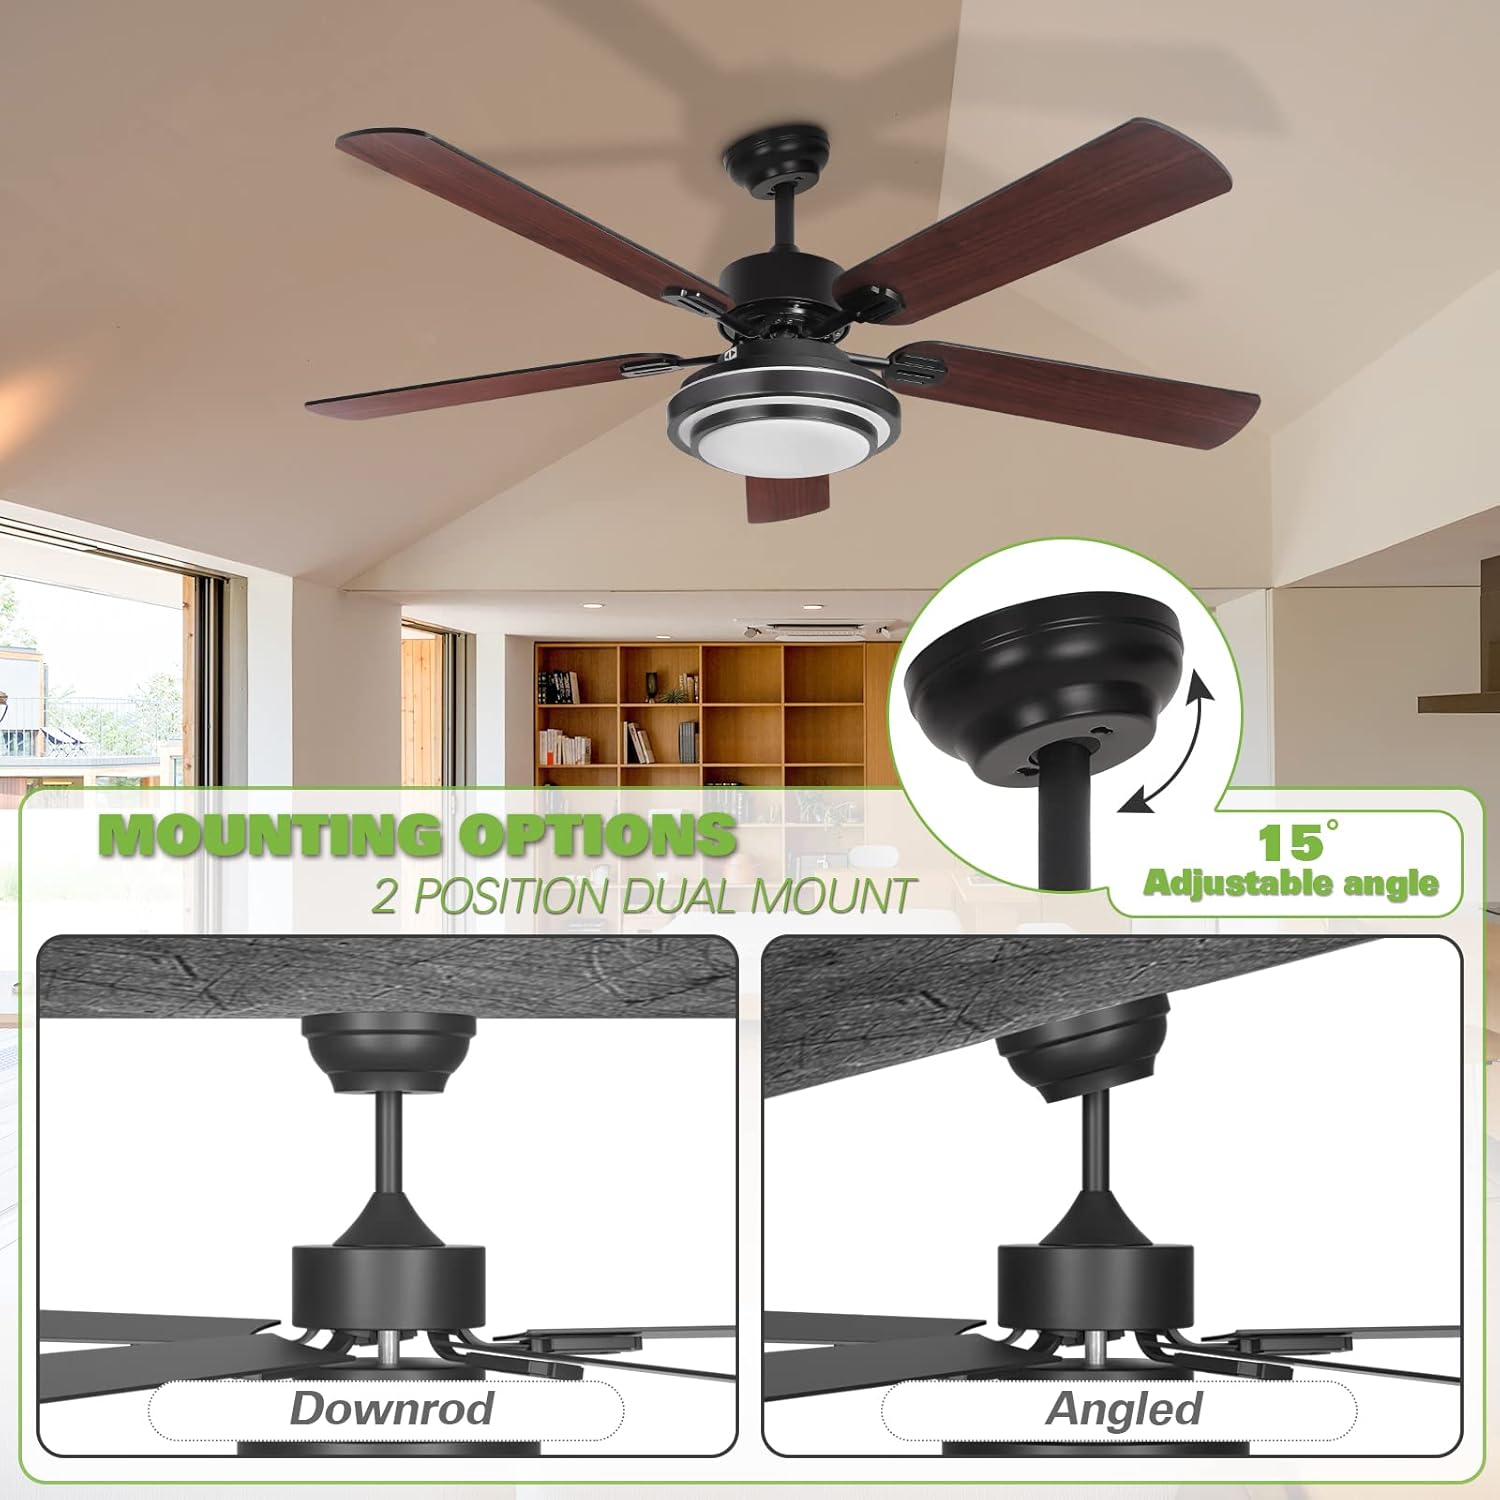
Figura 3.1: Illustration of downrod and angled mounting configurations. The fan can accommodate sloped ceilings up to 15 degrees.
- Suport de muntatge segur: Attach the mounting bracket to the ceiling junction box. Ensure the bracket is securely fastened and can support the fan's weight.
- Muntar la vareta de baixada: Insert the downrod through the canopy and connect it to the motor housing.
- Ventilador penjat: Aixequeu amb cura el conjunt del ventilador i pengeu-lo del suport de muntatge.
3.2 Cablejat elèctric
Connect the fan's electrical wires to the household wiring using the provided fast installation terminals and wire nuts. Ensure all connections are secure.
- Connect the ground wire (green or bare copper) from the fan to the ground wire from the outlet box.
- Connect the neutral wire (white) from the fan to the neutral wire from the outlet box.
- Connect the live wire (black) from the fan to the live wire from the outlet box.
- Install the remote receiver into the canopy.
3.3 Instal·lació de la fulla
The fan includes 5 reversible blades, with one side in dark wood color and the other in black. Choose your preferred finish before installation.

Figura 3.2: Reversible fan blades, offering a choice between dark wood and black finishes.
- Attach each blade to the blade arm using the provided screws.
- Secure the blade arms to the motor housing.
3.4 Light Kit Assembly
Connect the integrated LED light kit to the fan's wiring and secure the acrylic lampombra.
- Connect the LED light kit wires to the corresponding wires from the fan.
- Mount the LED light kit to the bottom of the fan motor housing.
- Attach the acrylic lampshade by twisting or securing it into place.
4. Instruccions de funcionament
The Hykolity ceiling fan is operated using the included remote control.
4.1 Funcions de control remot

Figura 4.1: Remote control functionality for light dimming and color temperature adjustment (3000K, 4000K, 5000K).
- Ventilador activat / desactivat: Premeu el botó del ventilador per encendre o apagar el ventilador.
- Velocitat del ventilador: Use the speed buttons (1, 2, 3) to adjust the fan's rotation speed.
- Llum encès/apagat: Premeu el botó de llum per encendre o apagar la llum LED integrada.
- Atenuació de la llum: Use the dimming buttons (+/-) to adjust the brightness of the LED light.
- Ajust de temperatura de color: The LED light offers three color temperatures: Warm White (3000K), Natural Light (4000K), and Daylight (5000K). Cycle through these options using the dedicated button on the remote or by quickly toggling the light switch.
4.2 Funció motora reversible
The fan features a reversible motor for year-round comfort. A slide switch on the fan's motor housing controls the direction of airflow.

Figura 4.2: Reversible motor switch for seasonal airflow adjustment.
- Summer Mode (Left Position): Set the switch to the LEFT position for downward airflow, creating a cooling effect.
- Winter Mode (Right Position): Set the switch to the RIGHT position for upward airflow, circulating warm air trapped near the ceiling.
- Important: Ensure the fan is OFF before changing the direction of the motor. The fan will not operate if the reverse switch is in the middle position.
5. Manteniment
Un manteniment regular garanteix un rendiment òptim i una llarga vida útil del ventilador de sostre.
- Neteja: Netegeu periòdicament les aspes del ventilador i la carcassa del motor amb un drap suau iamp tela. No utilitzeu netejadors abrasius ni dissolvents.
- Equilibri de la fulla: Si el ventilador trontolla, comproveu que tots els cargols de les pales estiguin ben ajustats i que les pales estiguin equilibrades. Hi ha kits d'equilibri disponibles si cal.
- Connexions elèctriques: Annually inspect all electrical connections for tightness. Ensure power is off at the circuit breaker before inspection.
- Kit de llum: The integrated LED light is designed for long life and typically does not require replacement. If issues occur, contact support.
6. Solució De Problemes
Consulteu la taula següent per veure els problemes habituals i les seves solucions.
| Problema | Causa possible | Solució |
|---|---|---|
| El ventilador no arrenca | No power to the fan; Loose wire connections; Remote control battery low; Reverse switch in middle position. | Check circuit breaker; Verify all wire connections are secure; Replace remote battery; Ensure reverse switch is fully engaged left or right. |
| La llum no funciona | Loose wire connection to light kit; LED driver failure; Remote control battery low. | Check light kit wiring; Contact support for LED driver replacement; Replace remote battery. |
| El ventilador trontolla | Cargols de la fulla solts; Fulles desequilibrades; Suport de muntatge solt. | Estrenyeu tots els cargols de la fulla; utilitzeu un kit d'equilibrat de la fulla; assegureu-vos que el suport de muntatge estigui ben fixat. |
| El comandament a distància no funciona | Battery depleted; Remote not paired with receiver. | Replace battery; Refer to remote pairing instructions (usually involves pressing a button within a few seconds of turning on power). |
| Soroll excessiu | Cargols solts; fregament de la carcassa del motor; pales que xoquen contra un obstacle. | Check and tighten all screws; Ensure no parts are rubbing; Clear any obstructions from blade path. |
7. Especificacions
Detailed technical specifications for the Hykolity 52 Inch Ceiling Fan.

Figura 7.1: Key dimensions of the 52-inch ceiling fan.
| Característica | Detall |
|---|---|
| Marca | Hicolitat |
| Model | Ventilador de sostre de 52 polzades |
| Diàmetre | 52 polzades |
| Height (Ceiling to Fan Bottom) | 15.7 inches (optional) |
| Font de llum | Integrated 24-watt LED |
| Temperatura de color | 3000K (Warm White), 4000K (Natural Light), 5000K (Daylight) |
| Nivell de soroll del motor | Menys de 35 dB |
| Nombre de fulles | 5 (Reversible: Dark Wood / Black) |
| Tipus de muntatge | Dual-Mount (Downrod, Angled up to 15°) |
| Tipus de control | Control remot |
| Potència/Wattage | 24 watts (per a la llum) |
| Pes de l'article | 7.83 kg |
| Material | Polycarbonate (blades), Metal (housing) |
| Llistat per ETL | Sí |
8. Garantia i Suport
Hykolity provides the following warranty for this product:
- Motor: Garantia de per vida.
- Light Accessories: 3 anys de garantia.
For any product problems or warranty claims, please contact the Hykolity after-sales support team. Keep your purchase receipt as proof of purchase.
Contact information is typically provided on the product packaging or official weblloc.


