Introducció
Thank you for choosing the Swann 8-Channel 4K NVR Security System. This manual will guide you through the installation, setup, and operation of your new security system. Please read all instructions carefully before use.
The Swann NVR system provides 4K Ultra HD (8-megapixel) resolution, allowing you to clearly see faces, license plates, and other details. It features advanced smart functions like customizable face recognition, person detection, and vehicle detection, providing instant alerts and recording when activity is detected. The system is designed to protect small to medium-sized businesses and large homes, covering all blind spots with up to 8 cameras monitoring entrances, gardens, driveways, and shops.
With advanced heat mapping, you can identify areas of high and low activity on screen, helping you pinpoint vulnerable areas. The system also offers color night vision up to 10 meters in ambient light, and black and white night vision up to 40 meters in complete darkness. Two-way audio allows you to hear sounds off-screen and communicate with visitors or family members remotely. The cameras are IP66 rated for weather resistance, suitable for outdoor use in rain, snow, and heat, but should be installed under eaves to avoid direct rain. The NVR includes a 2TB HDD for months of continuous recording and supports integration with smart home devices like Hey Google and Alexa for live streaming with voice commands.
Guia de configuració
Please ensure all cameras are connected and verified before permanent installation.
Pas 1: Unboxing i comprovació de components
Open the package. You will find three boxes inside: one containing the cameras and cables, and another containing the recorder and its accessories. Please confirm that all components are present and accounted for.
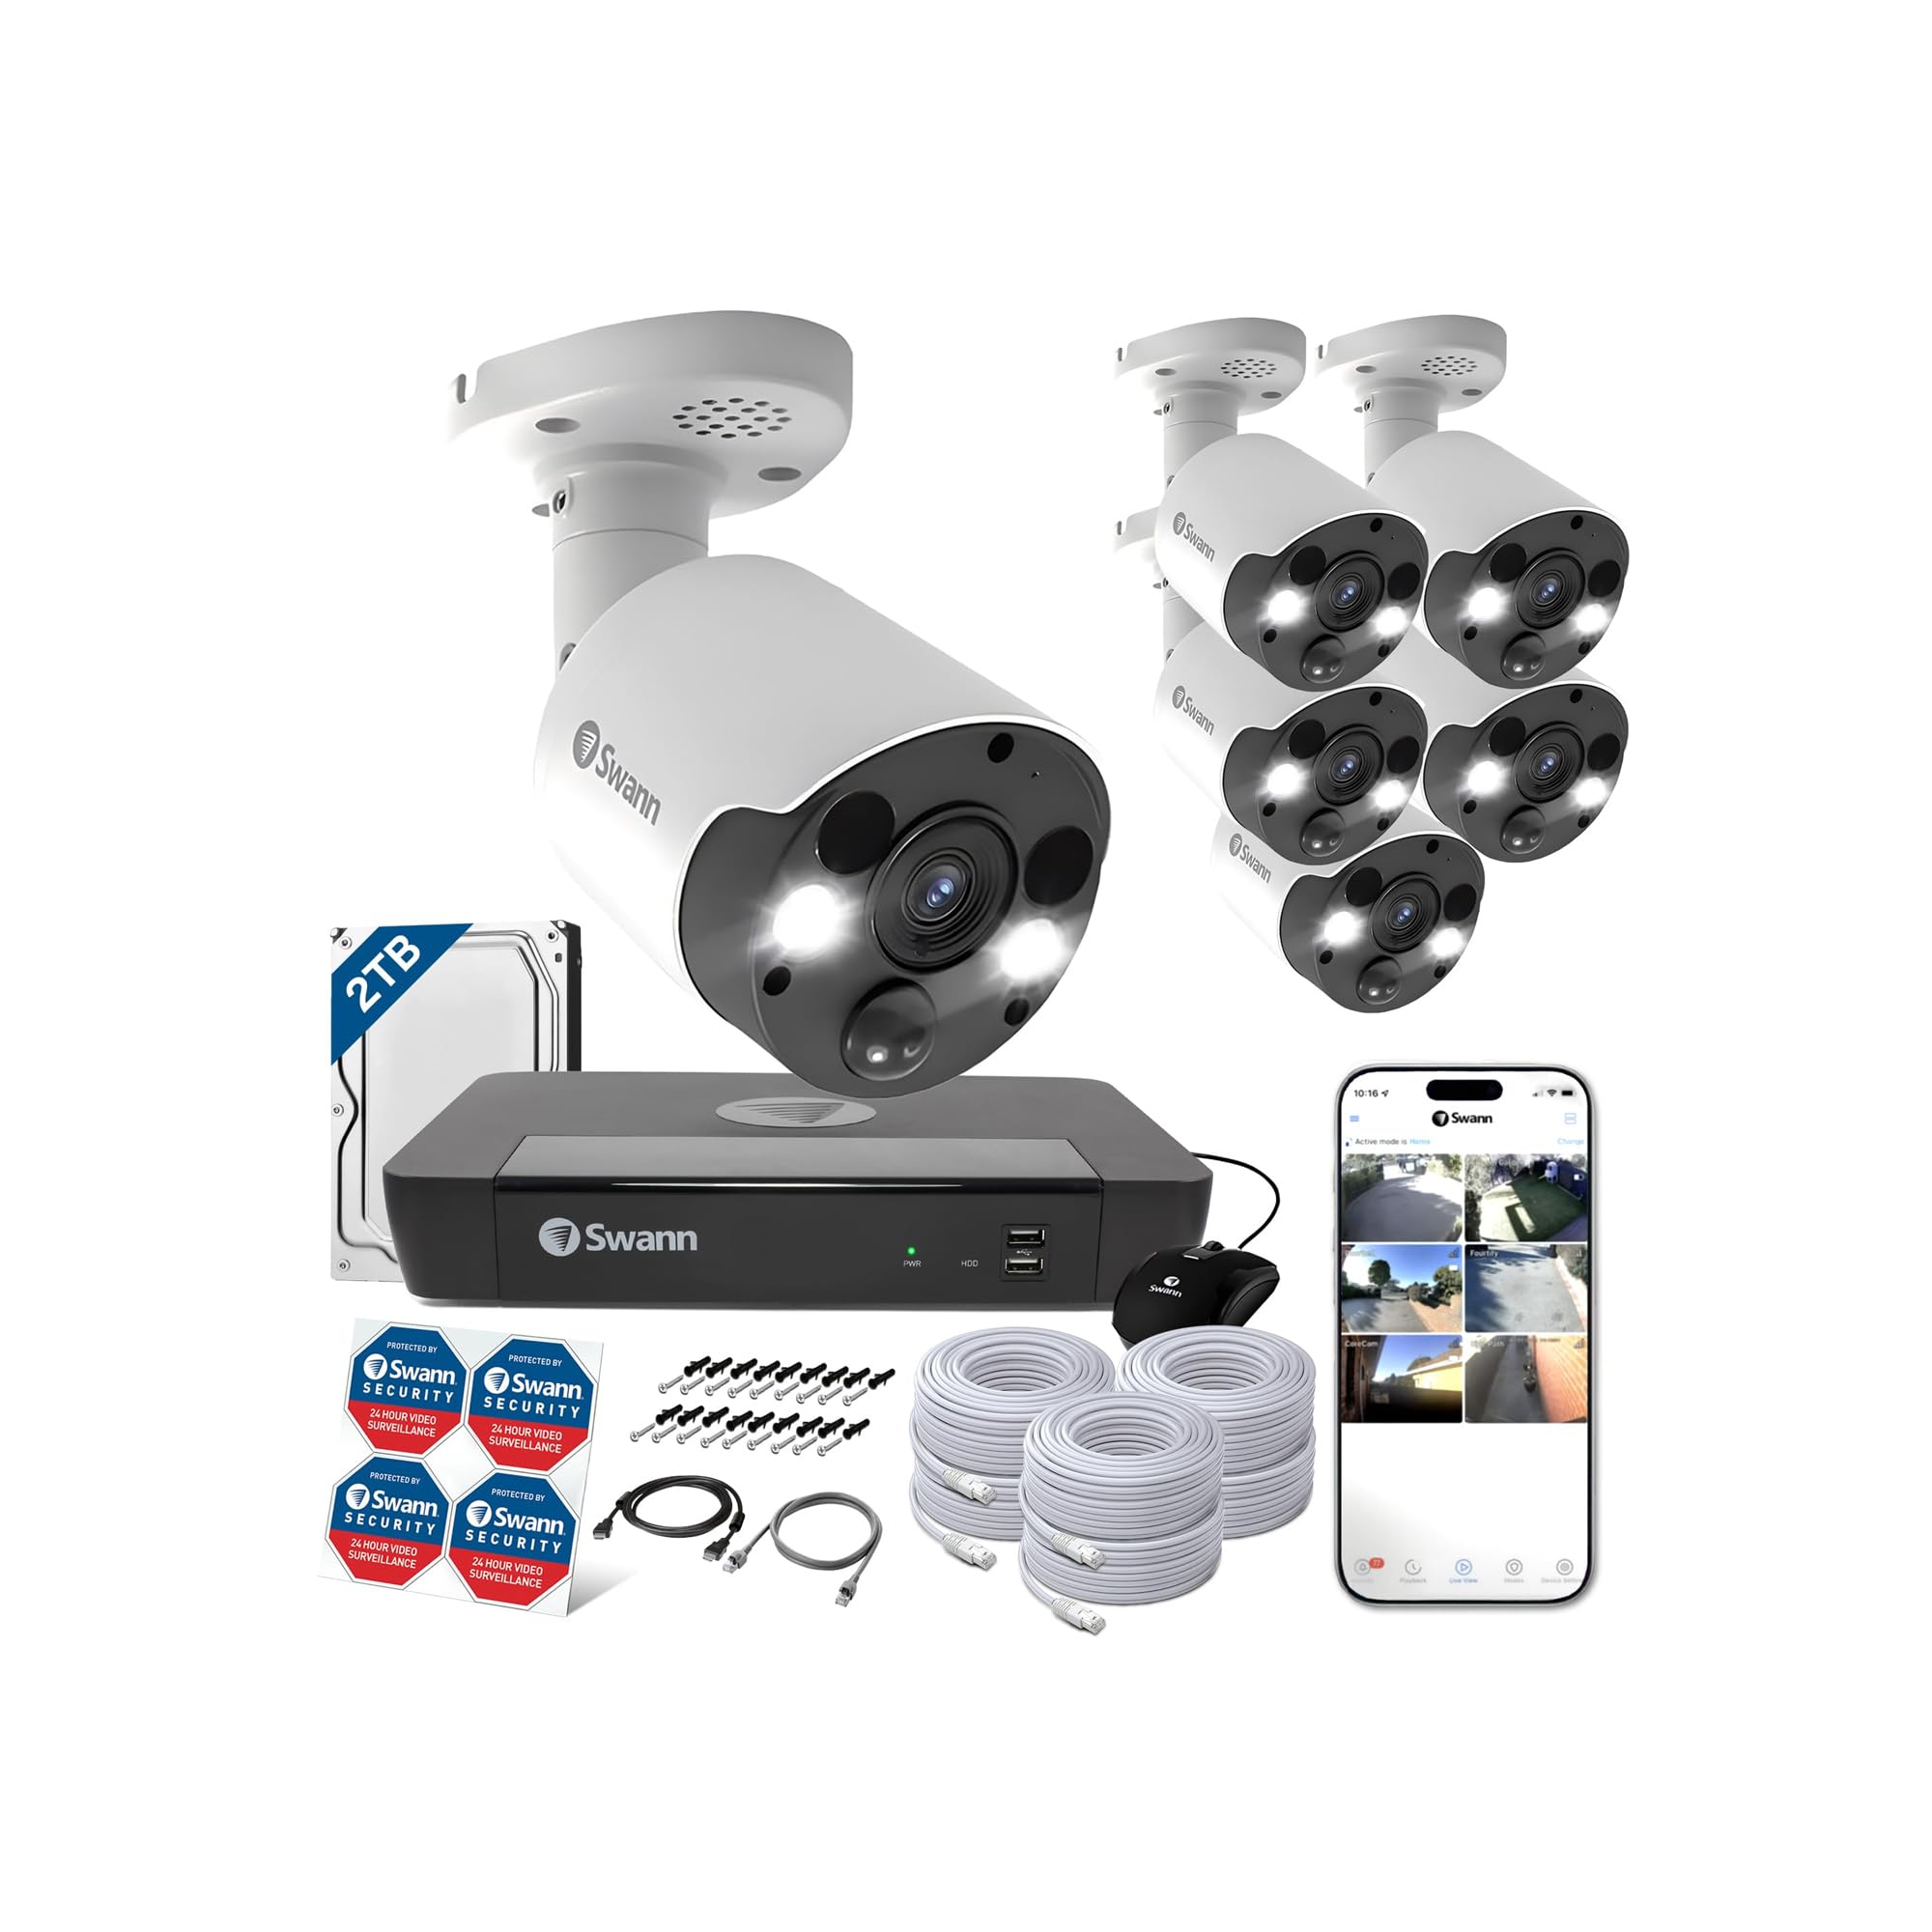
Image: All components of the Swann 8-Channel 4K NVR Security System, including the NVR recorder, six cameras, LAN cables, mouse, power adapter, and mounting screws.
Step 2: Connecting the Monitor and Recorder
Use the included HDMI cable to connect your monitor to the NVR recorder. Plug one end into the HDMI port on the back of the recorder and the other end into the HDMI input on your monitor.

Image: The rear panel of the NVR recorder with various ports labeled, including HDMI, VGA, Audio Out, WAN, and camera PoE LAN ports.
Step 3: Powering On the Recorder
Connect the power adapter to the recorder's power input. Securely plug the power cord into the adapter, then plug the power cord into a wall outlet. Finally, turn on the power switch on the recorder.
Important: To ensure stable operation, always connect the power plug directly to a wall outlet. Avoid using power strips or extension cords, as this may lead to unstable performance.
Step 4: Mouse Setup
Connect the included mouse to one of the USB ports on the recorder. You can use either the front or rear USB ports. A wireless USB mouse is also compatible.
Step 5: Connecting the Cameras
Connect each camera to the NVR recorder using the provided LAN cables. Plug one end of the LAN cable into a camera port on the NVR and the other end into the camera's LAN port. The cameras will receive both video signal and power through this single cable (Power over Ethernet - PoE).

Image: A Swann security camera showing its lens, infrared lights, and the attached cable with an Ethernet connector and an optional power connector. The additional power connector is typically not used with PoE.
Step 6: Network Connection for Remote Viewing
A view càmera footage on your smartphone, connect the NVR recorder to your router using a LAN cable. Plug one end into the WAN port on the NVR and the other into an available LAN port on your router.
Important: Mobile routers are not supported. Please use a Wi-Fi router connected via a wired LAN for stable network connectivity. Use the included LAN cable for connection.
Step 7: Waterproof Cap Installation (for outdoor cameras)
For outdoor camera installations, it is recommended to install the waterproof cap on the LAN cable connection. The cap consists of a small cap, a large cap, a rubber cap, and a rubber ring. Pass the caps through the camera-side of the cable in order from small to large. Install the rubber ring, then insert the cable into the camera cable and secure it with the large cap. Push the rubber cap between the large and small caps, then cover with the small cap. The rubber cap should protrude 3-5mm.
Note: The NVR series supports cable distances of approximately 100m between the camera and recorder. Cat5e or higher LAN cables can be used.
Outdoor Installation Note: While the cameras are IP66 rated for dust and water resistance, they are not completely waterproof. Install them under eaves or in other locations where they are not directly exposed to rain. Humidity may cause the camera lens to fog, which is not a defect and is not covered by warranty. Please be aware of this in advance.
Step 8: Initial System Configuration
After powering on, the monitor will display the Swann logo, followed by a setup wizard. Follow the on-screen prompts to configure your system. This includes setting the language, video format (50Hz or 60Hz depending on your region), time zone, date/time format, and creating a password for the 'admin' user.
Important: It is recommended to create a password of 6 or more characters, including numbers and letters, for enhanced security.
Time Zone Setting: Select "(GMT+9:00) Seoul, Tokyo, Osaka, Sapporo" for Japan.
Email Address Registration: When registering your email address, be careful with the placement of "." and "@" as typos are common.
NTP Settings: If connected to the internet, click "Update Now" to synchronize date and time. If not connected, manually set the date and time.
Once the setup wizard is complete, your NVR system is ready for use. If you wish to view camera images on your smartphone, please refer to the 'Smartphone Setup Guide' section.
Operating Your Security System
Característiques clau
- Resolució 4K Ultra HD: Captura imatges clares i detalladestage, essential for identifying critical details.
- Thermal & Motion Detection: Swann cameras detect heat and motion from people and vehicles, triggering recording and alerts.
- Night2Day Color Night Vision: In low light, the cameras can illuminate the area with spotlights to provide full-color night vision. In complete darkness, infrared night vision provides clear black and white images up to 40 meters.
- Àudio bidireccional: Comuniqueu-vos amb els visitants o dissuadeu els intrusos mitjançant el micròfon i l'altaveu integrats.
- Reconeixement facial: The system can recognize familiar faces and send alerts when family members return home.
- Integració de la llar intel·ligent: Connect with Hey Google and Alexa devices to view live streams using voice commands.
- Remot Viewing via Swann Security App: Access live and recorded footage from anywhere using the Swann Security app on your smartphone.
- Emmagatzematge local de 2 TB: The NVR comes with a 2TB hard drive, capable of storing months of footage before overwriting older data. Footage can be transferred to a USB memory stick or downloaded via the network.
- Dropbox Integration: Store still images from two cameras directly to your Dropbox account.
Smartphone Setup Guide (Swann Security App)
To set up the Swann Security app on your smartphone, follow these steps:
- Download the Swann Security app from Google Play (for Android) or the App Store (for iPhone).
- Open the app and tap "Register". Enter your name, email address, and create a password.
- Tap "Use my current location" to input your address. If all details are correct, tap "Register".
- Check your registered email address for a verification email from Swann. Click the verification link (or URL) to confirm your email.
- Log in to the app using your registered email address and password.
- Tap "Device Pairing" then "Start". Grant camera access to the app.
- Scan the QR code located on your NVR recorder.
- Select your purchase store and set a device name.
- Enter the password you created during the NVR's initial setup.
- Once the "Device Pairing Complete" screen appears, tap "Done".
Note: Each recorder can only be registered to one account. While multiple devices can log in to the same account, simultaneous connections are limited to 3 devices. Connecting more than 4 devices simultaneously may lead to reduced communication speed or issues with live video display.
Reproducció de vídeo
Use the Swann Security app or the NVR interface to review foo gravattage. You can search by date, time, and event type (motion, heat, face detection).
Manteniment
Cura general i neteja
Regularly clean the camera lenses and NVR unit with a soft, dry cloth. Avoid using harsh chemicals or abrasive materials that could damage the surfaces. Ensure the NVR is placed in a well-ventilated area to prevent overheating.
Recorder Initialization (Deleting Recording Data)
If you wish to delete all recording data from the NVR's hard drive, follow these steps:
Important: Only "Full Deletion" is supported. You cannot select and delete specific data. For complete data removal, disconnect all cameras from the NVR before proceeding with the initialization.
- From the main menu on the monitor, select "Setup".
- In the left-hand menu, select "Device".
- From the top submenu, select "HDD".
- Check the checkbox next to the HDD and click "Format HDD" (or "Wipe HDD" on some models).
- Enter the recorder's password and click "Authenticate".
- Read the warning message and click "OK".
- The formatting process will begin. Please wait until it is complete. This may take some time.
- Once "Formatting complete!" is displayed, click "OK". All recording data has been deleted.
Recorder Settings Initialization
To reset the NVR's settings to their factory defaults (without deleting recording data), follow these steps:
- From the main menu on the monitor, select "Setup".
- In the left-hand menu, select "Detailed Settings".
- From the top submenu, select "Maintain".
- Click "Load Defaults". In the pop-up window, click "All", then "Save".
- The registered settings will be initialized, and the system will restart. Please wait.
- The screen will go black temporarily, then display the Swann logo.
- Wait until the new settings can be registered. The screen will go black again briefly.
- When the setup wizard screen is displayed, new settings can be registered.
Unpairing App Account
If you need to unpair your NVR from the Swann Security app, follow these steps:
Note: The procedure may vary slightly between iPhone and Android devices.
- Open the Swann Security app.
- On iPhone, tap the "Device Settings" icon (bottom right). On Android, tap the "Device" icon (bottom right).
- Tap the recorder you wish to unpair.
- Scroll down the screen.
- On iPhone, tap "Delete this device". On Android, tap "System Settings", then "Delete Device".
- Confirm the action by tapping "Remove" (iPhone) or "Confirm" (Android).
- The unpairing process is complete.
Resolució de problemes
Problemes comuns i solucions
- Video Loss on Monitor: If you see "VIDEO LOSS" on your monitor, check the network connection icon in the bottom right corner. A green checkmark indicates a successful connection, while a red X indicates no connection. Ensure all camera cables are securely connected.
- App Playback Issues: If the Swann Security app is not displaying live video or playback correctly, it may be due to low communication speed between your smartphone, router, and recorder. Try the following:
- Uninstall and reinstall the Swann Security app.
- Reinicieu el vostre encaminador.
- Perform a recorder initialization (refer to the Maintenance section for instructions).
- Problemes d'alimentació: Ensure the NVR is directly connected to a wall outlet and not a power strip. Insufficient power can lead to unstable operation or the NVR going offline.
- Foggy Camera Lens: In humid conditions, the camera lens may fog up. This is not considered a defect and is not covered by warranty.
If you have tried the above troubleshooting steps and are still experiencing issues, please contact our support center for assistance.
Especificacions
| Característica | Especificació |
|---|---|
| Dimensions del producte (LxWxH) | 15.1 x 7 x 7 cm |
| Número de model de producte | SWNVK-886806FB-JP |
| Mida del producte | 15.1 x 7 x 7 cm; 8.44 kg |
| Pes del producte | 8.44 quilos |
| Ús recomanat | Motion detection, Night vision |
| Marca | Swann |
| Tecnologia de connectivitat | Amb cable |
| Ús interior/exterior | A l'aire lliure |
| Protocol de connexió | HomePlug |
| Tipus de muntatge | Muntatge de paret |
| Resolució de captura de vídeo | 4K |
| Color | Blanc |
| Nombre d'articles | 1 (System includes 1 NVR and 6 cameras) |
| Components inclosos | 7 LAN cables, 1 mouse, 1 AC adapter, Mounting screws and plugs, 1 Quick Start Guide, 1 Anti-theft sticker |
Garantia i Suport
Our company is an authorized distributor of Swann products. We offer a 1-year free warranty on this product. Should you have any questions or require assistance, please do not hesitate to contact our support center.
Correu electrònic de suport: support@uniqstyle.co.jp