1. Introducció
This manual provides detailed instructions for the proper setup, operation, and maintenance of your SmallRig AD-100 FreeBlazer Heavy-Duty Carbon Fiber Tripod System. Please read this manual thoroughly before using the product to ensure safe and efficient operation. Retain this manual for future reference.

Figure 1.1: SmallRig AD-100 FreeBlazer Tripod System with included carrying bag.
2. Informació de seguretat
- Always ensure all locking mechanisms are securely fastened before mounting equipment or adjusting the tripod.
- Do not exceed the maximum load capacity of 10 kg (22 lbs) for the tripod system.
- Eviteu exposar el trípode a temperatures extremes o ambients corrosius.
- Mantingueu les mans i els dits allunyats de les peces mòbils durant l'ajust per evitar que us pessiguin.
- Transport the tripod in its carrying bag to prevent damage.
3. Contingut del paquet
Verifiqueu que tots els elements que s'enumeren a continuació s'inclouen al vostre paquet:
- Tripod Kit x 1
- Clau Allen x 1
- Manual d'usuari x 1
- Bossa de transport x 1
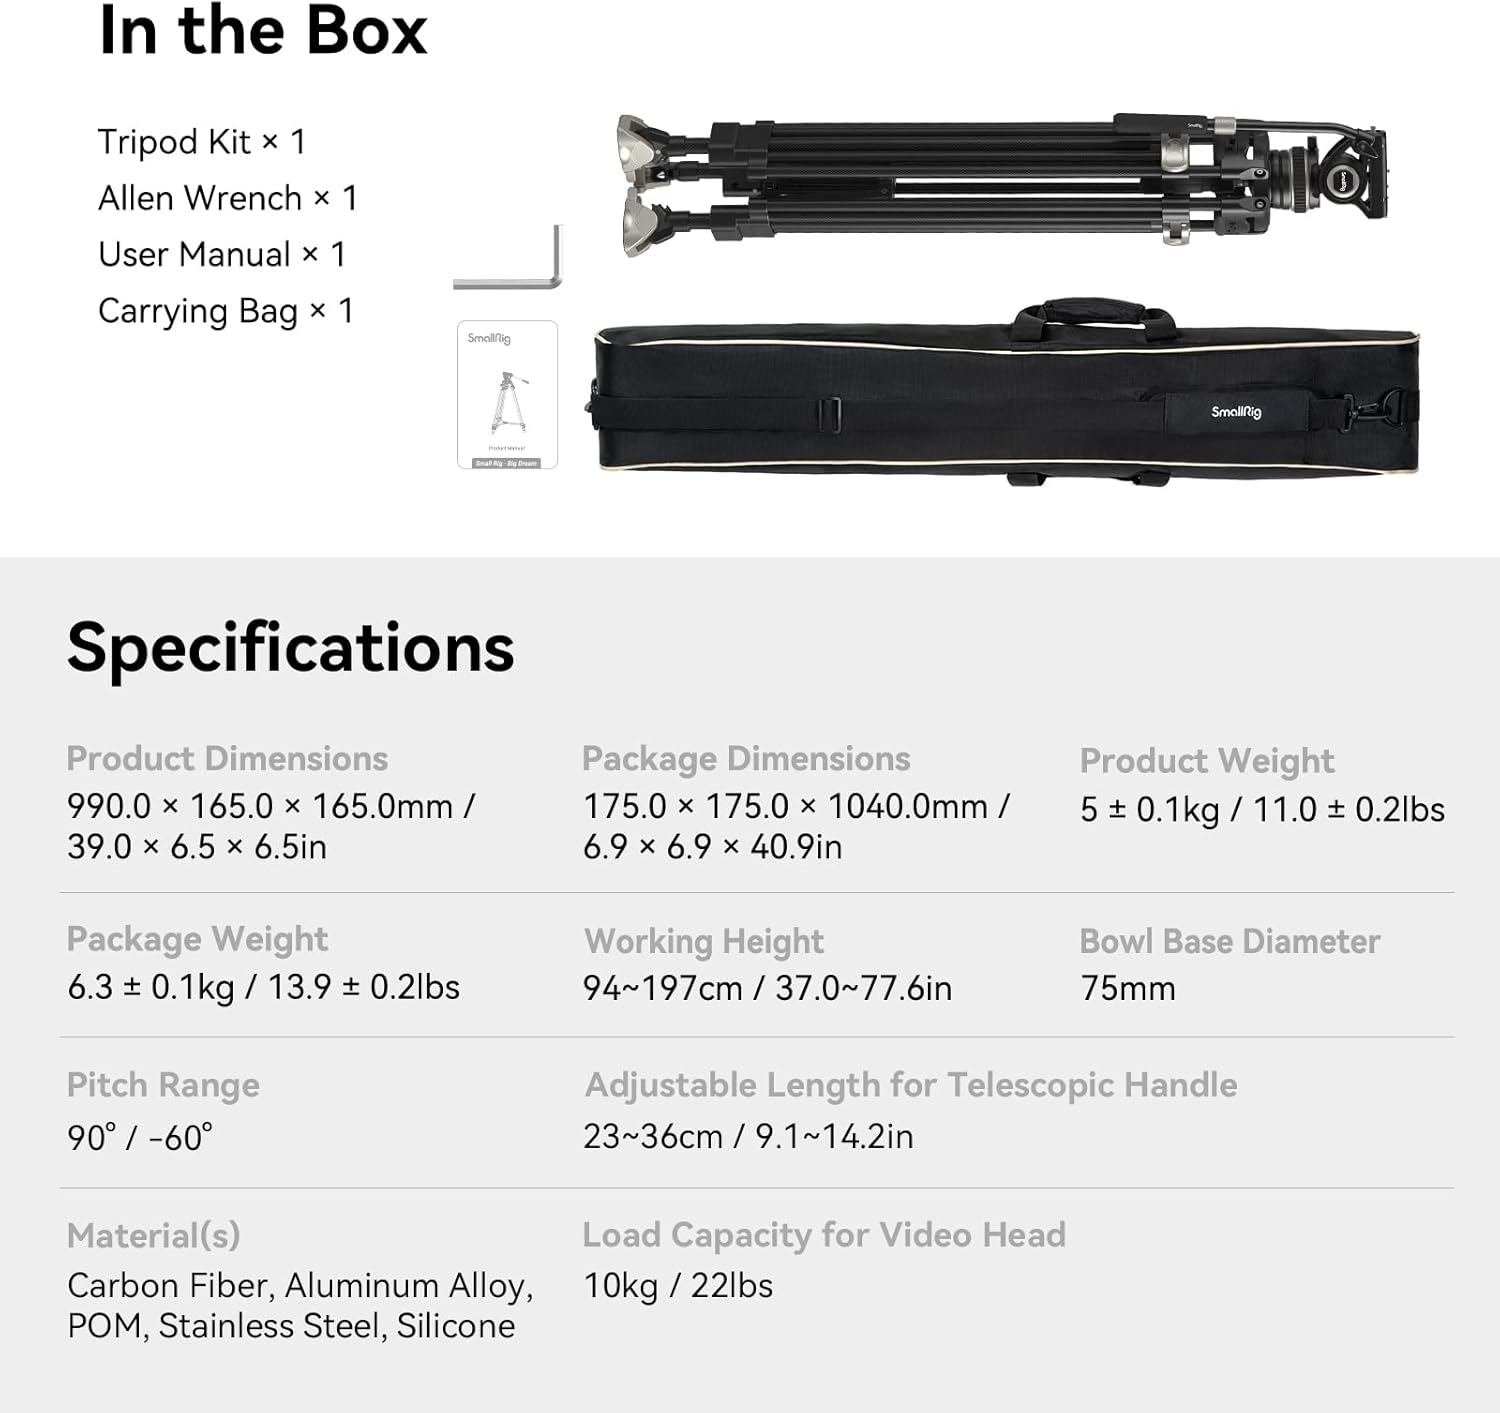
Figure 3.1: Included items in the SmallRig AD-100 FreeBlazer Tripod Kit.
4. Producte acabatview
Familiarize yourself with the main components of the SmallRig AD-100 FreeBlazer Tripod System.

Figure 4.1: Key components of the SmallRig AD-100 FreeBlazer Tripod.
- Fluid Head: Provides smooth pan and tilt movements.
- Mànec telescòpic: Adjustable handle for controlling pan and tilt.
- Placa d'alliberament ràpid: Dual-mode plate compatible with DJI RS series and MFT systems.
- One-Step Locking System: Allows rapid extension and retraction of tripod legs.
- Carbon Fiber Legs: Lightweight and durable leg sections.
- Center Spreader: Enhances stability.
- Peus intercanviables: Wide feet for general use and spike feet for soft terrain.
- Interfície d'expansió: 1/4"-20 threaded hole for attaching accessories.
5. Configuració
5.1. Desembalatge i inspecció inicial
Carefully remove all components from the carrying bag. Inspect for any signs of damage. If any parts are missing or damaged, contact customer support.
5.2. Extending and Folding the Tripod Legs
The AD-100 FreeBlazer features a one-step locking system for quick height adjustment.
- To extend the legs, locate the large toggle lever on each leg.
- Flip the toggle lever to unlock the leg sections. The legs will extend automatically or can be manually pulled to the desired height.
- Flip the toggle lever back to lock the leg sections securely in place.
- To fold, unlock the levers and push the leg sections inward until fully collapsed, then lock the levers.

Figure 5.1: One-Step Height Adjustment in action.

Figure 5.2: Efficiency of the one-step locking system.
5.3. Attaching the Fluid Head and Leveling
The tripod features a Ø75mm detachable bowl head for quick leveling.
- Ensure the fluid head is securely seated on the tripod's bowl base.
- Afluixeu el bol clamp knob located beneath the fluid head.
- Use the integrated bubble level on the fluid head to achieve a perfectly level horizon.
- Tighten the bowl clamp knob firmly to secure the head in position.
5.4. Changing Tripod Feet
The tripod comes with interchangeable wide feet and spike feet.
- To switch feet, locate the release mechanism on each foot.
- Press the release and swap the wide feet for the spike feet, or vice versa.
- Ensure the new feet are securely locked into place.

Figure 5.3: Interchangeable feet for different terrains.
6. Instruccions de funcionament
6.1. Muntatge de la càmera
The fluid head features a dual-mode quick-release plate for efficient camera mounting.
- Press the release button on the quick-release plate mount to detach the plate.
- Attach the quick-release plate to the bottom of your camera using the 1/4" or 3/8" screw. Ensure it is tightened securely.
- Slide the camera with the attached plate back into the fluid head mount until it clicks into place. Verify it is locked.
The quick-release plate is compatible with DJI RS 2 / RSC 2 / RS 3 / RS 3 Pro / RS 4 / RS 4 Pro quick release plates and MFT quick release plates, allowing for seamless transitions between tripod and stabilizer setups.

Figure 6.1: Dual-Mode Quick-Release Plate functionality.
6.2. Adjusting Pan and Tilt
The fluid head offers 360° pan and +90°/-60° tilt movements with adjustable damping.
- Control de panoràmica: Loosen the pan lock knob (usually located at the base of the fluid head) to allow horizontal rotation. Adjust the damping knob for desired smoothness. Tighten the pan lock knob to secure the position.
- Control d'inclinació: Loosen the tilt lock knob (usually on the side of the fluid head) to allow vertical movement. Adjust the damping knob for desired smoothness. Tighten the tilt lock knob to secure the position.
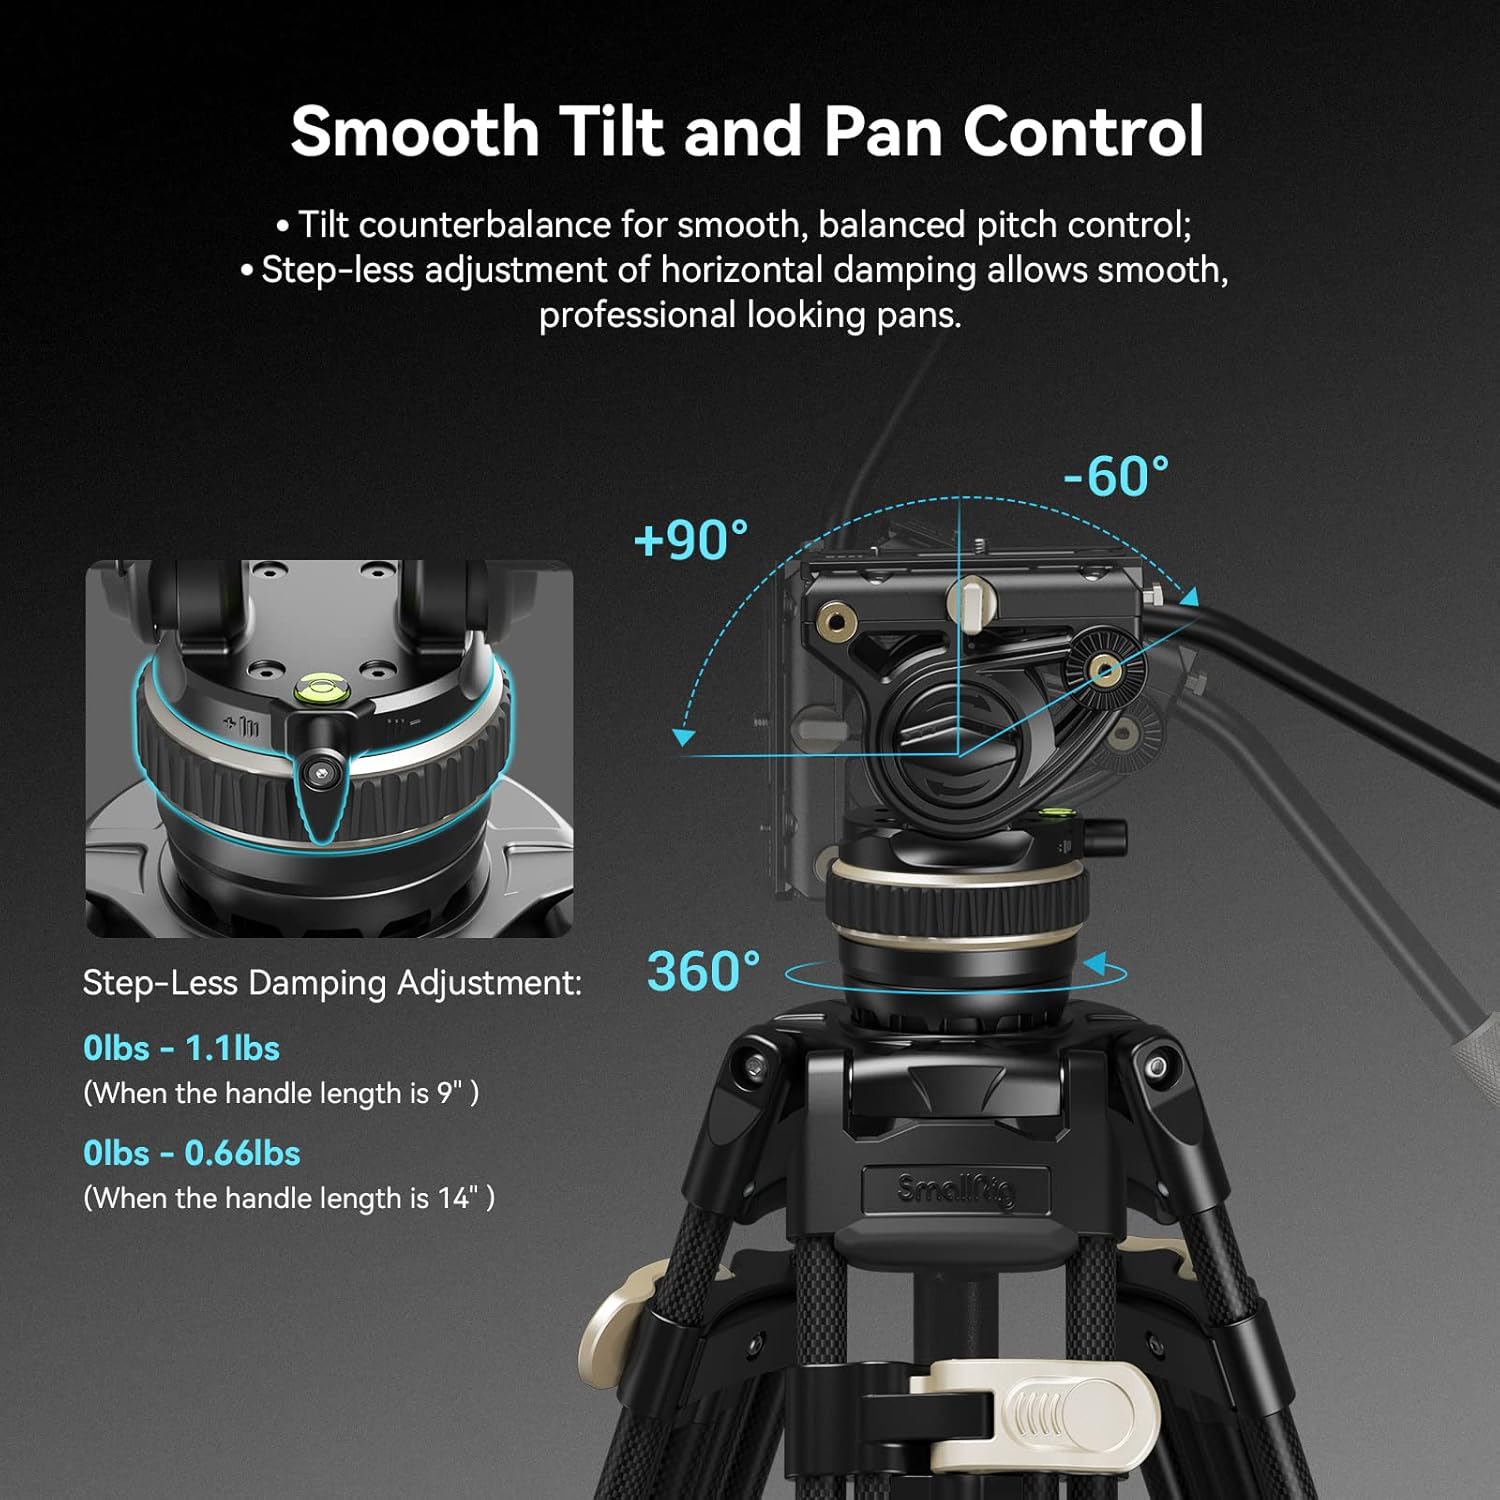
Figure 6.2: Fluid head pan and tilt adjustments.
6.3. Ús del mànec telescòpic
The removable telescopic handle (9.1"-14.2" / 23-36cm) can be adjusted for length and mounted on either side of the fluid head for comfortable operation.
- To adjust the handle length, twist the locking collar on the handle, extend or retract, then twist to lock.
- To change the mounting side, unscrew the handle from one side of the fluid head and re-attach it to the other side.
6.4. Fixació d'accessoris
The fluid head is equipped with a 1/4" extra threaded hole for attaching accessories such as LED fill lights, microphones, or magic arms.
- Locate the 1/4"-20 threaded hole on the side of the fluid head.
- Screw your accessory into this port until secure.
7. Manteniment
7.1. Neteja
- Wipe the carbon fiber legs and metal parts with a soft, dry cloth after each use.
- Per a la brutícia tossuda, utilitzeu una mica damp drap amb sabó suau i després assecar-lo bé.
- No utilitzeu productes químics ni productes de neteja abrasius.
7.2. Emmagatzematge
- Store the tripod in its provided carrying bag in a cool, dry place.
- Ensure all locking mechanisms are disengaged or lightly engaged during long-term storage to prevent stress on components.
8. Solució De Problemes
- Issue: Tripod legs do not extend or retract smoothly.
Solució: Check for any obstructions in the leg sections. Ensure the one-step locking levers are fully disengaged before attempting to adjust. Clean any dirt or debris from the leg mechanisms. - Issue: Fluid head movements are stiff or jerky.
Solució: Loosen the pan and tilt lock knobs. Adjust the damping control knobs to a lighter setting. Ensure no foreign objects are interfering with the head's movement. - Issue: Camera feels unstable on the quick-release plate.
Solució: Ensure the quick-release plate is securely attached to the camera and fully seated and locked into the fluid head mount. Verify the camera screw is tight.
9. Especificacions
| Característica | Detall |
|---|---|
| Dimensions del producte | 38.98 x 6.5 x 6.5 polzades (990 x 165 x 165 mm) |
| Pes de l'article | 11.02 lliures (5 kg) |
| Altura màxima | 78 polzades (197 cm) |
| Altura mínima | 37 polzades (94 cm) |
| Longitud plegada | 39 polzades (99 cm) |
| Límit de pes (capacitat de càrrega) | 22 lliures (10 kg) |
| Tipus de capçal de trípode | Fluid Head, Video Head |
| Bowl Base Diameter | 75 mm |
| Pan Range | 360° |
| Interval d'inclinació | +90° / -60° |
| Adjustable Length for Telescopic Handle | 23-36 cm (9.1-14.2 polzades) |
| Material | Fibra de carboni, aliatge d'alumini, POM, acer inoxidable, silicona |
| Nom del model | 100 dC |
| Número de model de l'article | 3989-CF-FBA-US |
10. Vídeos oficials de productes
No hi ha cap vídeo oficial específic del producte URLs with 'creator_type':'Seller' were provided in the product data. Therefore, no videos can be embedded in this manual.
11. Garantia i Suport
Per obtenir informació sobre la garantia i l'atenció al client, consulteu la pàgina oficial de SmallRig. weblloc web o contacteu amb el vostre distribuïdor. Conserveu el rebut de compra com a comprovant de compra.
Oficial de SmallRig Weblloc: www.smallrig.com


