Introducció
This manual provides comprehensive instructions for the installation, operation, and maintenance of your Natec Cabassu G2 Midi Tower PC Case. Please read this manual thoroughly before beginning installation to ensure proper setup and optimal performance.
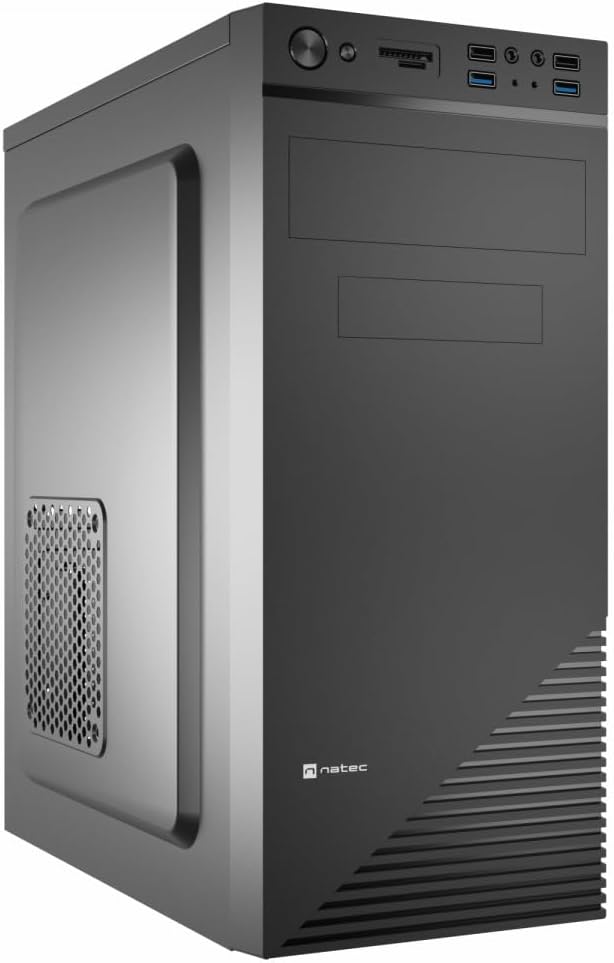
Figure 1: Natec Cabassu G2 Midi Tower PC Case. This image shows the front and left side of the black PC case, highlighting its sleek design and front panel layout.
Informació de seguretat
- Desconnecteu sempre l'alimentació de la presa de corrent abans d'instal·lar o treure qualsevol component.
- Handle components with care to prevent damage from static electricity.
- Mantingueu la carcassa allunyada de l'aigua, la humitat i les temperatures extremes.
- Assegureu-vos una ventilació adequada per evitar el sobreescalfament.
- Do not attempt to open the power supply unit.
Contingut del paquet
Verifiqueu que tots els elements siguin presents al paquet:
- Natec Cabassu G2 Midi Tower PC Case
- Accessory kit (screws, standoffs, cable ties)
- Manual d'usuari (aquest document)
Configuració i instal·lació de components
1. Preparació del cas
- Col·loqueu la caixa sobre una superfície plana i estable.
- Traieu els panells laterals desenroscant els cargols de la part posterior i fent lliscar els panells cap enrere.

Figura 2: Interior view of the Natec Cabassu G2 case with the side panel removed, illustrating the internal layout for component installation.
2. Instal·lació de la placa base
- Instal·leu la protecció d'E/S a l'obertura posterior de la carcassa.
- Align the motherboard with the pre-installed standoffs. The Cabassu G2 supports Mini ITX, Micro ATX, and ATX motherboards.
- Fixeu la placa base amb els cargols proporcionats.
3. Instal·lació de la font d'alimentació
- La font d'alimentació es munta a la part inferior de la carcassa.
- Slide the power supply into its designated bay from the rear of the case.
- Secure it with screws from the rear.
4. Instal·lació de la unitat d'emmagatzematge
- 2.5" Drives (SSDs/HDDs): The case features 3 x 2.5" drive bays. Mount drives using the provided screws in the designated locations.
- 3.5" Drives (HDDs): The case also supports 3.5" drives.
5. Instal·lació de la targeta d'expansió
- Remove the necessary expansion slot covers from the rear of the case (7 expansion slots available).
- Inseriu la targeta gràfica o altres targetes d'expansió a les ranures PCIe de la placa base.
- Fixeu les targetes amb cargols.

Figura 3: posterior view of the Natec Cabassu G2 case, detailing the I/O shield cutout, power supply opening, and seven expansion slots.
6. Gestió de cables
Route cables behind the motherboard tray where possible to improve airflow and aesthetics. Use the included cable ties to secure bundles.
7. Connexió dels cables del panell frontal
Connect the front panel cables (USB 2.0, USB 3.0, audio, power switch, reset switch, HDD LED, power LED) to the corresponding headers on your motherboard. Refer to your motherboard manual for exact pin assignments.

Figure 4: Close-up of the Natec Cabassu G2 front panel, showing 2x USB 2.0 ports, 2x USB 3.0 ports, audio jacks, and power/reset buttons.
Instruccions de funcionament
Encès/Apagat
- Encès: Premeu el botó d'encesa situat al tauler frontal.
- Apagar: Initiate shutdown through your operating system. For a forced shutdown, press and hold the power button for several seconds.
- Restablir: Press the reset button on the front panel to restart the system.
Using Front Panel Ports
El panell frontal proporciona un accés convenient a:
- 2 x ports USB 2.0
- 2 x ports USB 3.0
- Audio input (microphone) and output (headphone) jacks
Connect compatible devices to these ports as needed.
Manteniment
Neteja
- Netegeu regularment l'exterior de la carcassa amb un drap suau iamp tela. Eviteu els netejadors abrasius.
- Use compressed air to remove dust from fan filters and internal components. Ensure the system is powered off and unplugged before cleaning.
Filtres de pols
The case may include removable dust filters. Periodically remove and clean these filters to maintain optimal airflow and cooling performance.
Resolució de problemes
| Problema | Causa possible | Solució |
|---|---|---|
| El sistema no s'encén. | Power cables not connected properly. Faulty power supply. | Check all power connections (motherboard, CPU, GPU, power supply to wall). Ensure power supply switch is ON. |
| Els ports USB del panell frontal no funcionen. | Front panel USB cables not connected to motherboard. | Verify that the USB 2.0 and USB 3.0 headers are correctly connected to the motherboard. |
| Excessive fan noise. | Dust accumulation. Loose fan. | Clean dust from fans and filters. Ensure all fans are securely mounted. |
Especificacions
| Característica | Detall |
|---|---|
| Nom del model | Cabassu G2 |
| Número de model de l'article | S5624687 |
| Tipus de cas | Torre del Midi |
| Dimensions (LxWxH) | 19.69 x 19.69 x 11.02 polzades (50 x 50 x 28 cm) |
| Pes | 7.04 lliures (3.19 kg) |
| Material | Acrilonitril butadiè estirè (ABS), acer d'aliatge |
| Compatibilitat amb la placa base | Mini ITX, Micro ATX, ATX |
| Badies d'unitat de 2.5" | 3 |
| Ranures d'expansió | 7 |
| Ports d'E / S frontals | 2 USB 2.0, 2 USB 3.0, Entrada/Sortida d'àudio |
| Suport dels fans | 120mm (rear, pre-installed if applicable) |
| Mètode de refrigeració | Aire |
| Muntatge de la font d'alimentació | Muntatge inferior |
Informació de la garantia
Natec products are covered by a manufacturer's warranty. Specific warranty terms and conditions may vary by region and retailer. Please refer to the warranty card included with your product or visit the official Natec website for detailed information regarding warranty coverage and claims.
Suport
For technical assistance, troubleshooting, or further inquiries, please visit the official Natec support weblloc web o poseu-vos en contacte amb el seu departament d'atenció al client. La informació de contacte normalment es pot trobar a l'embalatge del producte o a la marca oficial. weblloc.
Weblloc: www.natec-zone.com (Exampl'enllaç, l'enllaç real pot variar)


