1. Introducció
The AotuLink 7-Inch Wireless Car Stereo (Model C7) is designed to enhance your driving experience by integrating smartphone functionalities directly into your vehicle. This portable device supports wireless Apple CarPlay and Android Auto, allowing seamless access to navigation, music, calls, and messages. It also features wireless mirror link for both iOS and Android devices, multimedia playback, and various audio output options including Bluetooth, FM transmission, built-in speaker, and AUX connection. The device can be mounted on your dashboard or windshield for optimal viewing.
2. Què hi ha a la caixa
Si us plau, verifiqueu que tots els elements que s'enumeren a continuació estiguin inclosos al vostre paquet:
- AotuLink 7-Inch Wireless Car Stereo Device
- Suport de ventosa
- Carregador de cotxe
- Disc de muntatge del panell de comandament
- Cable d'àudio de 3.5 mm
- Cable USB-C a USB-A
- Manual d'usuari

Figura 2.1: Contingut del paquet
3. Producte acabatview
Familiarize yourself with the device's components and ports:

Figure 3.1: Device Ports and Dimensions
- Botó d'encesa: Encén/apaga el dispositiu.
- AUX: 3.5mm audio output port for connecting to your car's AUX input.
- Targeta TF: Slot for a TransFlash (microSD) card for multimedia playback.
- AV IN: Port d'entrada d'àudio/vídeo.
- TIPUS-C: Port USB tipus C per a l'entrada d'alimentació.
4. Configuració
4.1 Muntatge del dispositiu
The AotuLink car stereo offers flexible mounting options for your dashboard or windshield.
4.1.1 Suction Cup Bracket Installation
- Attach the device to the suction cup bracket.
- Netegeu a fons la superfície de muntatge desitjada (parabrisa o quadre de comandament).
- Press the suction cup firmly against the surface and engage the locking lever to secure it.
- Adjust the angle of the bracket for optimal viewing.

Figure 4.1: Suction Cup Bracket Adjustments and Mounting
4.1.2 Dashboard Pad Mounting (Optional)
If your dashboard surface is not suitable for direct suction cup mounting, use the provided dashboard pad:
- Clean the dashboard area where you intend to place the pad.
- Peel off the protective film from the adhesive side of the dashboard pad.
- Firmly press the pad onto the dashboard and hold for 30 seconds to ensure strong adhesion. Allow 30 minutes for the adhesive to set before attaching the suction cup.
- Attach the suction cup bracket to the dashboard pad.

Figure 4.2: Dashboard Pad Mounting Steps
4.2 Connexió d'alimentació
Connect the provided car charger to the TYPE-C port on the device and plug the other end into your car's 12V power outlet (cigarette lighter socket). The device will power on automatically.
5. Instruccions de funcionament
Apple CarPlay sense fil 5.1
Connect your iPhone wirelessly to access maps, messages, calls, music, and more.
- Turn on Wi-Fi and Bluetooth on your iPhone.
- On your iPhone, go to Bluetooth settings and select the device starting with "T88******".
- Confirma l'emparellament quan se't demani.
- Select "Use CarPlay" on your iPhone.
- Wait approximately 30 seconds for the device to enter CarPlay mode.

Figure 5.1: Wireless Apple CarPlay Connection Steps
5.2 Wireless/Wired Android Auto
Connect your Android phone to use Android Auto features. Newer phones support wireless, while older phones may require a wired USB connection.
- Turn on Wi-Fi and Bluetooth on your Android phone.
- On your Android phone, go to Bluetooth settings, click "Pair new device", and select the device starting with "T88******".
- Confirma l'emparellament quan se't demani.
- Once "T88******" is displayed under "Connected devices", wait approximately 30 seconds for the device to enter Android Auto mode.
- For wired connection, connect your Android phone to the device's USB-C port using a USB cable.

Figure 5.2: Wireless Android Auto Connection Steps
5.3 Wireless Mirror Link (AirPlay & Android Cast)
Mirror your phone's screen to the car stereo for viewing contingut.
5.3.1 iOS AirPlay Connection
- Turn on Wi-Fi on your iPhone.
- Select the Wi-Fi device starting with "CARLINK******" and enter the password "12345678".
- Open your iPhone's Control Center and tap the "Screen Mirroring" icon.
- Select "SmartScreen" from the list.
- Wait for a moment to enter AirPlay mode.

Figure 5.3: iOS AirPlay Connection Steps
5.3.2 Android Cast Connection
- Turn on Wi-Fi on your Android phone.
- Scan the QR code displayed on the Android Cast interface of the car stereo and install the required app.
- In the app, select "Wi-Fi Direct" and click "CONNECT".
- Select "Start Now" when prompted.
- Wait for a moment to enter Android Cast mode.

Figure 5.4: Android Cast Connection Steps
5.4 Opcions de sortida d'àudio
The device offers several ways to output audio to your car's sound system:
- Bluetooth: Connect your phone via Bluetooth for high-quality audio streaming.
- Transmissor FM: Transmit audio to your car's FM radio by tuning both devices to the same FM frequency.
- Altaveu integrat: The device has its own speaker for direct audio output.
- Connexió AUX: Use the provided 3.5mm audio cable to connect the device's AUX output to your car's AUX input.

Figura 5.5: Opcions de sortida d'àudio
5.5 Control de veu
Utilize voice commands through Siri (for Apple CarPlay) or Google Assistant (for Android Auto) for hands-free operation of navigation, calls, messages, and music.

Figura 5.6: Siri i control per veu de Google
5.6 Reproducció multimèdia
The device supports playback of various media formats from a TF card or mirrored from your smartphone.
- Música: Supports .mp3, .wav, and other audio formats.
- Vídeo: Supports .f4v, .mov, .ts, .mp4, and other video formats.
- Imatges: View images stored on your TF card or mirrored from your phone.
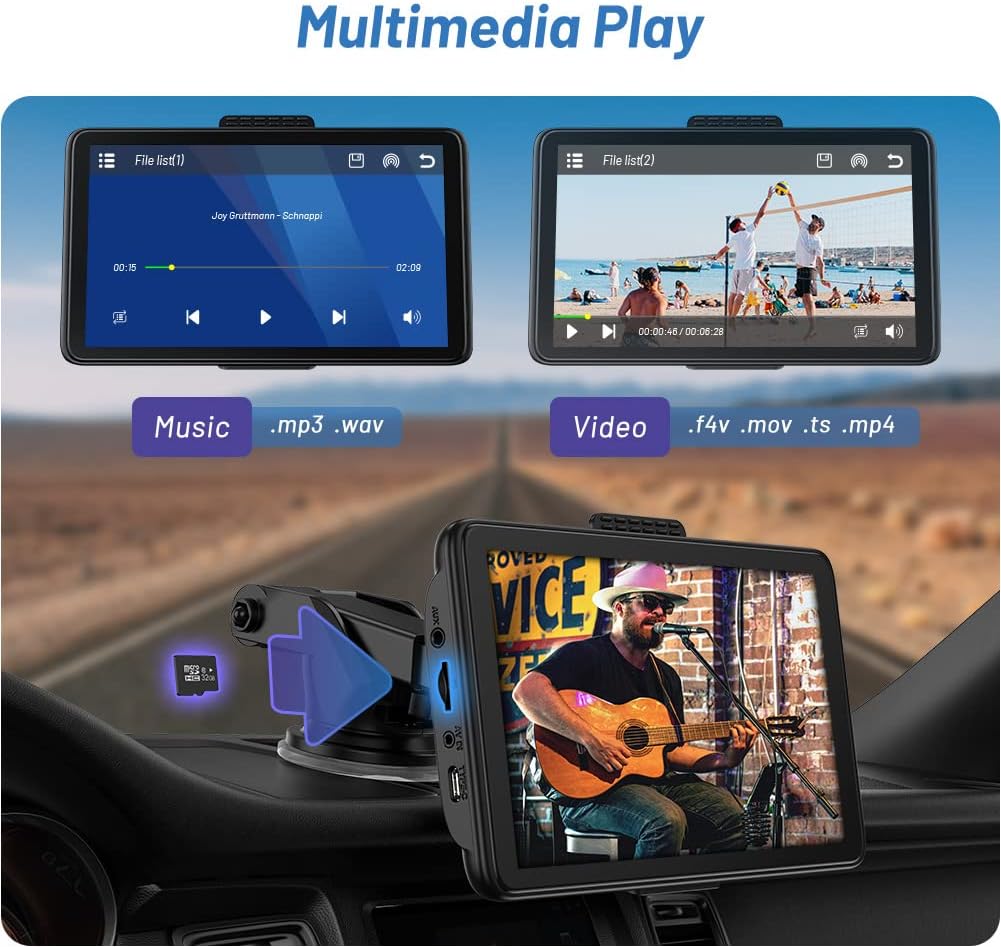
Figure 5.7: Multimedia Playback
5.7 Navegació
Utilize your preferred mobile navigation apps like Google Maps or Waze through Apple CarPlay or Android Auto for real-time directions on the 7-inch HD IPS display.
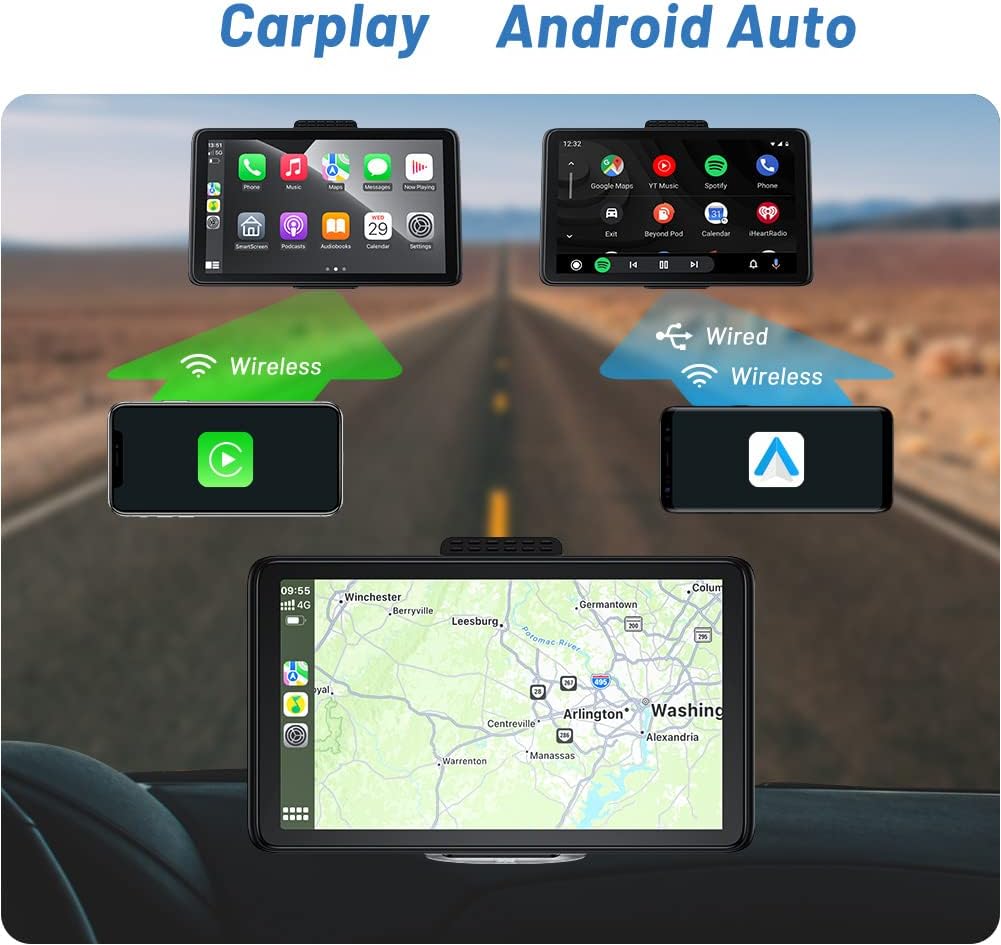
Figure 5.8: Navigation via Apple CarPlay and Android Auto
Video 5.1: Demonstration of Portable Carplay & Android Auto features, including navigation and interface interaction.
6. Manteniment
- Neteja: Use a soft, dry cloth to clean the screen and exterior of the device. Avoid using abrasive cleaners or solvents.
- Emmagatzematge: Quan no l'utilitzeu durant períodes prolongats, guardeu el dispositiu en un lloc fresc i sec, allunyat de la llum solar directa i de temperatures extremes.
- Temperatura: Avoid exposing the device to extreme hot or cold temperatures, as this can affect its performance and lifespan.
- Cura del cable: Assegureu-vos que tots els cables estiguin connectats correctament i que no estiguin doblegats ni pinçats, ja que això podria causar danys.
7. Solució De Problemes
| Problema | Causa possible | Solució |
|---|---|---|
| El dispositiu no s'encén. | No power from car charger or faulty connection. | Check car charger connection to device and 12V outlet. Ensure car's 12V outlet is functional. |
| Wireless CarPlay/Android Auto not connecting automatically. | Bluetooth/Wi-Fi interference or initial pairing issue. | Ensure phone's Bluetooth and Wi-Fi are on. Try turning Bluetooth off and on again on your phone. Re-pair the device if necessary. |
| Mala qualitat d'àudio (estàtic, baix volum). | FM transmitter interference, loose AUX cable, or car's audio settings. | If using FM, try a different frequency. Ensure AUX cable is fully inserted. Adjust volume on both the device and your car stereo. Consider using your car's Bluetooth for audio if available. |
| La pantalla tàctil no respon. | Error temporal de programari. | Restart the device by unplugging and re-plugging the power cable. |
8. Especificacions
- Marca: AotuLink
- Número de model: C7
- Mida de la pantalla: 7 polzades
- Tecnologia de connectivitat: Bluetooth
- Tipus de controlador: Android (Compatible with Apple CarPlay)
- Característica especial: Portàtil
- Dispositius compatibles: Smartphone, altaveu
- Ports HDMI totals: 1 (Note: JSON indicates 1 HDMI port, but device diagram shows AV IN, not HDMI. Assuming AV IN is the intended video input.)
- Tipus de connector: 3.5mm Jack, USB (Type-C for power)
- Mode de sortida d'àudio: estèreo
- Configuració del canal de so envoltant: 2
- Color: Negre
- Pes de l'article: 1.98 lliures
- Dimensions del paquet: 8.9 x 5.71 x 4.88 polzades
- Data de primera disponibilitat: 15 d'abril de 2023
9. Garantia i Suport
The AotuLink 7-Inch Wireless Car Stereo comes with a full one-year warranty. If you encounter any issues or require technical assistance, please contact the AotuLink Professional Team. They provide dedicated support and guidance to help resolve any technical problems or difficulties you may experience.
For support, please refer to the contact information provided in your product packaging or on the official AotuLink weblloc.


