1. Introducció
This manual provides essential information for the safe and efficient operation of your Acekool Portable Air Conditioner. This 3-in-1 unit offers cooling, fan, and dehumidification functions, designed to provide comfort in various indoor environments. Please read this manual thoroughly before installation and use, and retain it for future reference.
2. Informació de seguretat
Per evitar lesions a l'usuari o altres persones i danys a la propietat, s'han de seguir les instruccions següents. Un funcionament incorrecte a causa d'ignorar les instruccions pot causar danys o danys.
- Seguretat elèctrica: Ensure the power supply matches the unit's requirements (220 Volts). Do not operate with a damaged power cord or plug. Do not share the electrical outlet with other appliances. Always unplug the unit before cleaning or servicing.
- Refrigerant (R290): This appliance contains R290 refrigerant, which is flammable. Keep the unit away from open flames, heat sources, and ignition sources. Do not puncture or burn the refrigerant circuit.
- Col·locació: Place the unit on a flat, stable surface. Maintain a minimum distance of 20 cm from walls or other objects to ensure proper airflow. Do not block air inlets or outlets.
- Nens i animals de companyia: Keep children and pets away from the unit. Do not allow children to play with the appliance or its controls.
- Drenatge d'aigua: Ensure proper drainage of condensed water, especially during dehumidification mode, to prevent water overflow and damage.
- Manteniment: Només feu el manteniment tal com es descriu en aquest manual. Per a reparacions, contacteu amb personal de servei qualificat.
3. Què hi ha a la caixa
Carefully unpack the box and ensure all items are present and undamaged. If any items are missing or damaged, contact customer support.
- Portable Air Conditioner Unit (x1)
- Comandament a distància (x1)
- Exhaust Hose (x1)
- Window Sealing Kit (x1)
- Drain Hose (x1)
- Manual d'usuari (x1)

Image: All components included in the product package, clearly labeled with numbers for identification.
4. Configuració
Segueix aquests passos per configurar el teu aire condicionat portàtil per a un rendiment òptim.
4.1 Col·locació de la unitat
- Col·loqueu la unitat sobre una superfície ferma i plana a l'habitació desitjada.
- Ensure there is at least 20 cm of space around the unit for proper air circulation.
- Col·loqueu la unitat a prop d'una finestra o porta per a la instal·lació de la mànega d'escapament.
4.2 Instal·lació de la mànega d'escapament
- Attach the exhaust hose connector to the back of the air conditioner unit.
- Allarga la mànega d'escapament i connecta l'adaptador del kit de finestra a l'altre extrem.
- Adjust the window sealing plate to fit your window opening. Secure it in place.
- Insert the window kit adapter into the opening of the window sealing plate.
- Ensure the exhaust hose is as straight and short as possible to maximize efficiency. Avoid kinks or sharp bends.

Image: Visual instructions demonstrating the process of connecting the exhaust hose to the unit and installing it in a window.

Imatge: Detallada view of the exhaust hose connection points, highlighting the ease of installation.
4.3 Connexió d'alimentació
Plug the power cord into a grounded electrical outlet (220V). Do not use extension cords or adapters.
5. Instruccions de funcionament
El vostre aire condicionat portàtil Acekool es pot fer funcionar mitjançant el panell de control de la unitat o el comandament a distància inclòs.
5.1 Tauler de control acabatview
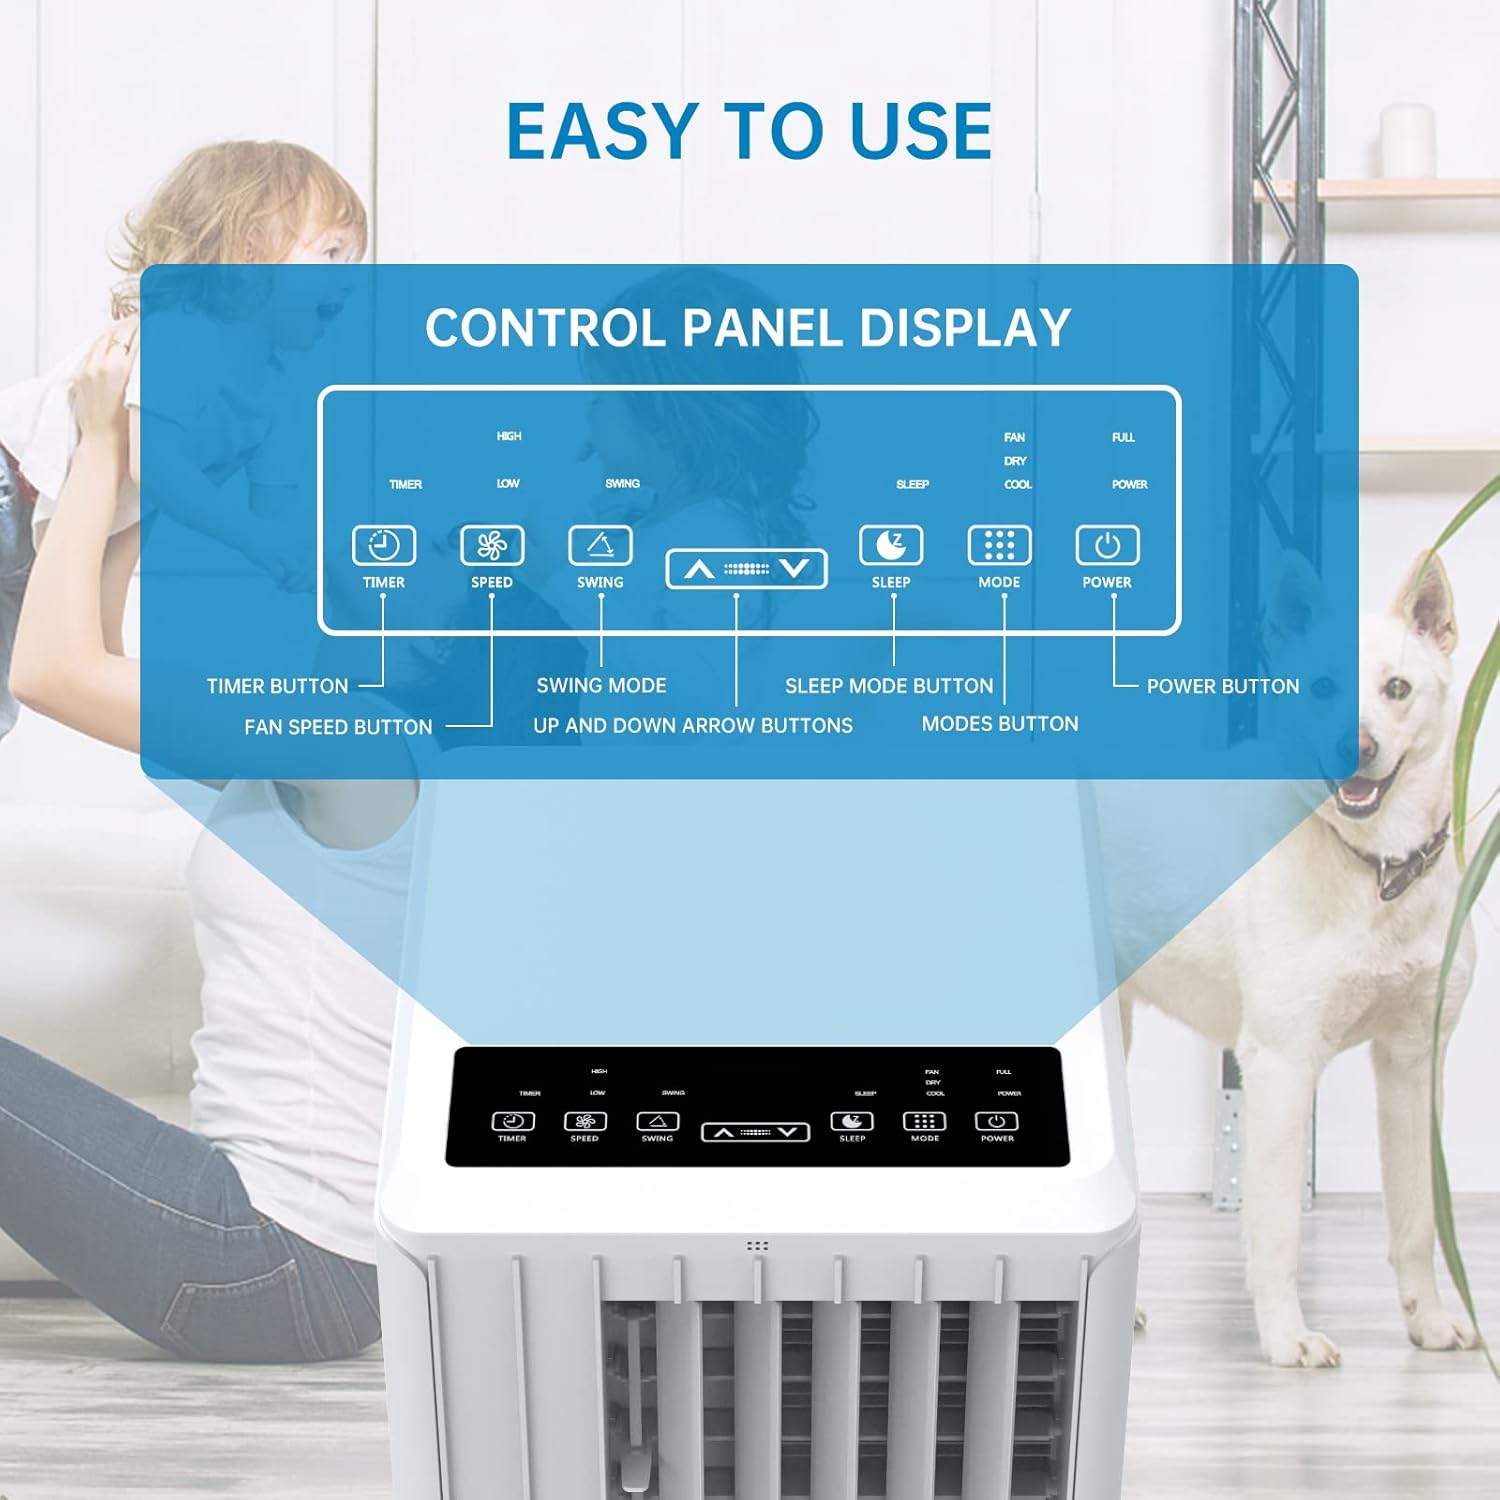
Image: A detailed diagram illustrating the control panel buttons and their functions, including Timer, Speed, Swing, Sleep, Mode, and Power.

Image: A user interacting with the touch-sensitive control panel, demonstrating its intuitive design.
- Botó d'encesa: Encén o apaga la unitat.
- Botó de mode: Alterna ciclísticament entre els modes de refrigeració, ventilador i deshumidificació.
- Botó de velocitat: Ajusta la velocitat del ventilador (Baixa, Mitjana, Alta).
- Botó del temporitzador: Sets the auto ON/OFF timer (up to 24 hours).
- Botó de swing: Activa o desactiva l'oscil·lació automàtica dels deflectors per a una distribució de l'aire més àmplia.
- Fletxes amunt/avall: Adjusts temperature settings or timer duration.
- Botó de dormir: Activates Sleep Mode for quiet operation and energy saving during sleep.
5.2 Control remot
The remote control provides convenient operation from a distance. Ensure there are no obstructions between the remote and the unit's receiver.

Image: The portable air conditioner unit alongside its remote control, demonstrating the convenience of remote operation and the air swing feature.
5.3 Modes de funcionament
The unit offers three primary operating modes:

Image: A graphic illustrating the three distinct modes of operation: Cooling, Dehumidifying, and Fan, with their respective visual effects.
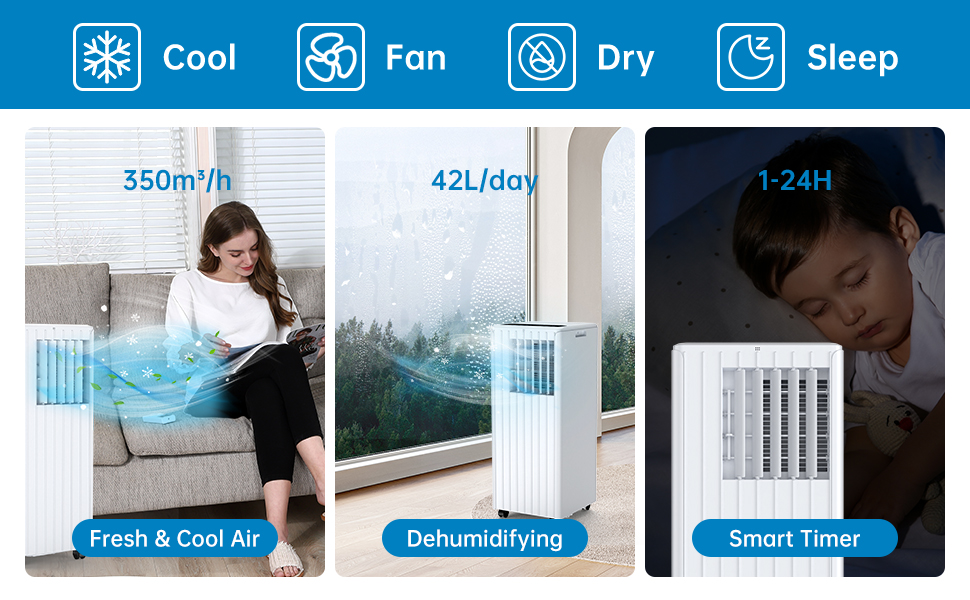
Image: A comprehensive display of the unit's modes, including cooling, fan, dry (dehumidifying), and sleep, along with performance metrics.
- Mode de refrigeració: Provides powerful cooling. Set your desired temperature using the Up/Down arrows. The unit will cool until the room reaches the set temperature.
- Mode de ventilador: Fa circular l'aire sense refredar. Trieu entre velocitats del ventilador Baixa, Mitjana o Alta.
- Mode de deshumidificació: Removes excess moisture from the air. The unit will operate at a low fan speed. Ensure the continuous drainage hose is connected for prolonged use in this mode.
5.4 Mode de repòs
Activate Sleep Mode for quiet operation and energy efficiency during nighttime. In this mode, the fan speed is reduced, and the temperature may gradually increase to ensure comfortable sleep.

Image: The portable air conditioner in a bedroom setting, illustrating its quiet operation and features like automatic shut-off and 24-hour smart timer for undisturbed sleep.

Image: A graph depicting the temperature adjustment curve in Sleep Mode, showing how the temperature gradually rises over several hours to maintain comfort.
6. Manteniment
Un manteniment regular garanteix la longevitat i el funcionament eficient del vostre aire condicionat.
6.1 Neteja del filtre d'aire
El filtre d'aire s'ha de netejar cada dues setmanes o amb més freqüència, depenent de l'ús i la qualitat de l'aire. Un filtre brut pot reduir l'eficiència de la refrigeració i el flux d'aire.
- Desendolleu la unitat de la presa de corrent.
- Localitzeu i traieu el filtre d'aire de la part posterior o lateral de la unitat.
- Wash the filter under running water (warm, not hot) or use a vacuum cleaner to remove dust.
- Deixeu que el filtre s'assequi completament abans de tornar-lo a inserir a la unitat. No l'exposeu a la llum solar directa.

Imatge: Un primer pla view of the washable filter being easily removed from the unit for maintenance.
6.2 Drenatge de l'aigua
The unit has an internal water collection tank. When the tank is full, the unit will stop operating and display an indicator. You will need to drain the water manually.
- Desendolleu la unitat.
- Place a shallow pan or bucket under the drainage outlet at the bottom rear of the unit.
- Remove the drainage plug and allow the water to drain completely.
- Replace the drainage plug firmly.
For continuous drainage in dehumidification mode, connect the provided drain hose to the continuous drainage outlet.
6.3 Neteja general
Netegeu l'exterior de la unitat amb un damp drap. No utilitzeu productes químics agressius, abrasius ni dissolvents.
6.4 Emmagatzematge
Abans d'emmagatzemar la unitat durant un període prolongat:
- Escorreu tota l'aigua condensada.
- Netegeu el filtre d'aire.
- Desendolla el cable d'alimentació i enrotlla'l amb cura.
- Guardeu la unitat en un lloc sec i fresc, allunyat de la llum solar directa i de temperatures extremes.
7. Solució De Problemes
If you encounter issues with your air conditioner, refer to the table below for common problems and solutions.
| Problema | Causa possible | Solució |
|---|---|---|
| La unitat no s'encén | Sense font d'alimentació Dipòsit d'aigua ple S'ha activat la protecció contra el sobreescalfament | Check power plug and outlet Escorreu el dipòsit d'aigua Deixeu que la unitat es refredi durant 30 minuts |
| Refrigeració insuficient | Filtre d'aire brut Exhaust hose blocked or kinked Mida de l'habitació massa gran Finestres/portes obertes Ajust de temperatura massa alt | Netegeu el filtre d'aire Check and clear exhaust hose Assegureu-vos que la unitat sigui adequada per a la mida de l'habitació Tanqueu totes les finestres i portes Baixeu la temperatura establerta |
| Fuga d'aigua | Tap de desguàs solt Unitat sense nivell Continuous drain hose improperly connected | Tap de drenatge segur Col·loqueu la unitat sobre una superfície plana Ensure drain hose is properly attached and sloped downwards |
| La unitat és sorollosa | La unitat no està sobre una superfície plana Components interns que vibren | Col·loqueu la unitat sobre una superfície plana i estable This may be normal operation noise, especially at high fan speeds. Ensure no obstructions. |
| El comandament a distància no funciona | Bateries gastades o inserides incorrectament Obstrucció entre el comandament a distància i la unitat | Canvieu les piles, comproveu la polaritat Remove any obstructions, ensure direct line of sight |
8. Especificacions
Technical specifications for the Acekool Portable Air Conditioner Model PAC-M09.
| Característica | Especificació |
|---|---|
| Número de model | PAC-M09 |
| Marca | Acekool |
| Capacitat de refrigeració | 9000 BTU |
| Refrigerant | R290 |
| Font d'alimentació | 220 Volts |
| Nivell màxim de soroll | 55 dB(A) |
| Dimensions del producte (L x A x A) | 38.2 x 35 x 88.5 cm |
| Pes del producte | 26 kg |
| Capacitat de deshumidificació | 42 L / dia |
| Classificació d'eficiència energètica | Classe A |
| VIENT | 2.8 |
| Àrea de cobertura recomanada | 30-40 m² |
9. Garantia i Suport
For warranty information, technical support, or service inquiries, please refer to the warranty card included with your product or contact Acekool customer service through their official website or the retailer where the product was purchased. Please have your model number (PAC-M09) and purchase date ready when contacting support.


