Introducció
Thank you for choosing the GAOMON SW01 Full Bed Frame. This manual provides detailed instructions for assembly, operation, maintenance, and troubleshooting to ensure safe and optimal use of your new bed frame. This bed frame features a storage headboard with a charging station, integrated LED lights, and four under-bed storage drawers.
Informació de seguretat
- Llegiu atentament totes les instruccions abans de muntar i utilitzar.
- Mantingueu totes les peces petites i els materials d'embalatge fora de l'abast dels nens.
- Munta el marc del llit sobre una superfície suau i neta per evitar ratllades.
- Assegureu-vos que tots els cargols i perns estiguin ben ajustats abans d'utilitzar-los. Comproveu-los periòdicament i torneu-los a apretar segons calgui.
- No supereu la capacitat màxima de pes de 1000 lliures.
- Use only the recommended mattress height of 8"-12" for optimal fit and safety.
- Avoid placing heavy objects on the headboard shelf to prevent damage or injury.
- Mantingueu els líquids allunyats de l'estació de càrrega per evitar riscos elèctrics.
Producte acabatview
The GAOMON SW01 Full Bed Frame is designed for comfort and functionality, offering ample storage and modern features.

Image: Detailed product dimensions of the GAOMON Full Bed Frame, showing overall length, width, and height, as well as dimensions for the headboard and drawers. The bed has a weight capacity of 1000 lbs.

Imatge: Una completa view of the GAOMON Full Bed Frame in a bedroom, showcasing its rustic brown finish, storage headboard, and under-bed drawers. The bed is made of metal and wood.
Contingut del paquet
Please ensure all parts are present before beginning assembly. Refer to the assembly video for visual guidance on identifying parts.
Video: This video demonstrates the unboxing and layout of all components included with the GAOMON Full Bed Frame, including metal frame parts, wooden slats, headboard sections, drawers, and hardware. (0:00 - 0:09)
Instruccions de muntatge
Assembly is recommended for two people and takes approximately 40 minutes. Do not fully tighten screws until all parts are connected.
- Assemble the Central Support Beam:
Connect the central support beam components (K, J, Y1, R) using the provided screws and Allen wrench. Ensure they are aligned correctly before tightening. - Muntar els rails laterals:
Connect the side rail components (L, M, Y1, R) in a similar manner to the central beam. - Connect Side Rails to Central Support:
Attach the assembled side rails to the central support structure using the designated hardware. - Attach Headboard Side Panels:
Secure the headboard side panels (A1, A2) to the main headboard section (B) using screws (T4). - Attach Headboard to Frame:
Connect the assembled headboard to the bed frame using screws (T5, T3). - Attach Footboard to Frame:
Secure the footboard (D) to the bed frame using screws (V2). - Attach Side Panels to Footboard:
Connect the footboard side panels (E1, E2) to the footboard using screws (T2, T1). - Instal·lar llistons:
Place the wooden slats across the bed frame. Ensure they are evenly spaced and secured if applicable. - Instal·leu l'estació de càrrega:
Insert the charging station (U3) into the designated slot on the headboard and secure it with screws (V1). - Instal·lar llums LED:
Connect the LED light strip (U2) and controller (U1) and attach them to the headboard using screws (V2).
Video: Step-by-step guide on assembling the central support beam of the bed frame. (0:10 - 0:26)
Video: Demonstrates the assembly of the bed frame's side rails. (0:27 - 0:43)
Video: Shows how to connect the side rails to the central support frame. (0:44 - 1:00)
Video: Guide for attaching the headboard side panels to the main headboard. (1:51 - 2:06)
Video: Instructions for securing the headboard to the bed frame. (2:07 - 2:21)
Video: Guide for attaching the footboard to the bed frame. (2:22 - 2:50)
Video: Instructions for attaching the side panels to the footboard. (2:51 - 3:09)
Video: Demonstrates the installation of the wooden slats onto the bed frame. (3:10 - 3:33)
Video: Shows how to install the charging station into the headboard. (3:34 - 3:43)
Video: Instructions for installing the LED light strip and controller. (3:44 - 3:52)
Instruccions de funcionament
Llums LED
- The bed frame features a built-in RGB LED light strip.
- Control the LED lights using the included remote controller or a compatible mobile application.
- Choose from 12 scene modes, 7 static colors, and 3 brightness modes.
- The LED lights can change color with the rhythm of sound and music for dynamic effects.

Image: The bed frame's LED lights are shown syncing with music, highlighting the smart controller, switch, 12 scene modes, 3 brightness adjustments, and app control features.
Vídeo: Un breu resumview of the LED bed frame with headboard and storage drawers, demonstrating the lighting features and storage options. (0:00 - 0:20)
Estació de càrrega
- The headboard includes 3 USB outlets (5V/2A) and 1 Type-C charging port (20W).
- Use these ports to conveniently charge your electronic devices such as phones, tablets, and smartwatches.
- Ensure the bed frame is plugged into a power outlet for the charging station to function.

Imatge: Un primer pla view of the headboard's charging station, showing the USB ports, Type-C port, and power cord connection.
Storage Drawers & Mesh Baskets
- The bed frame includes 4 large storage drawers with wheels for easy access.
- Use the drawers to store clothes, bedding, or other items, maximizing space utilization.
- Iron wire mesh storage baskets are integrated on both sides of the headboard for books, magazines, or small personal items.
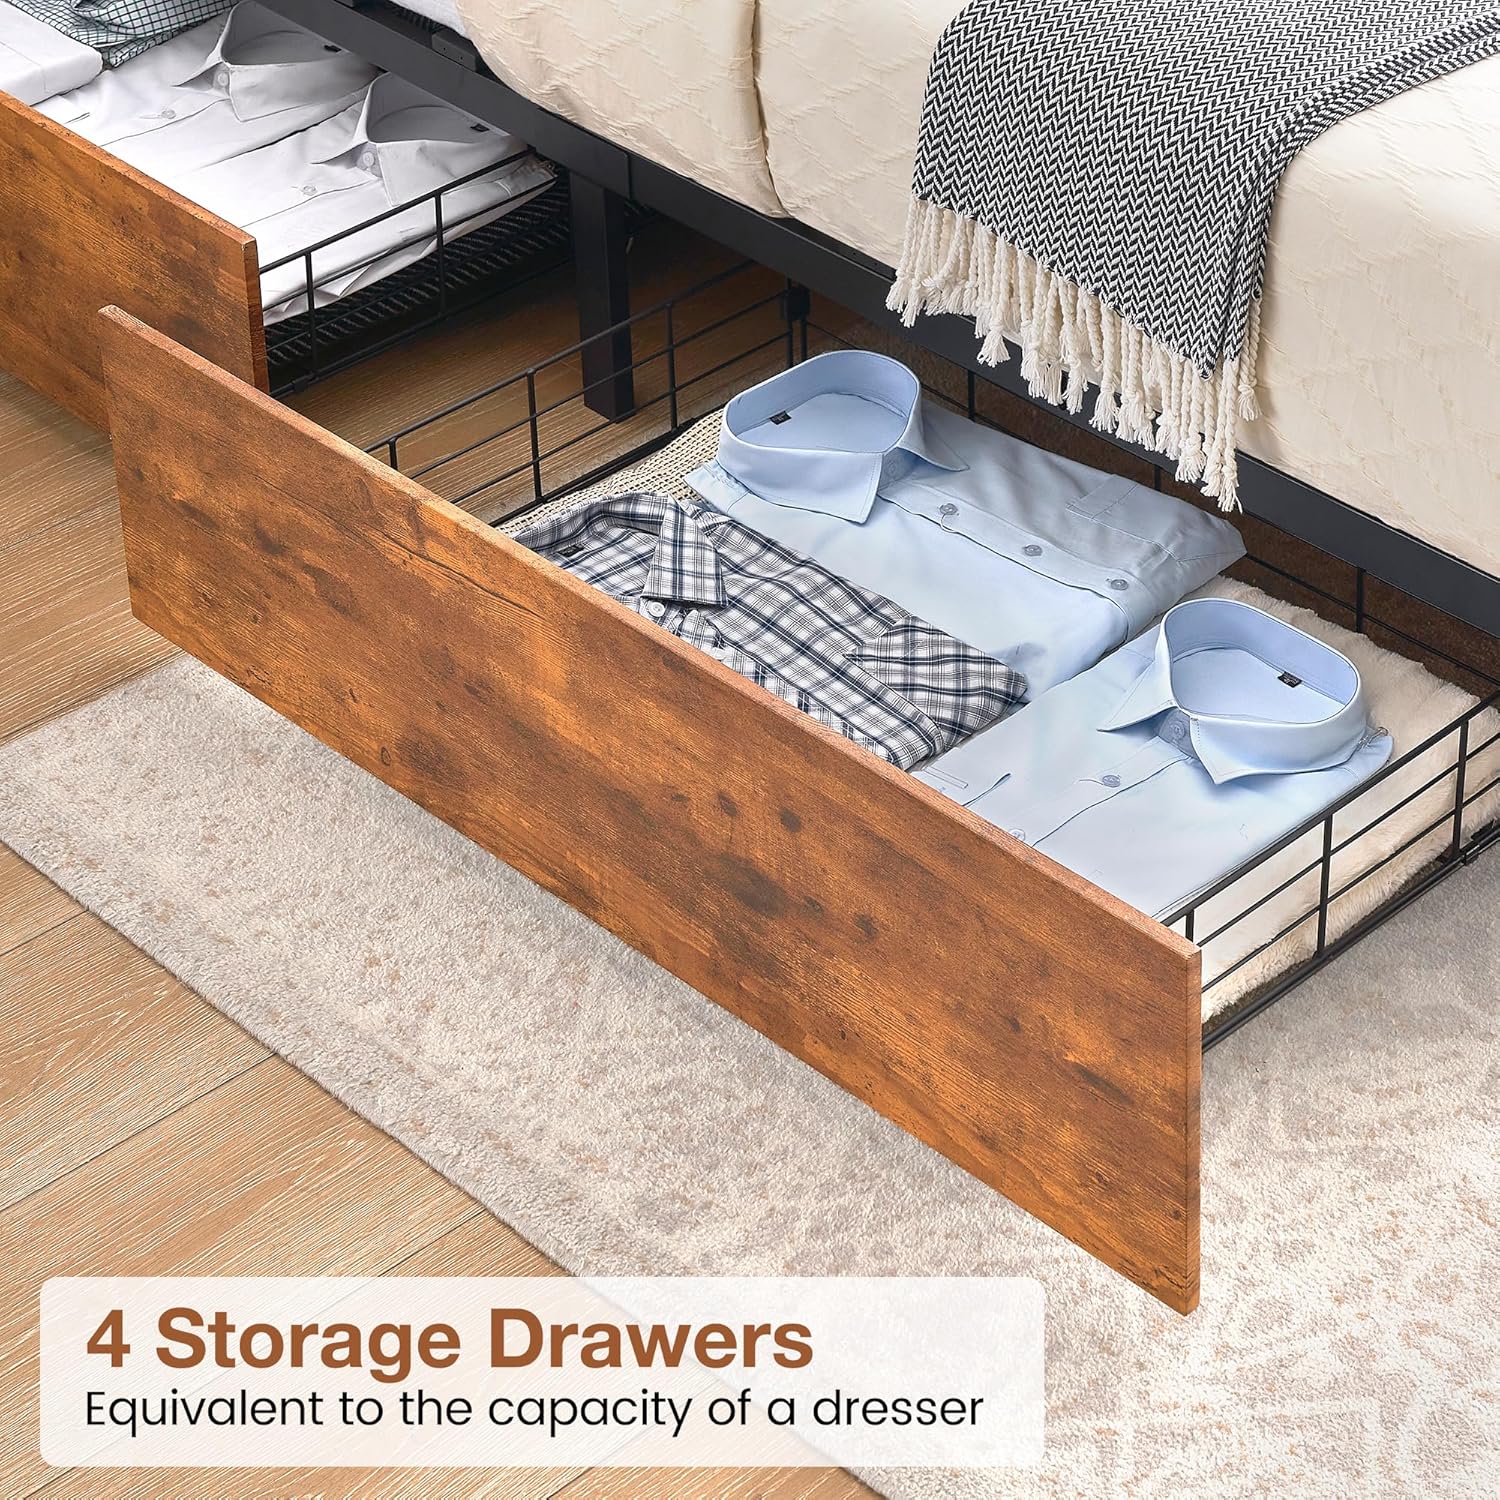
Image: Four under-bed storage drawers are shown pulled out, filled with folded shirts, demonstrating their capacity.

Imatge: Un costat view of the headboard, highlighting the 15.7-inch tall mesh storage basket, ideal for books and magazines.
Manteniment
- Neteja: For the fabric parts of the headboard and footboard, dry clean only. For metal and wood surfaces, wipe with a soft, damp tela. Eviteu els productes químics durs.
- Comprovació de maquinari: Inspeccioneu periòdicament tots els cargols i perns per assegurar-vos que romanen ajustats. Torneu a apretar-los si cal per mantenir l'estabilitat i evitar grinyols.
- Llistons: Ensure slats are properly seated and not damaged. Replace any broken slats immediately to maintain mattress support.
- Llums LED: If LED lights malfunction, check the power connection and controller. Do not attempt to repair electrical components yourself.
- Estació de càrrega: Keep the charging ports free of dust and debris. Do not force plugs into the outlets.
Resolució de problemes
| Problema | Causa possible | Solució |
|---|---|---|
| El marc del llit trontolla o grinyola. | Maquinari solt. | Revisa i estreny tots els cargols i perns. Assegura't que totes les connexions estiguin ben fixades. |
| Els llums LED no funcionen. | Power connection issue, faulty controller, or damaged light strip. | Ensure the power cord is securely plugged in. Check the controller for battery or damage. Contact customer support if the issue persists. |
| L'estació de càrrega no subministra energia. | Bed frame not plugged in, power outage, or internal wiring issue. | Verify the bed frame's main power cord is plugged into a working wall outlet. Check for tripped circuit breakers. |
| Els calaixos són difícils de treure o de ficar. | Obstruction, misaligned wheels, or uneven flooring. | Check for items blocking the drawers. Ensure the wheels are properly aligned in their tracks. Adjust the bed frame's position if flooring is uneven. |
Especificacions
- Model: SW01
- Mida: Complet
- Dimensions del producte: 80.8 cm de llargada x 52.3 cm d'amplada x 42 cm d'alçada
- Material: Metall, Fusta
- Color: marró
- Capacitat de pes: Fins a 1000 lliures
- Característiques especials: Lighted (RGB LED), No Box Spring Needed, Squeak Resistant, 4 Storage Drawers, USB & Type-C Charging Ports
- Recommended Mattress Height: 8-12 cm
- Muntatge requerit: Sí
Garantia i Suport
For warranty information or customer support, please refer to the documentation included with your purchase or contact GAOMON customer service directly. Keep your purchase receipt for warranty claims.


