1. Introducció
Thank you for choosing the Genesis 80GMVS Multi-Functional Vacuum Sealer. This appliance is designed to preserve food, liquids, and dry goods efficiently, making it suitable for food preservation, meal preparation, and sous vide cooking. Please read this manual thoroughly before operating the device to ensure safe and optimal performance.
Instruccions importants de seguretat
- Llegiu totes les instruccions abans d'utilitzar.
- No submergiu l'aparell, el cable d'alimentació ni l'endoll en aigua ni en altres líquids.
- Mantenir fora de l'abast dels nens. Aquest aparell no està pensat per a persones amb capacitats físiques, sensorials o mentals reduïdes, llevat que estiguin sota supervisió.
- Desconnecteu-lo de la presa de corrent quan no utilitzeu i abans de netejar-lo.
- No feu servir cap aparell amb un cable o un endoll danyats, o després que l'aparell funcioni malament o s'hagi fet malbé de cap manera.
- Utilitzeu només els accessoris recomanats pel fabricant.
- No utilitzar a l'aire lliure.
- Always place the appliance on a stable, flat, heat-resistant surface.
- Eviteu el contacte amb les peces mòbils.
- No utilitzeu per a finalitats diferents de les previstes.
2. Components del producte
Familiarize yourself with the main parts of your Genesis 80GMVS Vacuum Sealer:
- Tauler de control: Buttons for various sealing modes (Normal, Soft, Seal, External) and Stop.
- Tira de segellat: Heats to create a strong seal on vacuum bags.
- Canal de buit: Zona on s'extreu l'aire de la bossa.
- Lid Latch: Secures the lid during operation.
- Port d'accessoris: For connecting an external vacuum hose (not included) for containers.
- Cable d'alimentació: Connecta la unitat a una presa de corrent.
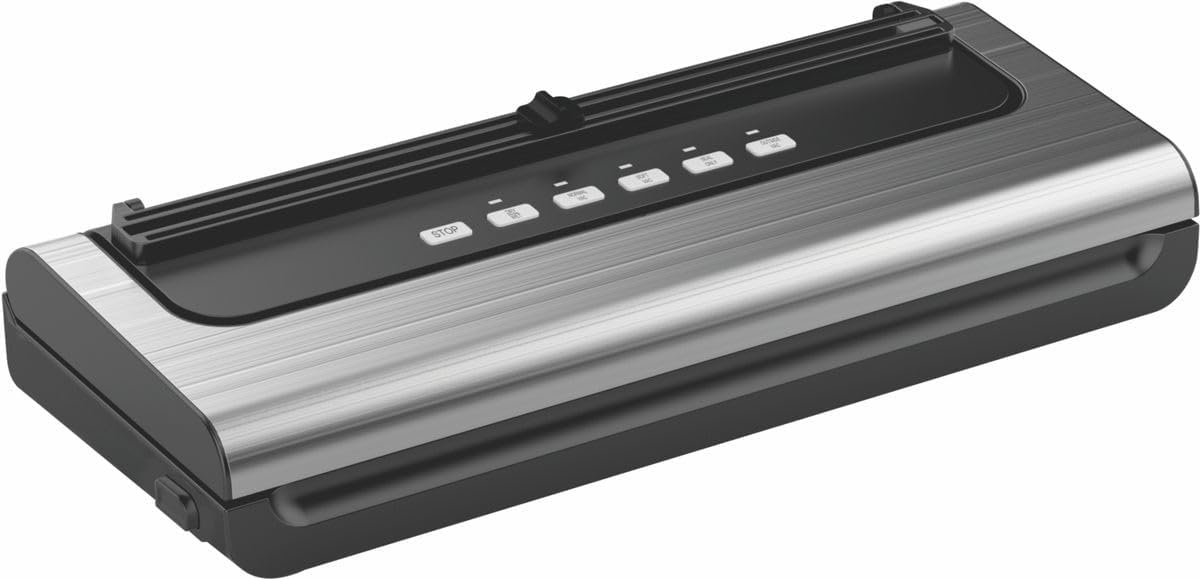
Figura 2.1: Mésview of the Genesis 80GMVS Multi-Functional Vacuum Sealer. This image displays the top view of the vacuum sealer, highlighting its sleek design and the control panel with various function buttons.
3. Configuració
- Desembalar: Carefully remove the vacuum sealer from its packaging. Retain packaging for future storage or transport.
- Inspeccionar: Comproveu si l'aparell presenta algun signe de danys. No l'utilitzeu si està danyat.
- Col·locació: Place the vacuum sealer on a dry, flat, and stable surface, ensuring adequate space around the unit for ventilation.
- Connexió d'alimentació: Plug the power cord into a standard electrical outlet. The indicator light may illuminate, indicating the unit is ready.
4. Instruccions de funcionament
This section details how to use your vacuum sealer for various food types and sealing methods.
4.1 Preparing Bags and Food
- Use only vacuum sealer bags designed for this appliance.
- Ensure the bag is clean and dry inside the sealing area.
- Leave at least 7-10 cm of space between the food and the top of the bag for proper sealing.
- Per a aliments humits, precongela'ls o posa'n un tovalló de paper dins la bossa per absorbir l'excés d'humitat.
4.2 Vacuum Sealing (Dry Mode)
- Place the open end of the bag into the vacuum channel. Ensure it lies flat and smooth over the sealing strip.
- Close the lid firmly until the latches click into place.
- Premeu el botó NORMAL button for standard vacuum and seal. The appliance will automatically vacuum the air and then seal the bag.
- Once the process is complete, the indicator light will turn off. Press the lid release buttons (if present) or gently lift the lid to open.
- Remove the sealed bag.
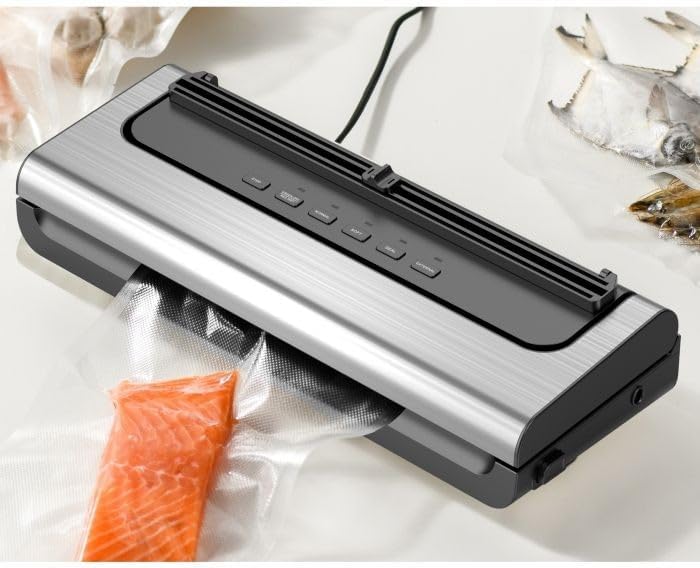
Figure 4.1: The Genesis 80GMVS vacuum sealer in operation, sealing a bag containing salmon. This image demonstrates the appliance actively extracting air from a bag, preparing it for preservation.
4.3 Vacuum Sealing (Wet/Moist Mode)
For foods with moisture, use the HUMIT setting (often combined with Normal/Soft depending on model, or indicated by a specific button if available). This mode adjusts the vacuum pressure and sealing time to accommodate liquids, preventing them from being drawn into the vacuum pump.
- Follow steps 1 and 2 from "Vacuum Sealing (Dry Mode)".
- Premeu el botó HUMIT button (if available) or select the appropriate setting for moist food.
- The appliance will proceed with vacuuming and sealing.
- Once complete, open the lid and remove the sealed bag.
4.4 Soft Vacuum Mode
For delicate items like bread, chips, or pastries, use the SUAU mode to prevent crushing. This mode reduces the vacuum pressure.
- Follow steps 1 and 2 from "Vacuum Sealing (Dry Mode)".
- Premeu el botó SUAU botó.
- Monitor the vacuum process. When the desired air removal is achieved, press the SEGELL button immediately to stop vacuuming and initiate sealing.
- Once complete, open the lid and remove the sealed bag.

Figura 4.2: Un primer pla view of the Genesis 80GMVS control panel and the sealing area with meat inside a bag. This image highlights the various control buttons, including 'STOP', 'NORMAL', 'SOFT', 'SEAL', and 'EXTERNAL', providing a clear view of the user interface during operation.
4.5 Seal Only Function
Utilitza el SEGELL button to create a seal without vacuuming. This is useful for making custom-sized bags from a roll or for resealing bags of snacks.
- Place the open end of the bag over the sealing strip.
- Tanqueu la tapa amb fermesa.
- Premeu el botó SEGELL button. The sealing indicator light will illuminate.
- Once the light turns off, the seal is complete. Open the lid and remove the bag.
4.6 External Vacuum Function
El EXTERNES function is used with an external vacuum hose (sold separately) to vacuum seal canisters, jars, or wine stoppers.
- Connect one end of the external vacuum hose to the accessory port on the vacuum sealer.
- Connect the other end of the hose to the port on your vacuum-sealable container.
- Premeu el botó EXTERNES button. The appliance will begin to extract air.
- The vacuuming will stop automatically or when you press STOP.
- Remove the hose from the container and the appliance.

Figura 4.3: Examples of various food items, including sliced meat, fish, and dried goods, successfully vacuum-sealed in transparent bags. This image illustrates the effectiveness of the vacuum sealer in preserving different types of food.
5. Manteniment i Neteja
Regular cleaning and maintenance will extend the life of your vacuum sealer.
- Abans de la neteja: Desendolleu sempre l'aparell de la presa de corrent.
- Exterior: Netegeu l'exterior del bloc amb l'anunciamp drap i sabó suau. No utilitzeu productes de neteja abrasius ni submergiu la unitat en aigua.
- Canal de buit: Clean any food residue or liquids from the vacuum channel using a damp cloth. Ensure it is completely dry before next use.
- Tira de segellat: Gently wipe the sealing strip with a soft, dry cloth. Do not scratch or damage the strip, as this can affect sealing performance.
- Emmagatzematge: Store the appliance in a clean, dry place with the lid unlatched to prevent compression of the sealing gaskets, which can lead to poor seals over time.
6. Solució De Problemes
Si teniu problemes amb la vostra segelladora al buit, consulteu els següents problemes i solucions habituals:
| Problema | Causa possible | Solució |
|---|---|---|
| L'aparell no s'encén. | No connectat; mal funcionament de la presa de corrent. | Assegureu-vos que el cable d'alimentació estigui ben connectat a una presa de corrent. |
| La bossa no aspira correctament. | Lid not properly closed; bag not positioned correctly; bag is damaged; moisture in vacuum channel. | Ensure lid is latched; reposition bag so opening is flat in vacuum channel; check bag for holes; clean and dry vacuum channel. |
| La bossa no tanca hermèticament. | Sealing strip is dirty or damaged; bag is wrinkled; too much moisture. | Clean sealing strip; ensure bag is flat; pre-freeze moist foods or use paper towel. |
| Air leaks into bag after sealing. | Improper seal; sharp objects in bag; bag material defect. | Re-seal the bag; ensure no sharp edges on food; use high-quality vacuum bags. |
7. Especificacions
| Característica | Detall |
|---|---|
| Marca | Gènesi |
| Número de model | 80GMVS |
| Material | Plàstic |
| Mode d'operació | Manual |
| Dimensions del producte | 44 L x 18.5 W x 10.5 H centímetres |
| Pes de l'article | 1.4 kg |
| Color | Multicolor |
8. Garantia i Suport
For warranty information and customer support, please refer to the documentation provided with your purchase or contact Genesis customer service. Keep your proof of purchase for warranty claims.
Fabricant: Gènesi


