1. Introducció
This manual provides essential information for the safe and effective use of your Snapmaker Artisan 3D Printer Dual Extruder. The Artisan is a versatile machine designed for 3D printing, with capabilities for laser engraving/cutting and CNC carving when equipped with additional modules (sold separately). This specific model focuses on dual-extrusion 3D printing.
The Snapmaker Artisan features an industrial-grade design, including linear rails for enhanced precision and durability, and a robust all-metal construction. It offers a large build volume of 400mm x 400mm x 400mm, making it suitable for a wide range of projects.
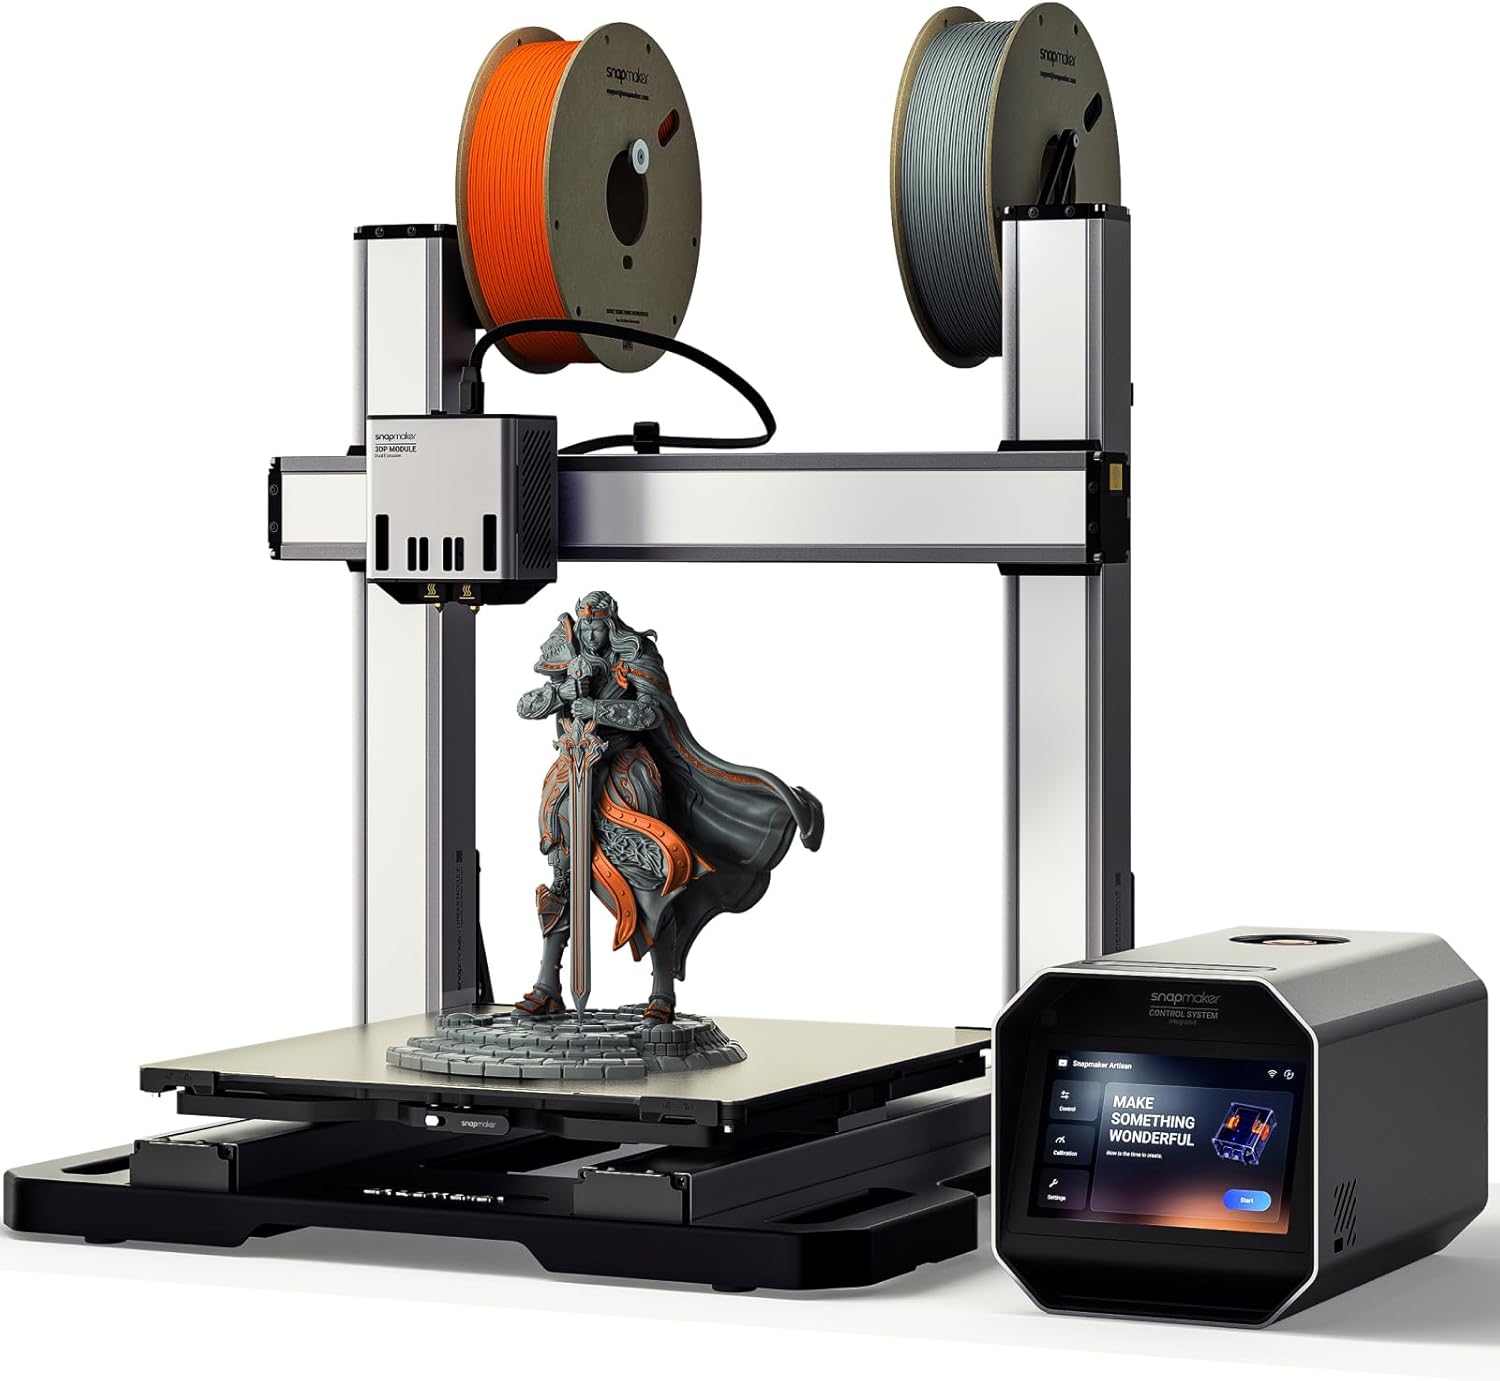
Image 1.1: The Snapmaker Artisan 3D Printer, showcasing its dual extruder setup and a sample 3D print.
2. Configuració i configuració inicial
The Snapmaker Artisan is designed for user-friendly setup. Follow these general steps for initial configuration:
- Desembalatge i muntatge: Carefully unpack all components. Refer to the included quick start guide for detailed assembly instructions. Ensure all connections are secure.
- Toolhead Installation: Attach the Dual-extrusion 3D Printing Module to the linear module. The modular design allows for quick swapping of toolheads.
- Build Plate Installation: Install the double-sided build plate. One side features glossy glass for smooth finishes, and the other has a PEI coating for enhanced adhesion.
- Power On and Touchscreen Interface: Connect the power cable and turn on the printer. The 7-inch touchscreen provides an intuitive interface for guided setup and calibration.
- Calibració automàtica: The Artisan features an easy calibration process. It can automatically level the heated bed and calibrate the Z-offset. A semi-automatic program guides you through calibrating the XY offset, which is crucial for dual-material printing alignment.
- Instal·lació de programari: Install the Snapmaker Luban software on your computer. This 3-in-1 software provides a streamlined workflow for preparing your 3D prints.

Image 2.1: The Artisan's automatic calibration process, ensuring precise bed leveling.
3. Instruccions de funcionament
3.1. 3D Printing with Dual Extrusion
The Artisan's dual-extrusion 3D printing module allows for multi-material or multi-color prints. It is equipped with 7:5:1 planetary plus dual extrusion gears for improved performance.
- Compatibilitat de materials: The printer supports a wide range of filaments, including PLA, ABS, PETG, TPU, and Nylon. The dual extruder is particularly useful for printing with breakaway supports.
- Loading Filament: Load two different filaments into the respective extruders. Ensure they are properly fed into the hot ends.
- Preparing Your Model: Use Snapmaker Luban software to prepare your 3D model. Assign different parts or support structures to each extruder.
- Starting a Print: Transfereix el codi G file to the printer (e.g., via USB or network). Use the 7-inch touchscreen to select your file and initiate the print. The touchscreen displays live work status and allows for dual nozzle temperature adjustments.

Image 3.1: The dual-extrusion module in action, demonstrating multi-color printing capabilities.
3.2. Funcions avançades
- Zone-heated Bed: The heated bed features a 260x260mm high-temperature zone capable of reaching 110°C in 2-3 minutes. The outer zone remains cooler, optimizing energy use.
- Compensació de vibracions: Advanced motion control algorithms and industrial-grade linear modules enable high dimensional accuracy even at high printing speeds.
- Quick Swap Hot Ends: Hot ends can be quickly swapped. Luban software automatically detects nozzle sizes and types, providing customized configurations.

Image 3.2: Visual representation of print quality improvement with vibration compensation enabled.
4. Manteniment
Regular maintenance ensures the longevity and optimal performance of your Snapmaker Artisan 3D Printer.
- Cleaning the Build Plate: After each print, clean the build plate to remove any residue. For the glass side, use isopropyl alcohol. For the PEI side, follow manufacturer recommendations.
- Manteniment de broquets: Periodically inspect and clean the nozzles. If clogs occur, follow the hot end cleaning procedure outlined in the detailed user manual. The quick-swap hot ends facilitate replacement if necessary.
- Linear Rail Inspection: While the industrial-grade linear rails are designed for durability, occasional inspection for dust or debris is recommended. Clean gently if needed.
- Actualitzacions de firmware: Regularly check for and install firmware updates for the printer and software to ensure you have the latest features and bug fixes.

Image 4.1: Quick-swapping hot ends for easy maintenance or nozzle replacement.
5. Solució De Problemes
Aquesta secció tracta els problemes habituals que podeu trobar durant el funcionament.
- Print Adhesion Issues: If prints are not sticking to the build plate, ensure the bed is properly leveled and clean. Adjust the Z-offset if necessary. Verify the heated bed temperature is appropriate for your filament.
- Extrusion Problems (Under/Over-extrusion): Check for filament clogs in the nozzle or hot end. Ensure the filament is loaded correctly and the extruder gears are not slipping. Verify the correct filament diameter and extrusion multiplier in your slicing software.
- Layer Shifting or Collisions: Ensure all belts are properly tensioned and the linear modules are free of obstructions. Check that the print bed is securely fastened.
- Software or Connectivity Issues: If the printer is not responding to commands or files are not transferring, check your network connection and ensure Luban software is up to date. Restart both the printer and the software.
- Preocupacions de qualitat d'impressió: For issues like stringing, blobs, or poor surface finish, review your slicing settings (retraction, print speed, cooling, temperature). Ensure vibration compensation is enabled for optimal results.
For more detailed troubleshooting guides, refer to the official Snapmaker support resources.
6. Especificacions
| Característica | Detall |
|---|---|
| Marca | Snapmaker |
| Model | Artisan 3DP |
| Dimensions del producte | 62 cm de profunditat x 58 cm d'amplada x 63.4 cm d'alçada |
| Pes de l'article | 82.1 lliures (37.3 quilograms) |
| Material | Alumini |
| Color | Negre |
| Volum de construcció | 400 mm x 400 mm x 400 mm |
| Tipus d'extrusora | Doble extrusió |
| Interfície de control | Pantalla tàctil de 7 polzades |
| Connectivitat | USB, Wi-Fi (via Luban software) |
| Llit Calefacció | Zone-heated, up to 110°C |
| Construeix la placa | Double-sided (Glass and PEI) |
7. Garantia i Suport
7.1. Informació de la garantia
The Snapmaker Artisan 3D Printer typically comes with a manufacturer's warranty. For specific details regarding the warranty period and coverage, please refer to the warranty card included with your product or visit the official Snapmaker website. Please note that a 30-day easy return policy is generally available for products purchased through authorized channels.
7.2. Atenció al client
For technical assistance, troubleshooting, or any product-related inquiries, please contact Snapmaker Customer Support. You can usually find contact information on the official Snapmaker website or through your purchase platform. Snapmaker is a company dedicated to developing and manufacturing desktop multi-function 3D printers, and they provide support for their products.
Recursos en línia:
- Official Snapmaker Weblloc: www.snapmaker.com
- Snapmaker Support Page: (Check official website for direct link)


