1. Introducció
This manual provides comprehensive instructions for the safe and effective operation of the ZOYI ZT303 Digital Multimeter. The ZT303 is a high-precision, auto-ranging measurement tool designed for professionals and enthusiasts, capable of measuring voltage, current, resistance, capacitance, frequency, and duty cycle. Please read this manual thoroughly before use to ensure proper operation and to prevent potential hazards.
2. Informació de seguretat
Per garantir un funcionament i un servei segurs del comptador, seguiu aquestes instruccions. Si no observeu aquestes advertències, podreu provocar lesions greus o la mort.
- Assegureu-vos sempre que el mesurador estigui en la funció i el rang correctes abans de fer mesures.
- No utilitzeu el mesurador si sembla danyat o si els cables de prova estan danyats.
- No apliqueu més del volum nominaltage, tal com està marcat al comptador, entre els terminals o entre qualsevol terminal i terra.
- Tingueu molta precaució quan treballeu amb voltagper sobre de 30 V CA RMS, 42 V pic o 60 V CC. Aquests voltagsuposen un risc de xoc.
- Disconnect the test leads from the circuit before changing functions.
- Remove the test leads from the meter before opening the battery cover.
- Do not operate the meter with the battery cover removed.
- Complir els codis de seguretat locals i nacionals.
3. Producte acabatview
The ZOYI ZT303 Digital Multimeter features a clear display, a rotary switch for function selection, and various input jacks for test leads.

Figura 3.1: Frontal view of the ZOYI ZT303 Digital Multimeter, showing the display, rotary switch, and input terminals.
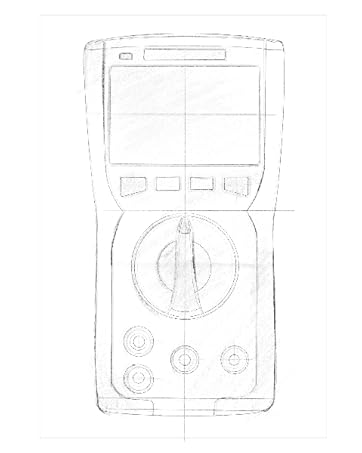
Figure 3.2: Technical drawing illustrating the internal layout or design elements of the ZOYI ZT303 Digital Multimeter.
3.1. Components
- Pantalla LCD: Mostra lectures de mesura, unitats i indicadors de funció.
- Botons de funció: For selecting specific modes (e.g., RANGE, REL, MAX/MIN, Hz, SELECT, HOLD).
- Interruptor rotatiu: Used to select the desired measurement function (e.g., V~, V-, A~, A-, Ω, NCV).
- Preses d'entrada:
- COM Jack: Terminal comú per a totes les mesures. Connecteu aquí el cable de prova negre.
- VHzΩCAP Diode Jack: Entrada per al voltage, frequency, resistance, capacitance, and diode/continuity tests. Connect the red test lead here for these functions.
- mAµA Jack: Entrada per a mil·ligramsampere i microampere current measurements. Connect the red test lead here for these functions.
- Jack de 10A: Input for 10 Ampere current measurements. Connect the red test lead here for high current measurements.
4. Configuració
4.1. Instal·lació de la bateria
- Assegureu-vos que el multímetre estigui apagat i desconnecteu tots els cables de prova.
- Localitzeu la tapa del compartiment de la bateria a la part posterior de la unitat.
- Descargoleu el(s) cargol(s) de subjecció i traieu la coberta.
- Insert new batteries (e.g., 2 x AAA or 9V, refer to the battery compartment for specific type) observing the correct polarity.
- Torneu a col·locar la tapa de la bateria i fixeu-la amb el(s) cargol(s).
4.2. Connexió dels cables de prova
Always connect the black test lead to the COM jack. Connect the red test lead to the appropriate input jack based on the measurement function:
- Per al voltage, Resistance, Capacitance, Frequency, Diode, and Continuity: Connect the red lead to the VHzΩCAP Diode jack.
- For mA/µA Current: Connect the red lead to the mAµA jack.
- For 10A Current: Connect the red lead to the 10A jack.
5. Instruccions de funcionament
5.1. Encendre/apagar
Turn the rotary switch from the "OFF" position to any desired measurement function to power on the meter. To power off, turn the rotary switch back to the "OFF" position.
5.2. Auto Ranging
The ZT303 features auto-ranging, which automatically selects the appropriate measurement range. For manual range selection, press the GAMMA botó.
5.3. DC/AC Voltage Mesura (V)
- Poseu el commutador rotatiu a la V~ (Volum AC)tage) o V- (DC Voltage) posició.
- Connect the black test lead to the COM jack and the red test lead to the VHzΩCAP Diode jack.
- Connecteu les sondes de prova al circuit o component que s'ha de mesurar.
- Llegeix el voltage valor a la pantalla LCD.
5.4. DC/AC Current Measurement (A, mA, µA)
Precaució: Never connect the meter in parallel to a voltage source when measuring current. This can damage the meter and the circuit.
- Ajusteu l'interruptor rotatiu al rang de corrent adequat (A~, A-, mAµA~, mAµA-).
- Connect the black test lead to the COM jack. Connect the red test lead to the mAµA jack for low current or the 10A jack for high current.
- Open the circuit where current is to be measured and connect the meter in series with the load.
- Llegiu el valor actual a la pantalla LCD.
5.5. Mesura de resistència (Ω)
Precaució: Assegureu-vos que el circuit estigui desenergitzat i que tots els condensadors estiguin descarregats abans de mesurar la resistència.
- Poseu el commutador rotatiu a la Ω posició.
- Connect the black test lead to the COM jack and the red test lead to the VHzΩCAP Diode jack.
- Connecteu les sondes de prova al component que s'ha de mesurar.
- Llegiu el valor de la resistència a la pantalla LCD.
5.6. Mesura de la capacitança (F)
Precaució: Assegureu-vos que el condensador estigui completament descarregat abans de mesurar per evitar danys al mesurador.
- Poseu el commutador rotatiu a la CAP position (often shared with Ω or Diode, use SELECT button if needed).
- Connect the black test lead to the COM jack and the red test lead to the VHzΩCAP Diode jack.
- Connecteu les sondes de prova als terminals del condensador.
- Llegiu el valor de la capacitat a la pantalla LCD.
5.7. Frequency/Duty Cycle Measurement (Hz/%)
- Poseu el commutador rotatiu a la Hz/% position (often shared with voltage or other functions, use SELECT button if needed).
- Connect the black test lead to the COM jack and the red test lead to the VHzΩCAP Diode jack.
- Connecteu les sondes de prova a la font de senyal.
- Read the frequency or duty cycle value on the LCD display.
5.8. Prova de díodes i prova de continuïtat
- Poseu el commutador rotatiu a la Díode/Continuitat posició. Utilitzar el SELECCIONA botó per alternar entre la prova de díodes i la prova de continuïtat.
- Connect the black test lead to the COM jack and the red test lead to the VHzΩCAP Diode jack.
- Prova de díode: Connecteu la sonda vermella a l'ànode i la sonda negra al càtode del díode. Un voltatge directetage drop will be displayed. Reverse the probes; an "OL" (Overload) reading indicates a good diode.
- Prova de continuïtat: Connect the probes across the circuit or component. A continuous beep and a low resistance reading indicate continuity.
5.9. Vol sense contactetage (NCV) Detecció
- Poseu el commutador rotatiu a la NCV posició.
- Move the top part of the meter close to the conductor or outlet.
- The meter will emit an audible beep and/or flash an LED indicator when AC voltages detecta e.
5.10. Funció de retenció de dades
Premeu el botó MANTENIM button to freeze the current reading on the display. Press it again to release the hold function.
5.11. MAX/MIN Function
Premeu el botó MAX/MIN button to enter MAX/MIN recording mode. The meter will display the maximum or minimum reading detected since the mode was activated. Press again to cycle between MAX, MIN, and current reading. Hold to exit.
5.12. Relative Measurement (REL)
Premeu el botó REL button to store the current reading as a reference value. Subsequent measurements will be displayed as the difference from this reference value. Press again to exit relative mode.
6. Manteniment
6.1. Neteja
Netegeu el cas amb l'anunciamp drap i detergent suau. No utilitzeu abrasius ni dissolvents. Assegureu-vos que el mesurador estigui completament sec abans d'utilitzar-lo.
6.2. Substitució de la bateria
When the low battery indicator appears on the display, replace the batteries as described in Section 4.1. Prompt replacement ensures accurate readings and proper operation.
6.3. Substitució de fusibles
If the current measurement function fails, the fuse may need replacement. Refer to the specific fuse ratings printed near the input jacks or inside the battery compartment. Fuse replacement typically involves opening the back case (after removing batteries) and carefully replacing the blown fuse with one of the identical type and rating. If unsure, consult a qualified technician.
7. Solució De Problemes
| Problema | Causa possible | Solució |
|---|---|---|
| Sense pantalla o pantalla tènue | Bateries baixes o esgotades | Canviar les piles (Secció 4.1) |
| Es mostra "OL" (sobrecàrrega) | La mesura supera el rang seleccionat o la capacitat màxima del mesurador | Select a higher range (if in manual range) or ensure measurement is within meter's limits. |
| Lectures incorrectes | Incorrect function selected, poor test lead connection, or damaged test leads | Verify function, check lead connections, inspect and replace damaged leads. |
| La mesura de corrent no funciona | Fusible cremat | Canvieu el fusible (Secció 6.3) |
8. Especificacions
| Característica | Detall |
|---|---|
| Marca | ZOYI |
| Número de model | ZT303 |
| Dimensions del producte | 4.53 x 1.97 x 7.68 polzades |
| Pes de l'article | 14.11 unces (399.98 grams) |
| Font d'alimentació | Funciona amb bateria |
| Color | Blau |
| Mostra | Digital LCD, 19999 Counts (typical for ZT303 series) |
| Variant | Distància automàtica/manual |
| Característiques especials | True RMS, NCV, Data Hold, Backlight, MAX/MIN, REL |
Nota: Especificacions elèctriques detallades (per exemple, voltage/current ranges, accuracy) are typically printed on the device or included in a separate specification sheet.
9. Garantia i Suport
Warranty information for the ZOYI ZT303 Digital Multimeter is typically provided at the point of purchase or within the product packaging. For specific warranty terms, technical support, or service inquiries, please refer to the official ZOYI weblloc web o poseu-vos en contacte amb el vostre distribuïdor autoritzat.
Per a més ajuda, visiteu: ZOYI Official Flagship Store on Amazon


