1. Introducció
This manual provides instructions for the proper use and maintenance of the Laser 8849 Front Upper Control Arm Ride Height Gauge. This specialized tool is designed for setting the initial ride height position of the front upper suspension control arm on Tesla Model 3 and Model Y vehicles. It is essential for accurate setup when replacing the front upper suspension arms.
The Laser 8849 tool is equivalent to OEM part number 1450399-00-A.

Figura 1: The Laser 8849 Front Upper Control Arm Ride Height Gauge. This image shows the overall design of the tool, featuring a cylindrical shaft with a threaded end and a circular plate.
2. Informació de seguretat
Always observe general workshop safety practices when working on vehicles. Failure to follow safety precautions can result in personal injury or damage to the vehicle.
- Utilitzeu l'equip de protecció individual (EPI) adequat, incloent-hi ulleres i guants de seguretat.
- Ensure the vehicle is securely supported on jack stands or a lift before commencing any work.
- Refer to the vehicle manufacturer's service manual for specific procedures and torque specifications.
- Mantenir la zona de treball neta i ben il·luminada.
- No utilitzeu eines danyades o modificades.
3. Contingut del paquet
The package for the Laser 8849 Front Upper Control Arm Ride Height Gauge includes the following item:
- 1 x Laser 8849 Front Upper Control Arm Ride Height Gauge
4. Configuració
Before using the Laser 8849 gauge, ensure the vehicle is prepared according to the manufacturer's instructions for front upper control arm replacement or adjustment. This typically involves lifting the vehicle and removing the wheel to access the suspension components.

Figura 2: posterior view of the Laser 8849 gauge, highlighting the threaded end designed for secure attachment to the control arm mount.
5. Instruccions de funcionament
Follow these steps to correctly use the Laser 8849 gauge for setting the front upper control arm ride height:
- Preparar el vehicle: Ensure the vehicle is safely supported and the front suspension area is accessible. The new front upper control arm should be loosely installed or ready for installation.
- Install the Gauge: Screw the threaded end of the Laser 8849 gauge directly into the front upper control arm mount on the vehicle chassis. Ensure it is securely fastened.
- Position the Control Arm: Bring the new front upper control arm into position. The arm should rest against the circular plate of the Laser 8849 gauge. This sets the arm to its initial ride height position.
- Apretar els elements de fixació: While holding the control arm firmly against the gauge's plate, tighten the bolts that attach the front upper control arm to its mount. Refer to the vehicle manufacturer's specifications for correct torque values.
- Traieu l'indicador: Once the control arm fasteners are tightened to specification, unscrew and remove the Laser 8849 gauge from the mount.
- Assemblea final: Complete the remaining steps of the suspension assembly as per the vehicle manufacturer's instructions.
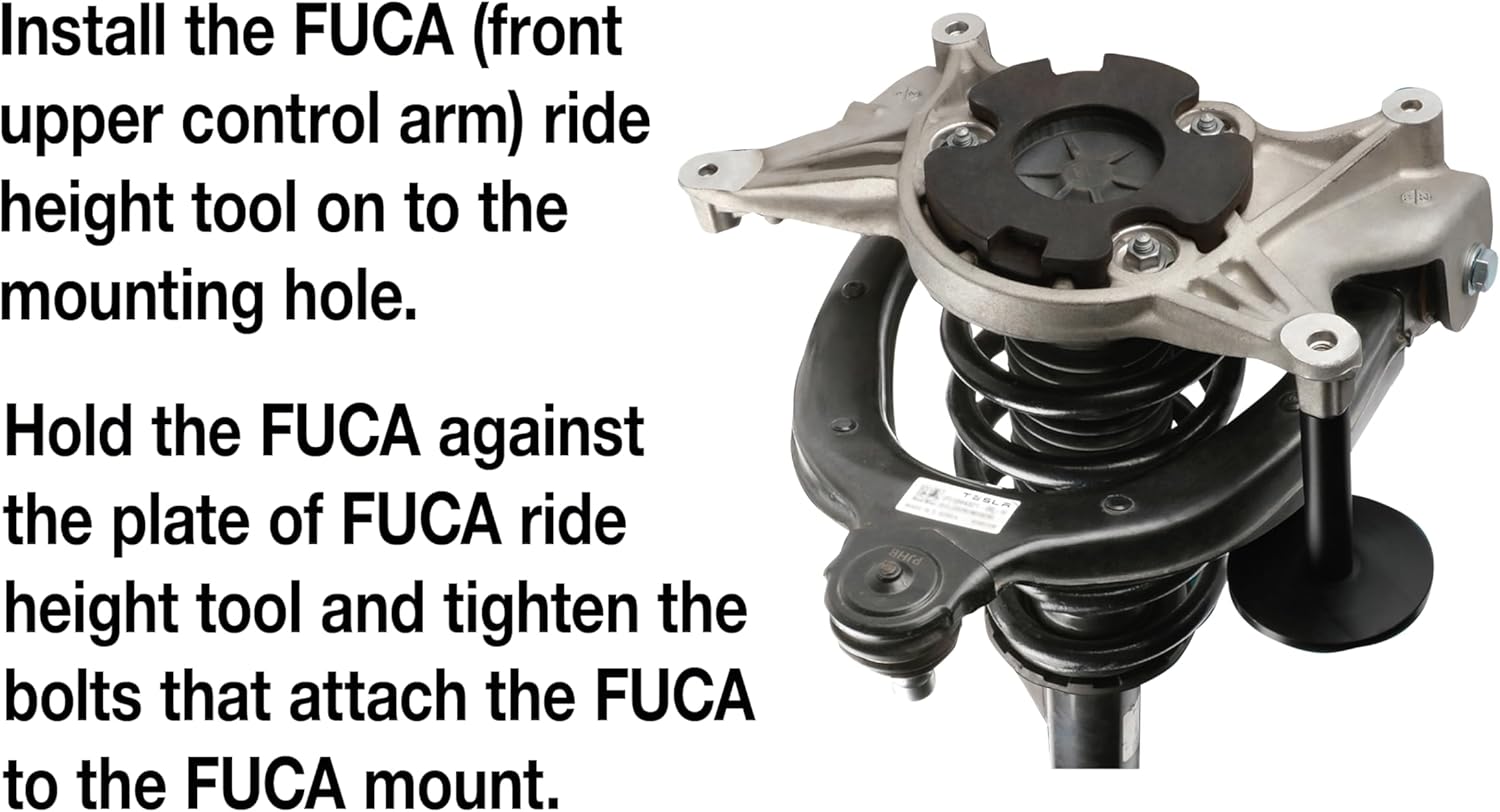
Figura 3: The Laser 8849 gauge being installed into the front upper control arm mounting hole on a Tesla Model 3 or Model Y. The image shows a hand holding the tool in position against the vehicle's suspension.
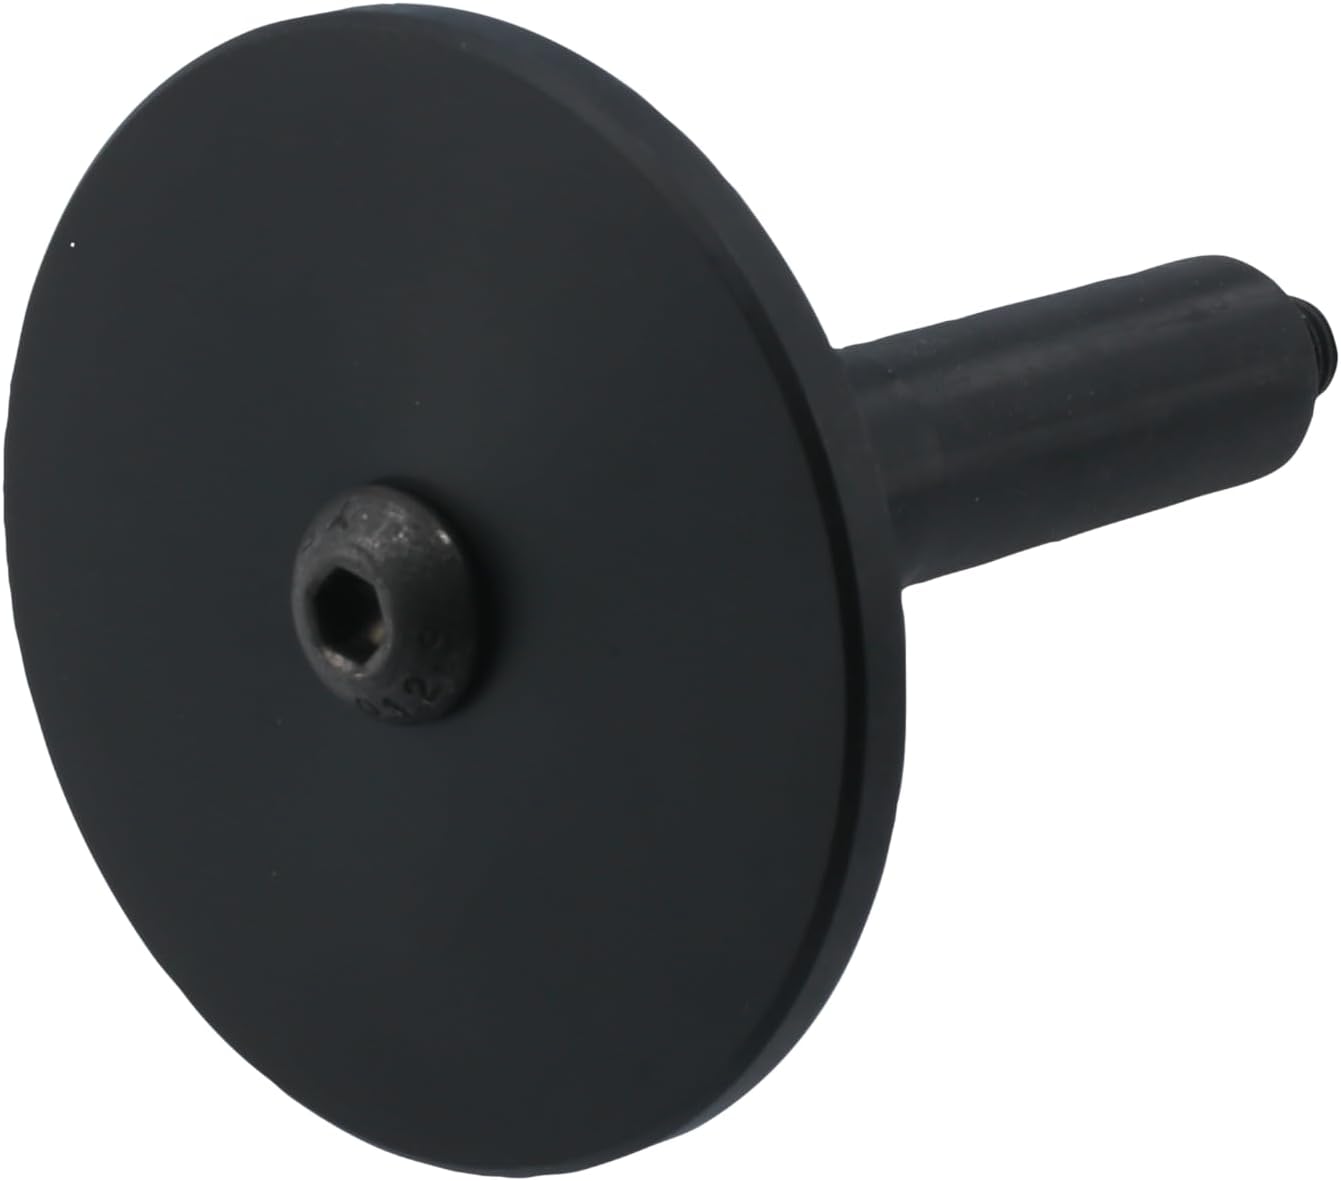
Figura 4: lateral view of the Laser 8849 gauge, illustrating the flat circular plate that the control arm will rest against to establish the correct ride height.
Nota: For rear ride height adjustments, please refer to Laser Part No. 8850.
6. Manteniment
To ensure the longevity and accuracy of your Laser 8849 gauge, follow these simple maintenance guidelines:
- Clean the tool after each use with a dry cloth to remove any dirt, grease, or debris.
- Store the gauge in a clean, dry environment to prevent corrosion.
- Inspect the threaded section for any damage or wear before each use. Do not use if threads are stripped or damaged.
- Avoid dropping the tool or subjecting it to excessive force, which could affect its precision.
7. Solució De Problemes
The Laser 8849 gauge is a simple mechanical tool. Most issues relate to improper usage or vehicle-specific problems.
- Tool does not thread into mount: Ensure the mounting hole threads are clean and undamaged. Verify you are using the correct tool for the specific vehicle model (Tesla Model 3 or Y).
- Control arm does not sit flush against the plate: Recheck the orientation of the control arm and ensure no obstructions are present. The arm should be free to move into position.
- Unusual ride height after assembly: This is likely due to incorrect torque values applied to the control arm fasteners or other suspension components. Always follow the vehicle manufacturer's torque specifications.
8. Especificacions
| Número de model | 8849 |
| Aplicació | Front Upper Control Arm Ride Height Setting |
| Vehicles compatibles | Tesla Model 3, Tesla Model Y |
| Equivalent OEM | 1450399-00-A |
| Material | Construcció duradora |
| Pes de l'article | 6 unces (aproximadament 170 grams) |
| Dimensions del paquet | 5.55 x 3.43 x 3.39 polzades |
9. Garantia i Suport
For warranty information or technical support regarding the Laser 8849 Front Upper Control Arm Ride Height Gauge, please contact your authorized Laser tools distributor or visit the official Laser Tools weblloc web. Conserveu el rebut de compra com a comprovant de compra.
Per obtenir informació addicional sobre el producte o per view other specialized tools, you may visit the Laser brand page.


