Introducció
Thank you for choosing the Mastech MS8233D Digital Multimeter. This manual provides essential information for the safe and effective operation, maintenance, and troubleshooting of your device. Please read this manual thoroughly before use and keep it for future reference.
Informació de seguretat
ADVERTÈNCIA: Per evitar descàrregues elèctriques o lesions personals, llegiu i comprengueu tota la informació de seguretat abans d'utilitzar aquest producte.
- Assegureu-vos sempre que el multímetre estigui en la funció i el rang correctes abans de fer mesures.
- No apliqueu més del volum nominaltage, as marked on the meter, between terminals or between any terminal and earth ground. The MS8233D has a Safety Rating of CATII 600V.
- Tingueu precaució quan treballeu amb voltagper sobre de 30 V CA RMS, 42 V pic o 60 V CC. Aquest volumtagsuposen un risc de xoc.
- Keep your fingers behind the probe barriers during measurements.
- Do not use the meter if it is damaged or if the case is open. Inspect the meter and test leads before use.
- Substituïu la bateria immediatament quan aparegui l'indicador de bateria baixa per garantir lectures precises.
- No feu funcionar el mesurador en entorns amb gasos, vapors o pols explosius.
Característiques clau
The Mastech MS8233D Digital Multimeter offers a range of functionalities for various electrical measurements:
- Visualització: 2000 counts for precise readings.
- Variant: Auto and Manual Ranging capabilities.
- Prova de díode: Features a Diode Open Voltage de 1.5V.
- Prova de continuïtat: Audible buzzer for resistance less than 60Ω.
- Conservació de dades: Freezes the displayed reading for convenience.
- Apagat automàtic: Conserva la durada de la bateria.
- Vol. Sense contactetage Detecció (NCV): Per identificar cables actius sense contacte directe.
- Mesura màxima: Records the highest value measured.
- Il·luminació de fons de pantalla: Per a la visibilitat en condicions de poca llum.
- Indicació de bateria baixa: Indica quan cal substituir la bateria.
- Font d'alimentació: Operates on 1x 9V 6F22 Battery.
- Certificacions: Conforme a RoHS.
- Classificació de seguretat: CATII 600V.
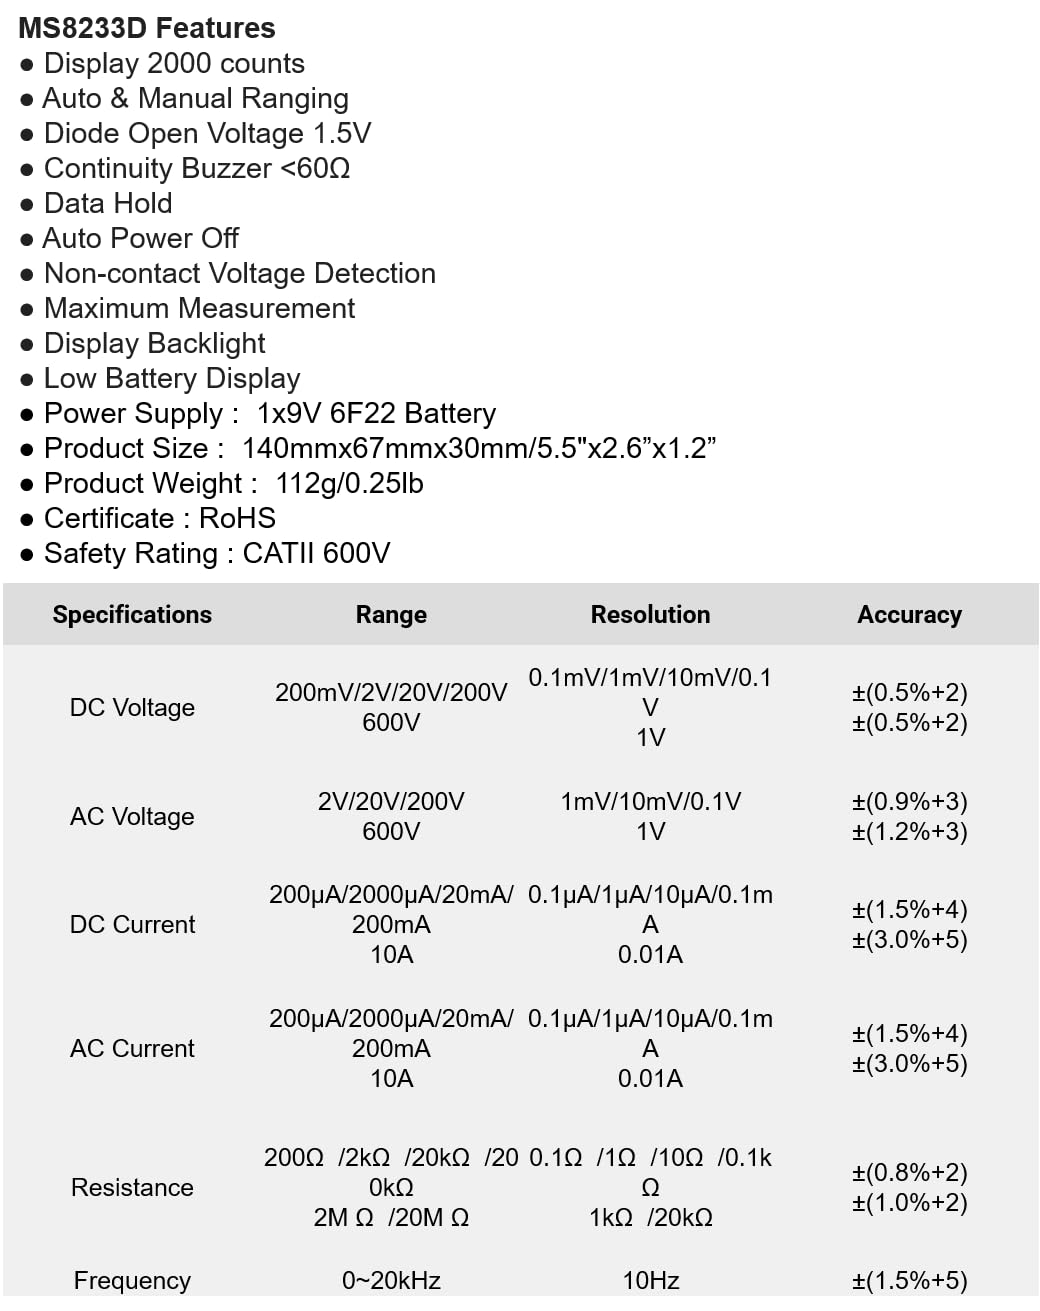
Figura 1: Frontal view of the Mastech MS8233D Digital Multimeter, highlighting the display, rotary function switch, and input terminals.
Producte acabatview i Components
The MS8233D multimeter is designed for ease of use and durability. Familiarize yourself with its main parts:

Figura 2: Mésview of the MS8233D Digital Multimeter, illustrating its physical dimensions, power supply, and typical applications in domestic, industrial, and electronics settings.
- Pantalla LCD: Mostra lectures de mesura, unitats i indicadors de funció.
- Funció Interruptor rotatiu: Used to select the desired measurement function (e.g., ACV, DCV, Resistance, Diode, Continuity, Temperature, NCV).
- Preses d'entrada: Terminals for connecting test leads.
- COM Jack: Common (negative) input terminal for all measurements.
- Presa VΩmA: Terminal d'entrada positiu per a voltage, resistance, diode, continuity, and small current measurements.
- Jack de 10A: Positive input terminal for high current (up to 10A) measurements.
- Botons de funció: For features like Data Hold, Backlight, and Range selection.
Configuració
Instal·lació de la bateria
The MS8233D requires one 9V 6F22 battery for operation. To install or replace the battery:
- Ensure the multimeter is turned off and disconnect all test leads from the input terminals.
- Localitzeu la tapa del compartiment de la bateria a la part posterior del mesurador.
- Use a screwdriver to loosen the screw(s) on the battery cover and remove the cover.
- Connect the new 9V battery to the battery clips, observing the correct polarity.
- Col·loqueu la bateria al compartiment i torneu a col·locar la tapa, fixant-la amb el(s) cargol(s).
Nota: The meter includes a low battery indicator. Replace the battery promptly when this indicator appears to maintain measurement accuracy.
Instruccions de funcionament
Before making any measurement, ensure the test leads are properly connected and the function switch is set to the desired range.
Mesurant DC Voltage (DCV)
- Introduïu el cable de prova vermell a la presa VΩmA i el cable de prova negre a la presa COM.
- Set the rotary switch to the desired DCV range (e.g., 200mV, 2V, 20V, 200V, 600V). If unsure, start with the highest range or use auto-ranging if available.
- Connecteu les sondes de prova al component o circuit que s'ha de mesurar, observant la polaritat.
- Llegeix el voltage valor a la pantalla LCD.
Mesurar AC Voltage (ACV)
- Introduïu el cable de prova vermell a la presa VΩmA i el cable de prova negre a la presa COM.
- Set the rotary switch to the desired ACV range (e.g., 2V, 20V, 200V, 600V).
- Connecteu les sondes de prova al component o circuit que s'ha de mesurar.
- Llegeix el voltage valor a la pantalla LCD.
Measuring DC/AC Current (DCA/ACA)
CAUTION: Never connect the meter in parallel to a voltage source when measuring current. This can damage the meter and the circuit.
- Per a corrents de fins a 200 mA, inseriu el cable de prova vermell a la presa VΩmA. Per a corrents de fins a 10 A, inseriu el cable de prova vermell a la presa de 10 A. Inseriu el cable de prova negre a la presa COM.
- Set the rotary switch to the desired DC or AC current range (e.g., 200µA, 2000µA, 20mA, 200mA, 10A).
- Open the circuit where current is to be measured and connect the meter in series with the load.
- Llegiu el valor actual a la pantalla LCD.
Mesura de la resistència (Ω)
- Introduïu el cable de prova vermell a la presa VΩmA i el cable de prova negre a la presa COM.
- Set the rotary switch to the desired Resistance range (e.g., 200Ω, 2kΩ, 20kΩ, 200kΩ, 2MΩ, 20MΩ).
- Assegureu-vos que el circuit o component estigui desenergitzat abans de mesurar la resistència.
- Connecteu les sondes de prova a través del component.
- Llegiu el valor de la resistència a la pantalla LCD.
Prova de díode
- Introduïu el cable de prova vermell a la presa VΩmA i el cable de prova negre a la presa COM.
- Set the rotary switch to the Diode symbol (usually shared with Continuity).
- Connecteu la sonda vermella a l'ànode i la sonda negra al càtode del díode.
- La pantalla mostrarà el volum d'avançtagcaiguda de e. Invertiu les sondes; la pantalla hauria de mostrar 'OL' (bucle obert) per a un bon díode.
Prova de continuïtat
- Introduïu el cable de prova vermell a la presa VΩmA i el cable de prova negre a la presa COM.
- Set the rotary switch to the Continuity symbol (usually shared with Diode).
- Connecteu les sondes de prova a través del circuit o component.
- If the resistance is below approximately 60Ω, the buzzer will sound, indicating continuity. The display will also show the resistance value.
Vol. Sense contactetage (NCV) Detecció
- Set the rotary switch to the NCV function.
- Move the top part of the meter (NCV sensor area) close to the conductor suspected of having AC voltage.
- The meter will emit an audible beep and the NCV indicator will light up if AC voltages detecta e.
Funció de retenció de dades
Premeu el botó «HOLD» per congelar la lectura actual a la pantalla. Torneu-lo a prémer per alliberar la retenció i reprendre les mesures en directe.
Funció de llum de fons
Press the 'LIGHT' button to turn on the display backlight. Press it again to turn it off. The backlight may automatically turn off after a short period to conserve battery.
Manteniment
Neteja
Netegeu la carcassa del comptador amb anuncisamp drap i un detergent suau. No utilitzeu abrasius ni dissolvents. Assegureu-vos que el mesurador estigui completament sec abans d'utilitzar-lo.
Canvi de bateria
Refer to the 'Battery Installation' section under 'Setup' for instructions on replacing the 9V battery. Always replace the battery when the low battery indicator is displayed to ensure accurate readings and proper operation.
Substitució de fusibles
The MS8233D is equipped with internal fuses to protect against overcurrent. If the current measurement function stops working, the fuse may need replacement. Fuse replacement should only be performed by qualified personnel. Use only fuses of the specified type and rating (e.g., F200mA/250V for mA range, F10A/250V for 10A range).
Resolució de problemes
| Problema | Causa possible | Solució |
|---|---|---|
| Sense pantalla o pantalla tènue | Bateria baixa o baixa | Substituïu la bateria de 9V. |
| Lectures incorrectes | Incorrect function/range selected; poor test lead connection; low battery | Verify function and range; check test lead connections; replace battery. |
| La mesura de corrent no funciona | Fusible cremat | Replace the appropriate fuse (refer to Maintenance section). |
| 'OL' (Overload) displayed | Measurement exceeds selected range; open circuit (for continuity/resistance) | Select a higher range; check for open circuit. |
| No hi ha bip de continuïtat | Resistance too high; open circuit | Check for continuity; ensure resistance is below 60Ω. |
Especificacions
The following table details the measurement ranges, resolutions, and accuracies for the Mastech MS8233D Digital Multimeter:

Figure 3: Comprehensive specifications for the MS8233D, outlining measurement capabilities and precision.
| Característica | Especificació |
|---|---|
| Mostra | 2000 recomptes |
| DC Voltage | 200mV / 2V / 20V / 200V / 600V |
| Vol. ACtage | 2V / 20V / 200V / 600V |
| Corrent DC | 200µA/2000µA/20mA/200mA/10A |
| Corrent alterna | 200µA/2000µA/20mA/200mA/10A |
| Resistència | 200Ω / 2kΩ / 20kΩ / 200kΩ / 2MΩ / 20MΩ |
| Freqüència | 0-20 kHz |
| Volum obert de díodestage | 1.5 V |
| Buzzer de continuïtat | <60Ω |
| Font d'alimentació | 1x 9V 6F22 Battery |
| Dimensions del producte | 140 mm x 67 mm x 30 mm (5.5 "x 2.6" x 1.2") |
| Pes del producte | 112 g (0.25 lliures) |
| Classificació de seguretat | CATII 600V |
| Certificacions | CE, RoHS |
Garantia i Suport
For warranty information and technical support, please refer to the documentation provided with your purchase or contact the seller/manufacturer directly. Keep your purchase receipt as proof of purchase for any warranty claims.


