1. Introducció
This manual provides detailed instructions for the installation, operation, and maintenance of your PUTORSEN Monitor Wall Mount. This heavy-duty wall-mounted monitor arm is designed to support ultrawide screens up to 49 inches and weighing up to 44 lbs. It features a gas spring for smooth adjustments, along with tilt, swivel, and rotation capabilities to optimize your viewing experience and reclaim desk space.
Si us plau, llegiu aquest manual detingudament abans de la instal·lació i conserveu-lo per a futures consultes.

Image 1.1: The PUTORSEN Monitor Wall Mount installed with a 49-inch ultrawide monitor, showcasing its strength and stability.
2. Informació de seguretat
- Capacitat de pes: Do not exceed the maximum weight capacity of 44 lbs (20 kg). Exceeding this limit may result in serious injury or product damage.
- Mida de la pantalla: Compatible with monitors from 17 to 49 inches.
- Compatibilitat VESA: Ensure your monitor has VESA mounting patterns of 75x75mm or 100x100mm.
- Tipus de paret: This mount is designed for installation on wood stud walls, brick walls, or concrete walls. DO NOT mount solely on drywall. Drywall cannot support the weight of the mount and monitor.
- Instal·lació professional: If you are unsure about the installation process or wall type, consult a qualified professional.
- Gas Spring Warning: The gas spring is under pressure. Exercise caution during assembly and adjustment. Do not attempt to disassemble the gas spring cylinder.
- Nens: Mantingueu les peces petites allunyades dels nens.
3. Contingut del paquet
Please verify that all components are present and undamaged before proceeding with installation. All necessary hardware for installation is included.
Note: An ultrawide adapter for monitors with circular/non-standard VESA patterns is not included. Check your monitor's original packaging for a conversion adapter if needed.
4. Especificacions
| Característica | Especificació |
|---|---|
| Marca | PUTORS |
| Model | B0CZDS7RYY |
| Material | Acrylonitrile Butadiene Styrene (ABS), Alloy Steel, Aluminum |
| Color | Negre |
| Tipus de muntatge | Muntatge de paret |
| Tipus de moviment | Swivel, Tilt, Rotation, Height Adjustment |
| Compatibilitat de la mida del monitor | 17" - 49" (flat or curved) |
| Capacitat de pes | Fins a 44 lliures (20 kg) |
| Compatibilitat VESA | 75x75mm, 100x100mm |
| Interval d'inclinació | +50° a -20° |
| Gamma giratòria | ±90° |
| Interval de rotació | 360° (±180°) |
| Ajust d'alçada | Up to 11.34 inches (via gas spring) |
| Wall Distance (Min/Max) | 4.15" / 22.58" |
| Pes de l'article | 8.16 lliures |
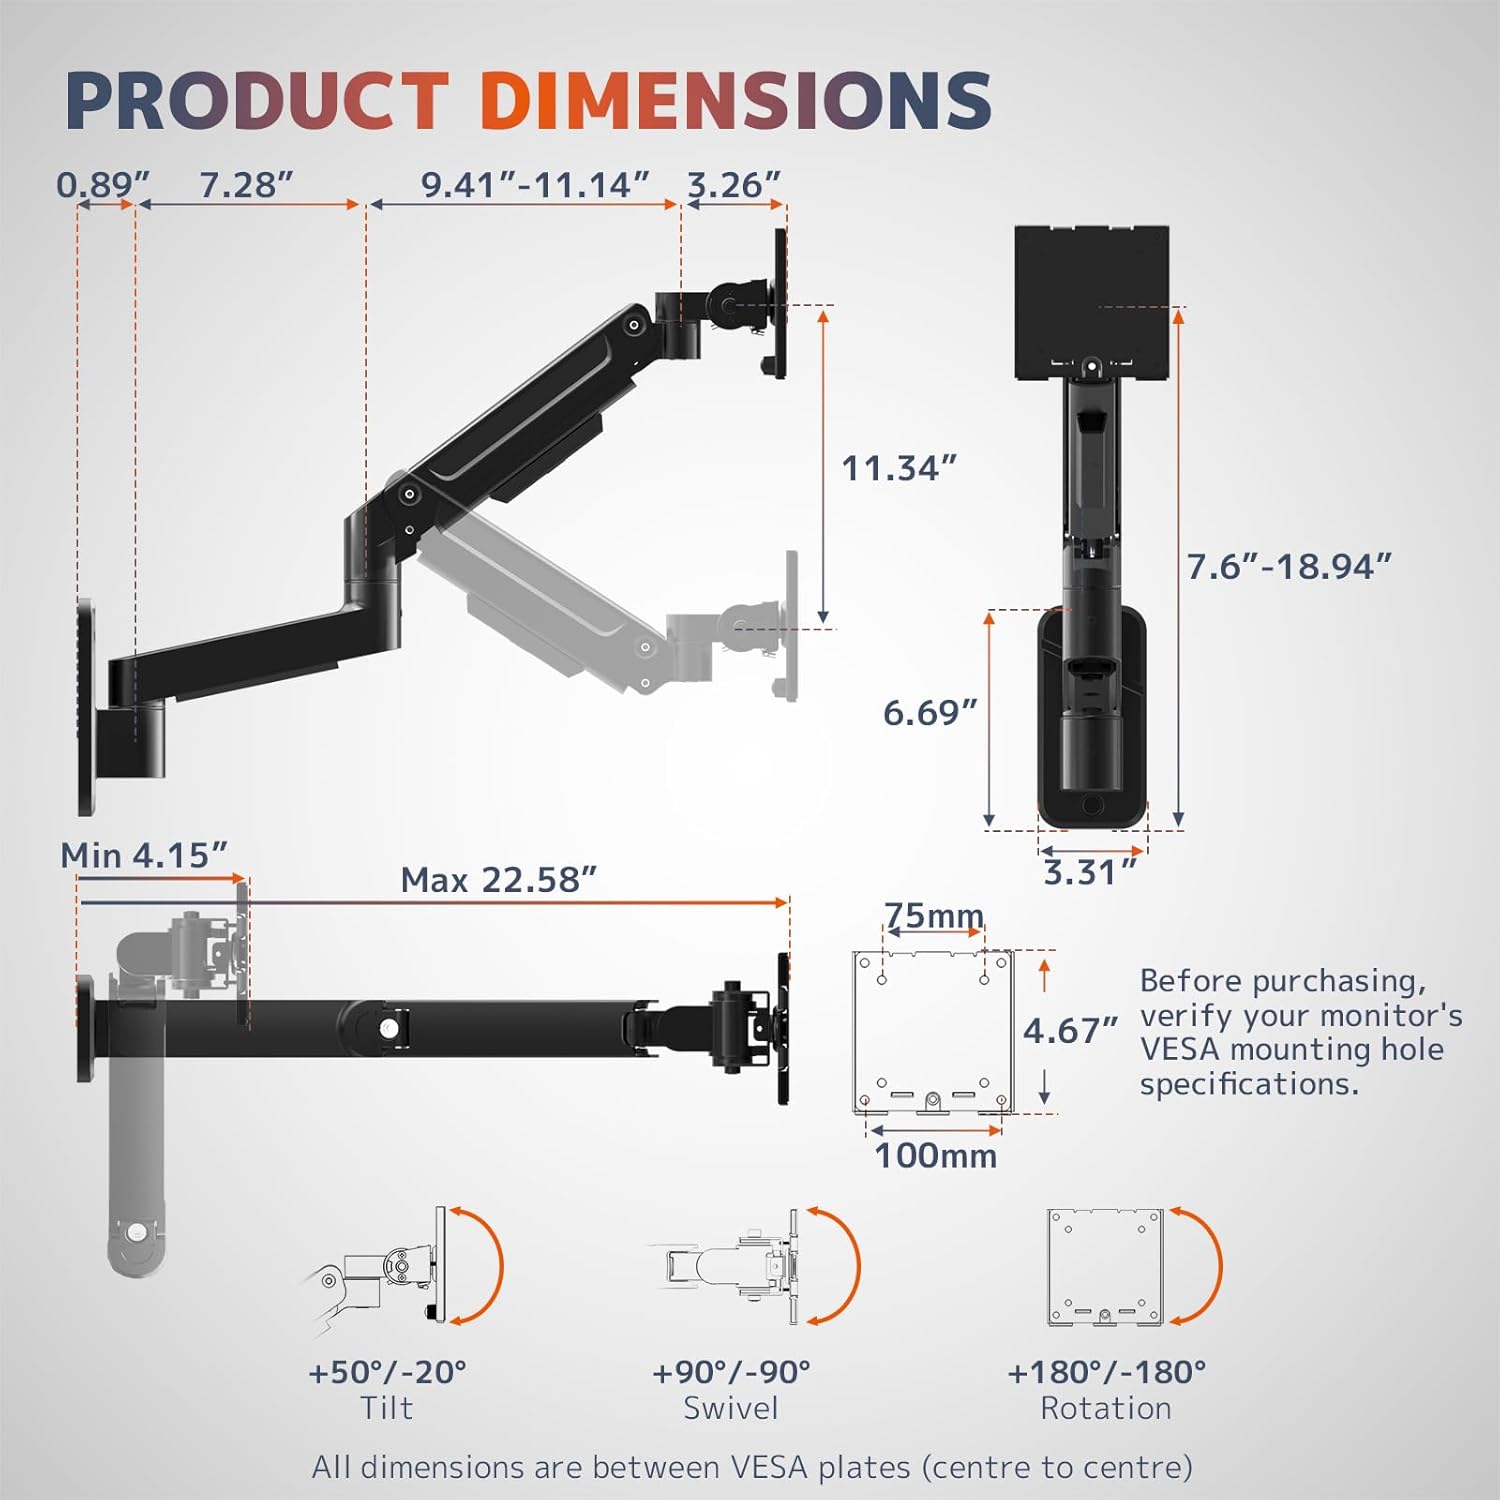
Image 4.1: Detailed product dimensions and movement ranges. Verify your monitor's VESA specifications before purchase.
5. Configuració i instal·lació
Follow these steps carefully for a secure installation. It is recommended to have a second person assist during certain stages of installation, especially when mounting the monitor.
5.1 Choose a Mounting Location
- Identify a suitable wall location that can support the combined weight of the mount and your monitor.
- Ensure the wall is a wood stud, brick, or concrete wall. Avoid drywall-only installations.
- Use a stud finder to locate the center of a wood stud if mounting on a wood stud wall.
5.2 Attach Wall Plate
- Position the wall plate at the desired height and mark the drilling locations.
- Drill pilot holes according to the provided template and hardware instructions.
- Secure the wall plate to the wall using the appropriate screws and anchors for your wall type. Ensure it is firmly attached.
5.3 Assemble Arm Sections
- Connect the arm sections as shown in the assembly diagram. The modular design allows for straightforward assembly.
- Assegureu-vos que totes les connexions estiguin estretes i segures.

Image 5.1: Streamlined installation process, illustrating modular assembly and compatible wall types. Remember: Do not mount solely on drywall.
5.4 Col·loqueu la placa VESA al monitor
- Col·loqueu amb cura el monitor cara avall sobre una superfície suau i neta.
- Alineeu la placa VESA amb els forats de muntatge de la part posterior del monitor (75 x 75 mm o 100 x 100 mm).
- Secure the VESA plate to the monitor using the provided screws. Do not overtighten.

Image 5.2: The heavy-duty tilt mechanism and VESA interface. Ensure proper alignment and secure fastening of the VESA plate to your monitor.
5.5 Mount Monitor to Arm
- With assistance, carefully lift the monitor with the attached VESA plate.
- Slide the VESA plate onto the monitor arm's mounting head until it clicks into place or is securely fastened.
- Tighten any safety screws or mechanisms to prevent accidental dislodgement.
5.6 Gestió de cables
- Route monitor cables through the integrated cable management channels on the arm.
- This helps maintain a neat and clutter-free workspace.

Image 5.3: Reinforced base with integrated cable management for a clean setup.
6. Instruccions de funcionament
The PUTORSEN Monitor Wall Mount offers full motion capabilities for optimal viewcomoditat.
6.1 Height Adjustment (Gas Spring)
- To adjust the monitor height, gently push or pull the monitor to the desired position. The gas spring system allows for smooth vertical movement up to 11.34 inches.
- If the arm does not hold its position or is difficult to move, refer to the "Troubleshooting" section for gas spring tension adjustment.
6.2 Ajust d'inclinació
- The monitor can be tilted +50° upwards and -20° downwards.
- Loosen the tilt adjustment screw slightly, adjust the monitor to the desired angle, then re-tighten the screw to secure it.
6.3 Ajustament del gir
- The monitor arm allows for a ±90° swivel range.
- Gently rotate the monitor horizontally to achieve your preferred viewangle de ing.
6.4 Ajust de rotació
- The VESA plate allows for a full 360° rotation (±180°).
- Rotate the monitor to switch between landscape and portrait orientations as needed.

Image 6.1: The monitor arm's extendable design allows for flexible positioning and space optimization.
7. Manteniment
- Neteja: Utilitzeu un suau, damp cloth to clean the surface of the mount. Avoid harsh chemicals or abrasive cleaners.
- Comprovacions periòdiques: Reviseu periòdicament tots els cargols i connexions per assegurar-vos que estiguin ben ajustats i segurs. Torneu a apretar-los si cal.
- Molla de gas: The gas spring is designed for long-term performance. No specific maintenance is required for the gas spring itself, but ensure its tension is correctly adjusted for your monitor's weight.
8. Solució De Problemes
| Problema | Solució |
|---|---|
| Arm will not raise: Monitor feels too heavy, arm sags. | Tighten the gas spring adjustment screw in the "+" direction (counter-clockwise) until the arm can hold the monitor's weight. |
| Arm will not lower: Monitor feels too light, arm stays up. | Loosen the gas spring adjustment screw in the "-" direction (clockwise) until the arm can be lowered smoothly. |
| Tilt is too loose: Monitor tilts freely or sags. | Tighten the tilt adjustment screw clockwise to prevent the monitor from lowering. |
| Tilt is too stiff: Difficult to adjust monitor tilt. | Loosen the tilt adjustment screw counter-clockwise for smoother movement. |
| La muntura sembla inestable. | Ensure all mounting screws are securely tightened. Verify the wall type is appropriate and the mount is anchored correctly. |
| Els cables són desordenats. | Utilize the integrated cable management channels on the arm to route and conceal cables. |

Image 8.1: Joint adjustment guide for gas spring tension and tilt mechanism.
9. Garantia i assistència
PUTORSEN products are manufactured with quality and durability in mind. While specific warranty details may vary by region and retailer, we stand by the quality of our products.
Atenció al client: Our dedicated customer support team is available to assist with any installation guidance, compatibility questions, or usage concerns you may have. We are committed to providing clear and practical support to ensure a smooth experience with your product.
For assistance, please refer to the contact information provided with your purchase or visit the official PUTORSEN weblloc.