1. Introducció
Thank you for choosing the Zapco ST-4XP-SQ-III 4-Channel Class AB 800W RMS Sound Quality Amplificador. Aquest manual proporciona informació essencial per a la instal·lació, el funcionament i el manteniment adequats del vostre amplifier. Please read this manual thoroughly before attempting to install or operate the unit to ensure optimal performance and safety.
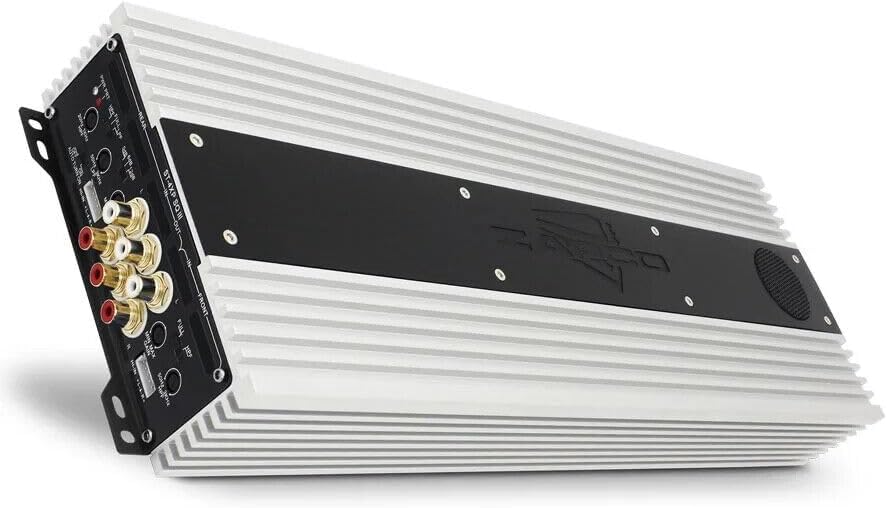
This image displays the Zapco ST-4XP-SQ-III ampvidador, espectacleasing its sleek design and heat sink fins. The main body is silver with a black central panel featuring the Zapco logo.
2. Informació de seguretat
Observeu sempre les següents precaucions de seguretat durant la instal·lació i el funcionament:
- Disconnect the vehicle's negative battery terminal before any wiring.
- Assegureu-vos que tot el cablejat estigui correctament encaminat i fixat per evitar danys o curtcircuits.
- Use appropriate gauge wiring for power, ground, and speaker connections as specified.
- Muntar el ampl'extintor de forma segura en un lloc que permeti una ventilació adequada i que estigui protegit de la humitat i de la calor excessiva.
- No opereu el amplificador si està malmès o no funciona correctament. Consulteu la secció de resolució de problemes o poseu-vos en contacte amb el servei d'assistència.
3. Producte acabatview
The Zapco ST-4XP-SQ-III is a high-performance 4-channel Class AB amplifier designed for superior sound quality in automotive applications. Key features include:
- 4-Channel, Full Range, Class A/B operation
- Tiffany style Panel Mount RCA connectors
- Speaker Level Inputs with Auto-on functionality
- Control de guany d'entrada variable
- Variable electronic crossover (HPF/LPF)
- Control d'augment de graves variable
- Robust new aluminum chassis for efficient heat dissipation
Disseny del tauler de control

This image shows the input and control panel of the Zapco ST-4XP-SQ-III amplifier. Visible controls include gain adjustments, high-pass filter (HPF), low-pass filter (LPF), bass boost, and RCA input jacks for front and rear channels. Speaker level inputs and an auto-on switch are also present.
The control panel provides access to input connections and sound tuning adjustments. This includes RCA inputs, speaker level inputs, gain controls, and crossover frequency adjustments for both front and rear channels.
Power and Speaker Output Terminals

This image details the power and speaker output terminals of the Zapco ST-4XP-SQ-III amplifier. It includes connections for Ground (GND), Remote (REM), +12V Battery (Bat), and speaker outputs for front and rear channels, with bridging options indicated.
The power and speaker output panel features robust terminals for secure connections. These include connections for the main power supply (+12V Bat), ground (GND), remote turn-on (REM), and speaker outputs for the front and rear channels, with clear markings for bridging configurations.
4. Configuració i instal·lació
Una instal·lació correcta és crucial per al rendiment i la longevitat del vostre ampinstal·lador. Si no esteu segurs de cap dels passos a seguir, consulteu un instal·lador professional.
4.1 Muntatge
- Choose a mounting location that is dry, well-ventilated, and away from direct sunlight or heat sources.
- Assegureu-vos d'espai suficient al voltant de ampLificador per a la circulació d'aire.
- Assegureu-vos el amplifier firmly using appropriate hardware to prevent movement during vehicle operation.
4.2 Connexions de cablejat
Refer to the 'Power and Speaker Output Terminals' image for visual guidance.
- Power (BAT +12V): Connect a fused power cable directly from the vehicle's positive battery terminal to the +12V terminal on the amplifier. The fuse should be located within 18 inches of the battery.
- Terra (GND): Connect a ground cable of the same gauge as the power cable to a clean, unpainted metal surface on the vehicle chassis. Ensure a solid electrical connection.
- Remot (REM): Connecteu un cable d'encesa remota des de la sortida remota de la unitat principal al terminal REM del amplifier. This turns the amplifier on and off with your head unit. If using speaker level inputs, the amplifier features an auto-on function.
- Senyal d'entrada:
- Entrades RCA: Connecteu els cables RCA des del pre-emissor de la unitat principalamp outputs to the corresponding RCA input jacks (Front IN, Rear IN) on the ampmés viu.
- Entrades de nivell d'altaveu: If your head unit does not have RCA outputs, connect the speaker wires from the head unit to the amplifier's speaker level input terminals. Ensure correct polarity. The amplifier's auto-on feature will activate when a signal is detected.
- Sortides dels altaveus: Connecteu els vostres altaveus al amplifier's speaker output terminals (Front L/R, Rear L/R). Observe correct polarity (+ to + and - to -). For bridged operation, refer to the markings on the amplifier for the correct terminals.
5. Instruccions de funcionament
Un cop instal·lat, ajusteu el ampConfiguració del lificador per a un rendiment so òptim.
5.1 Control de guanys
The variable input gain control (MIN MAX GAIN) matches the ampla sensibilitat d'entrada del supervisor al nivell de sortida de la unitat principal. Comenceu amb el guany al mínim. Reproduïu una pista familiar a aproximadament el 75% del volum màxim de la unitat principal. Augmenteu lentament el amplifier's gain until you hear slight distortion, then back off slightly. This ensures maximum clean output.
5.2 Configuració del crossover
The ST-4XP-SQ-III features variable electronic crossovers for both High-Pass Filter (HPF) and Low-Pass Filter (LPF).
- HPF (filtre de pas alt): Permet freqüències a dalt the set point to pass through. Use this for full-range speakers to prevent them from playing low bass, which can cause distortion and damage.
- LPF (filtre de pas baix): Permet freqüències a continuació the set point to pass through. Use this for subwoofers to ensure they only reproduce bass frequencies.
- COMPLET: Eviteu el crossover, permetent que passin totes les freqüències.
Adjust the HPF and LPF settings according to your speaker types and desired sound. Typical settings for full-range speakers might be an HPF between 80Hz-120Hz. For subwoofers, an LPF between 80Hz-100Hz is common.
5.3 Augment de baix
The variable bass boost control allows you to enhance low-frequency output. Use this feature sparingly, as excessive bass boost can lead to distortion and potential speaker damage. Adjust to taste, ensuring the sound remains clear.
5.4 Auto-on with Speaker Level Inputs
When using speaker level inputs, the amplifier can automatically detect an audio signal and power on. Ensure the 'AUTO TURN ON' switch is set to 'ON' if you wish to utilize this feature. If using a remote turn-on wire, set this switch to 'OFF'.
6. Manteniment
The Zapco ST-4XP-SQ-III ampEl lificador requereix un manteniment mínim per garantir un rendiment a llarg termini.
- Neteja: Netegeu periòdicament el ampNetegeu l'exterior del purificador amb un drap suau i sec per eliminar la pols i la brutícia. No utilitzeu productes químics agressius ni netejadors abrasius.
- Inspecció: Regularly check all wiring connections for tightness and signs of corrosion or damage. Ensure the amplifier's mounting remains secure.
- Ventilació: Assegureu-vos que el amplifier's heat sink fins are not obstructed, allowing for proper airflow and cooling.
7. Solució De Problemes
Si teniu problemes amb el vostre amplificador, consulteu la taula següent abans de contactar amb el servei d'assistència.
| Problema | Causa possible | Solució |
|---|---|---|
| Sense alimentació / Ampel lifier no s'encén |
|
|
| Sense sortida de so |
|
|
| So distorsionat |
|
|
| Ampsobreescalfament del lificador |
|
|
8. Especificacions
The following are the technical specifications for the Zapco ST-4XP-SQ-III ampmés viu:
- Potència @ 4Ω: 4 x 150 watts RMS
- Potència @ 2Ω: 4 x 250 watts RMS
- Potència en pont @ 4Ω: 2 x RMS de 500W
- THD @ Potència nominal: <0.1% THD
- Relació senyal/soroll: > 95 dB
- Separació de canals: > 60 dB
- Resposta de freqüència: 15Hz a 30KHz ±1dB
- Sensibilitat d'entrada: 0.25v a 5v
- Net Dimensions (W x H x L): 160 mm x 58 mm x 450 mm (6.3 x 2.28 x 17.72 polzades)
- Overall Dimensions (W x H x L): 160 mm x 58 mm x 475 mm (6.3 x 2.28 x 18.7 polzades)
- Pes de l'article: Aproximadament 10 lliures
9. Garantia i Suport
9.1 Informació de la garantia
The Zapco ST-4XP-SQ-III amplifier ve amb a 1 anys de garantia from the date of purchase. This warranty covers defects in materials and workmanship under normal use. It does not cover damage caused by improper installation, accident, misuse, abuse, neglect, unauthorized modification, or normal wear and tear. Please retain your proof of purchase for warranty claims.
9.2 Atenció al client
For technical assistance, warranty service, or general inquiries, please visit the official Zapco website or contact your authorized Zapco dealer. You can often find detailed FAQs, additional resources, and contact information on the manufacturer's weblloc.
Zapco Official Weblloc: Visit the Zapco Store on Amazon


