1. Producte acabatview
This manual provides detailed instructions for the OLIGHT Baldr Pro Tactical Weaponlight and the Oclip Rechargeable EDC Flashlight. This bundle offers versatile lighting solutions for various applications, combining high performance with compact design.
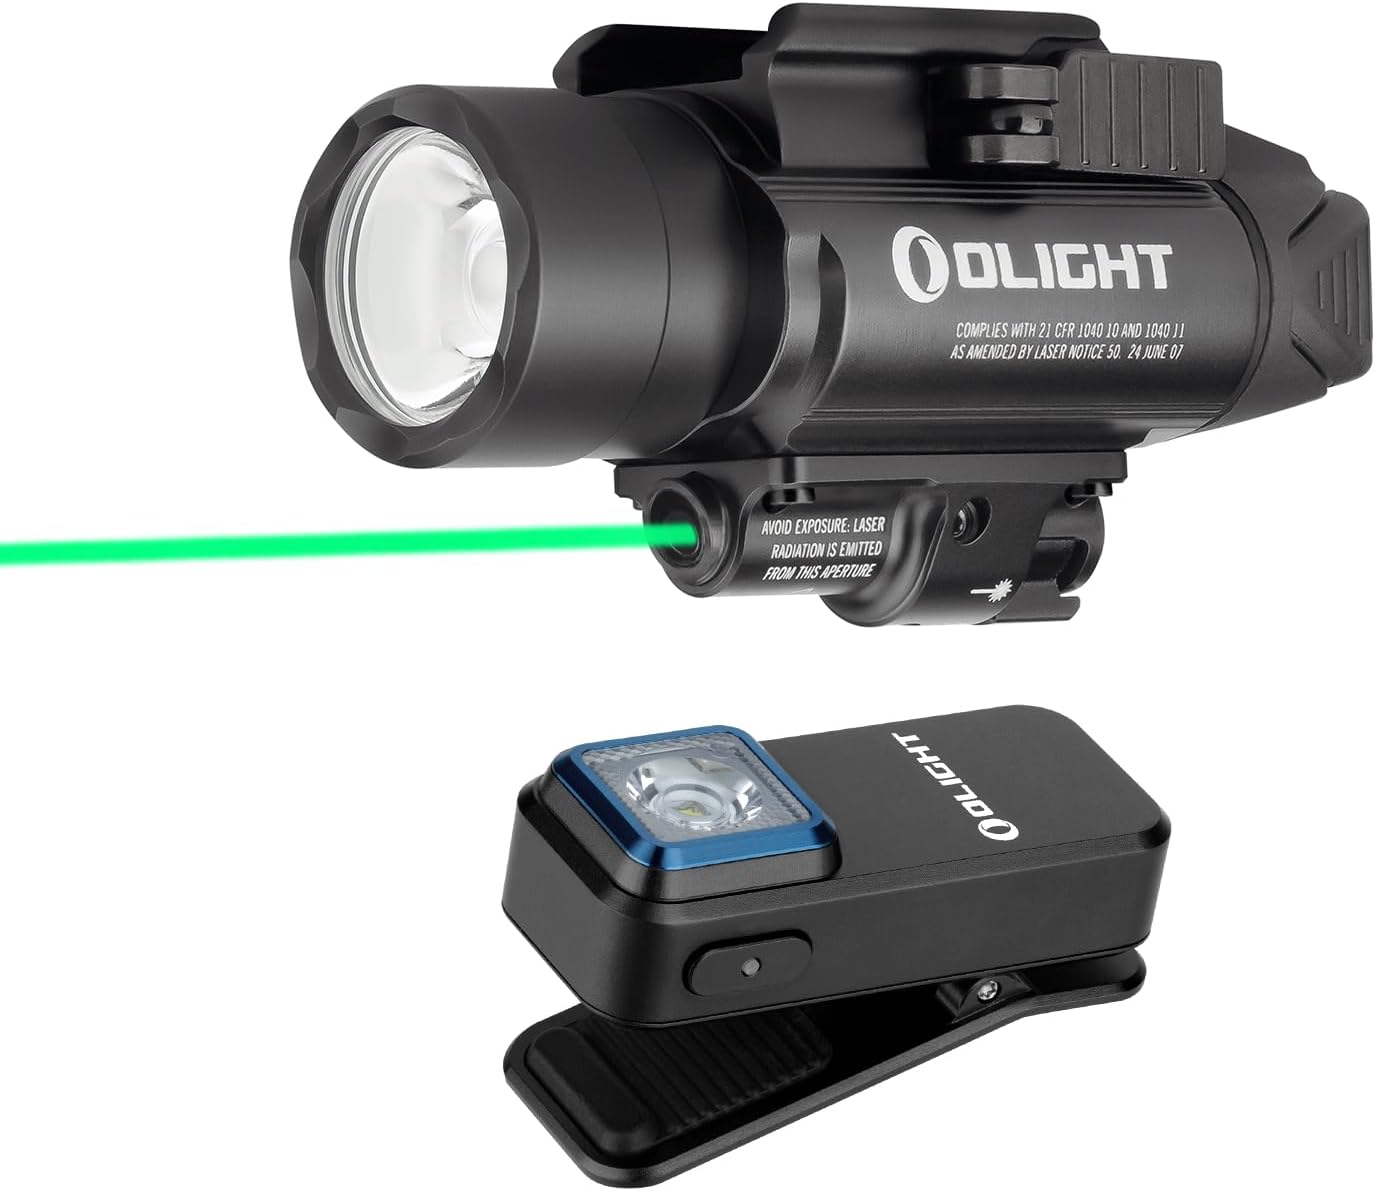
Image 1.1: The OLIGHT Baldr Pro Tactical Weaponlight and Oclip Rechargeable EDC Flashlight bundle.

Image 1.2: The Baldr Pro weaponlight, featuring a powerful white LED and a green laser sight.

Image 1.3: The Oclip compact EDC flashlight with a versatile clip design.
1.1 Baldr Pro Tactical Weaponlight
The Baldr Pro is designed for equipment with Picatinny (MIL-STD-1913) or GL rails. It features a powerful 1350-lumen white LED and a visible green laser sight. The light output can be adjusted to 300 lumens for constant lighting. Its robust aluminum alloy construction ensures durability and reliability.
1.2 Oclip Rechargeable EDC Flashlight
The Oclip is a lightweight and compact everyday carry (EDC) flashlight. It weighs only 1.05 oz (30g) and measures 1.90 inches (48.5mm) in length. It offers up to 300 lumens of white light output and includes a red light mode for night vision preservation. The Oclip is conveniently rechargeable via USB Type-C.
2. Configuració i instal·lació
2.1 Baldr Pro Installation
The Baldr Pro is compatible with both GL rails (pre-installed) and Picatinny rails (adapter included). To install, align the light with the rail and secure it using the side swing arm mechanism. To detach, loosen the side swing arm.

Image 2.1: The Baldr Pro is compatible with GL and Picatinny rails.

Image 2.2: Included rail adapters for versatile mounting options.
2.1.1 Instal·lació de la bateria
The Baldr Pro is powered by two batteries. Ensure correct polarity when inserting the batteries into the compartment.
2.1.2 Green Beam Adjustment
The green beam can be adjusted for accuracy using the integrated adjustable screws. This allows for precise targeting and zeroing.
2.2 Oclip Setup
The Oclip features a robust clip for attachment to various items such as keychains, caps, or backpacks. Simply open the clip and secure it to your desired location.
2.2.1 Charging the Oclip
The Oclip is rechargeable via a USB Type-C port. Connect the provided charging cable to the Oclip and a compatible USB power source (e.g., laptop, wall adapter, power bank). A charging indicator light will show the charging status.

Image 2.3: The Oclip's compact dimensions and various attachment methods.
3. Instruccions de funcionament
3.1 Baldr Pro Operation
The Baldr Pro offers multiple lighting modes and laser activation. Refer to the device's controls for specific activation sequences.
- Modes de llum blanca: The white LED can output up to 1350 lumens for maximum illumination or 300 lumens for constant lighting.
- Green Beam: The green laser beam is clearly visible in both day and night conditions for accurate targeting.
- Modes combinats: A toggle switch allows selection between white light only, green beam only, or a combination of both white light and green beam.

Image 3.1: The Baldr Pro mounted, illustrating its operational modes and controls.
3.2 Oclip Operation
The Oclip features various white light levels and a red light mode for different scenarios.
- Modes de llum blanca: The Oclip provides multiple white light output levels, including Moonlight (1.5 lumens, 30 hours), Low (10 lumens, 12 hours), Medium (100 lumens, 90 minutes), and High (300-180 lumens, 1+60 minutes).
- Mode de llum vermella: A 4-lumen red light is available for preserving night vision without being overly bright.
Image 3.2: Visual representation of the Oclip's various light modes and their respective runtimes.
4. Manteniment
To ensure the longevity and optimal performance of your OLIGHT products, follow these maintenance guidelines:
- Neteja: Regularly wipe down the exterior of both the Baldr Pro and Oclip with a clean, soft cloth. Avoid using abrasive cleaners or solvents.
- Battery Care (Baldr Pro): For the Baldr Pro, ensure batteries are inserted correctly. If storing the device for extended periods, remove the batteries to prevent leakage.
- Charging (Oclip): Always use the provided or a certified USB Type-C cable for charging. Avoid overcharging or completely draining the battery frequently to prolong its lifespan.
- Emmagatzematge: Store both devices in a cool, dry place away from direct sunlight and extreme temperatures.
5. Solució De Problemes
If you encounter issues with your OLIGHT Baldr Pro or Oclip, consider the following common troubleshooting steps:
- El dispositiu no s'encén:
- For Baldr Pro, check if batteries are correctly inserted and fully charged.
- For Oclip, ensure it is charged. Connect it to a power source and check the charging indicator.
- Sortida de llum tènue:
- Batteries may be low. Recharge the Oclip or replace batteries in the Baldr Pro.
- Assegureu-vos que la lent estigui neta i lliure d'obstruccions.
- Laser Not Visible (Baldr Pro):
- Check if the laser mode is activated via the toggle switch.
- Ensure the laser aperture is not blocked.
- Difficulty Attaching/Detaching (Baldr Pro):
- Ensure the side swing arm is fully loosened or tightened as required.
- Verify that the correct rail adapter (GL or Picatinny) is being used for your equipment.
If problems persist after attempting these steps, please contact OLIGHT customer support for further assistance.
6. Especificacions
| Característica | Especificació |
|---|---|
| Marca | LLUM |
| Model | Baldr Pro + Oclip |
| Baldr Pro White Brightness | 1350 lúmens (màx.) |
| Baldr Pro Beam Distance | 260 metres |
| Baldr Pro Power Source | Battery Powered (Two Batteries) |
| Baldr Pro Material | Alumini |
| Oclip Max Brightness | 300 lúmens |
| Oclip Power Source | Recarregable (USB tipus C) |
| Pes de l'oclip | 1.05 oz / 30 g |
| Longitud de l'oclip | 1.90 in / 48.5 mm |
| Baldr Pro Runtime | 1 hour and 30 minutes (at max output) |
| Tipus de font de llum | LED |
7. Garantia i Suport
7.1 Informació de la garantia
OLIGHT products are backed by a Lifetime Warranty, reflecting the brand's commitment to quality and durability. For specific terms and conditions of the warranty, please refer to the official OLIGHT weblloc o contacteu amb el servei d'atenció al client.
7.2 Atenció al client
For any inquiries, technical assistance, or warranty claims, please visit the official OLIGHT website or their brand store on Amazon. You can find contact information and frequently asked questions there.


