Introducció
This manual provides detailed instructions for the assembly, operation, and maintenance of your Patiowell 8x6 FT Outdoor Storage Shed. Please read all instructions carefully before beginning assembly and retain this manual for future reference.
Nota important: Before assembly, please check your local Homeowners Association (HOA) policy to ensure that the shed can be built in your area. The shed components may arrive in several packages at different times. Please ensure all packages have arrived before starting assembly.

Image: Patiowell 8x6 FT Outdoor Storage Shed installed in a backyard.
Informació de seguretat
- Utilitzeu sempre l'equip de seguretat adequat, inclosos guants i protecció ocular, durant el muntatge.
- Assegureu-vos que la zona de muntatge estigui lliure d'obstacles i anivellada.
- No intenteu muntar la caseta amb vents forts o condicions meteorològiques adverses.
- Mantingueu els nens i les mascotes allunyats de la zona de reunió.
- Use caution when handling tools and components to prevent injury.
- Two or more people are recommended for assembly to ensure safety and ease of installation.
Contingut del paquet
Your Patiowell 8x6 FT Outdoor Storage Shed includes various panels, support beams, hardware, and accessories. Please refer to the detailed parts list provided in your physical manual to verify all components are present before starting assembly. Note that the shed will be divided into several packages, which may arrive at different times.
Muntatge i muntatge
The Patiowell shed features an easy "kick-it" installation method, reducing the number of screws required for assembly. Follow the steps below for a smooth setup process.
Guia de vídeo de muntatge
Video: Detailed assembly instructions for the Patiowell 8x6 FT Plastic Shed.
Step 1: Floor Installation
Assemble the plastic floor base panels (A1, A2, A3) by interlocking them. Ensure they are securely connected. Attach the floor perimeter piece (A4) and secure it with the specified screws (SPF-20) and caps (A5). This sturdy plastic floor base provides protection against water damage.
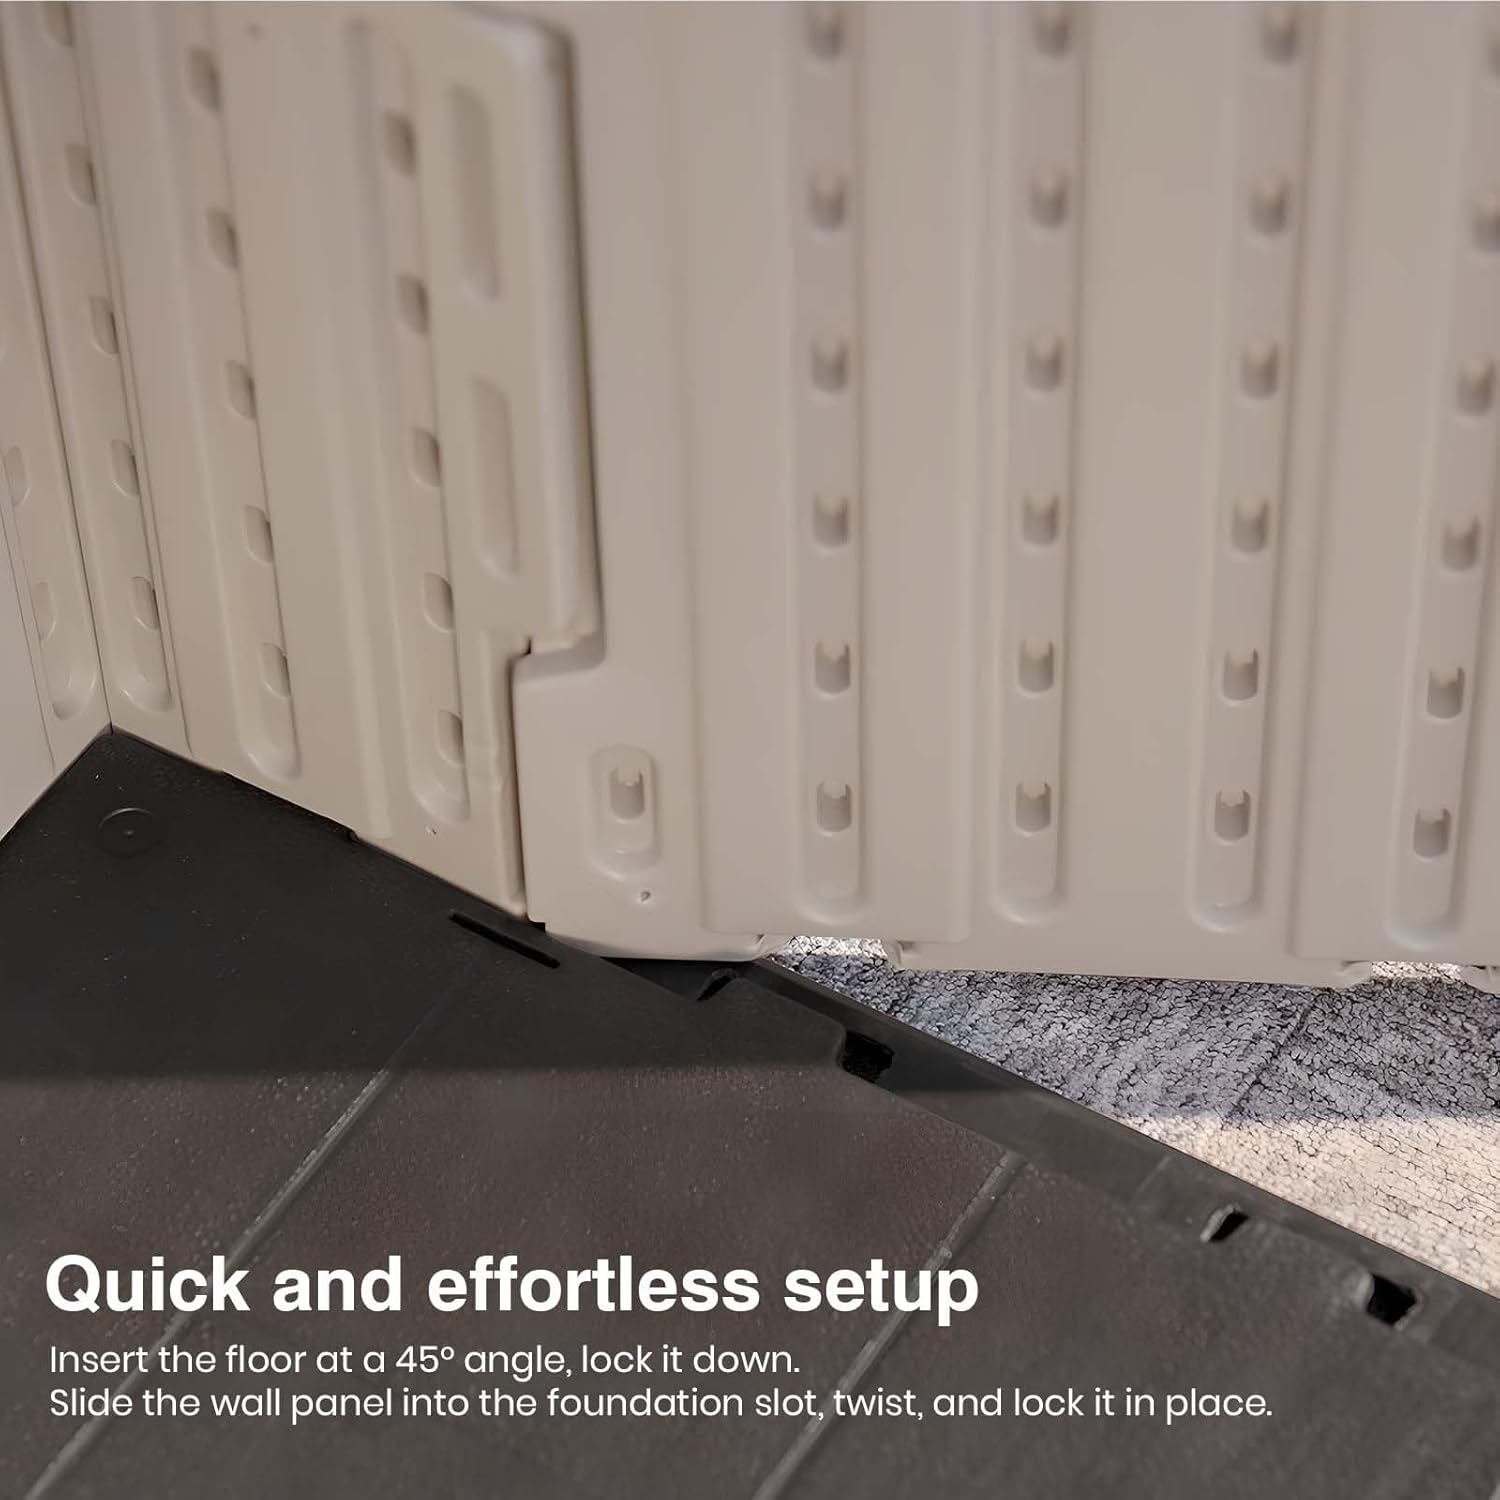
Image: Demonstrates the quick and effortless setup of the floor panels.
Step 2: Wall Panel Installation
Begin installing the wall panels (B1, B2, B3, B4, B5, B6) by inserting them into the foundation slots of the floor base. Use the "kick-it" method to firmly secure each panel. Ensure the window panel (B3+W1+W2) is placed in the designated position. The panels interlock to form the shed walls.

Image: Illustration of the "Kick-it" installation method, highlighting reduced screw usage.
Step 3: Wall Panel Fixing Components
Install the internal wall panel fixing components (B2-1, B2-2, B2-3, B2-4) using the provided screws (SP6-20) and nuts (M6-10, M6-25). These components reinforce the wall structure and ensure stability.
Step 4: Roof Support Beams Installation
Assemble the roof support beams (D2-1, D2-2, D2-3, E1-1) by connecting them with the central support (E4) using bolts (M6-55) and nuts (M6). Secure the assembled beams to the top of the wall panels with screws (SP6-15). This forms the internal framework for the roof.
Step 5: Front and Rear Triangular Panels Installation
Attach the front and rear triangular panels (CL, CR) to the roof support structure. Secure them using the connecting bar (DD) and screws (M5-8, SP6-20, SP6-25). These panels provide the gable ends of the shed.
Step 6: Roof Section Installation
Install the roof panels (D1, D2, D3) onto the roof support beams. Ensure they are properly aligned and secured with screws (SP6-20, SP6-25). Attach the roof ridge caps (E1, E3) to complete the roof structure. The roof is designed to be weather-resistant.
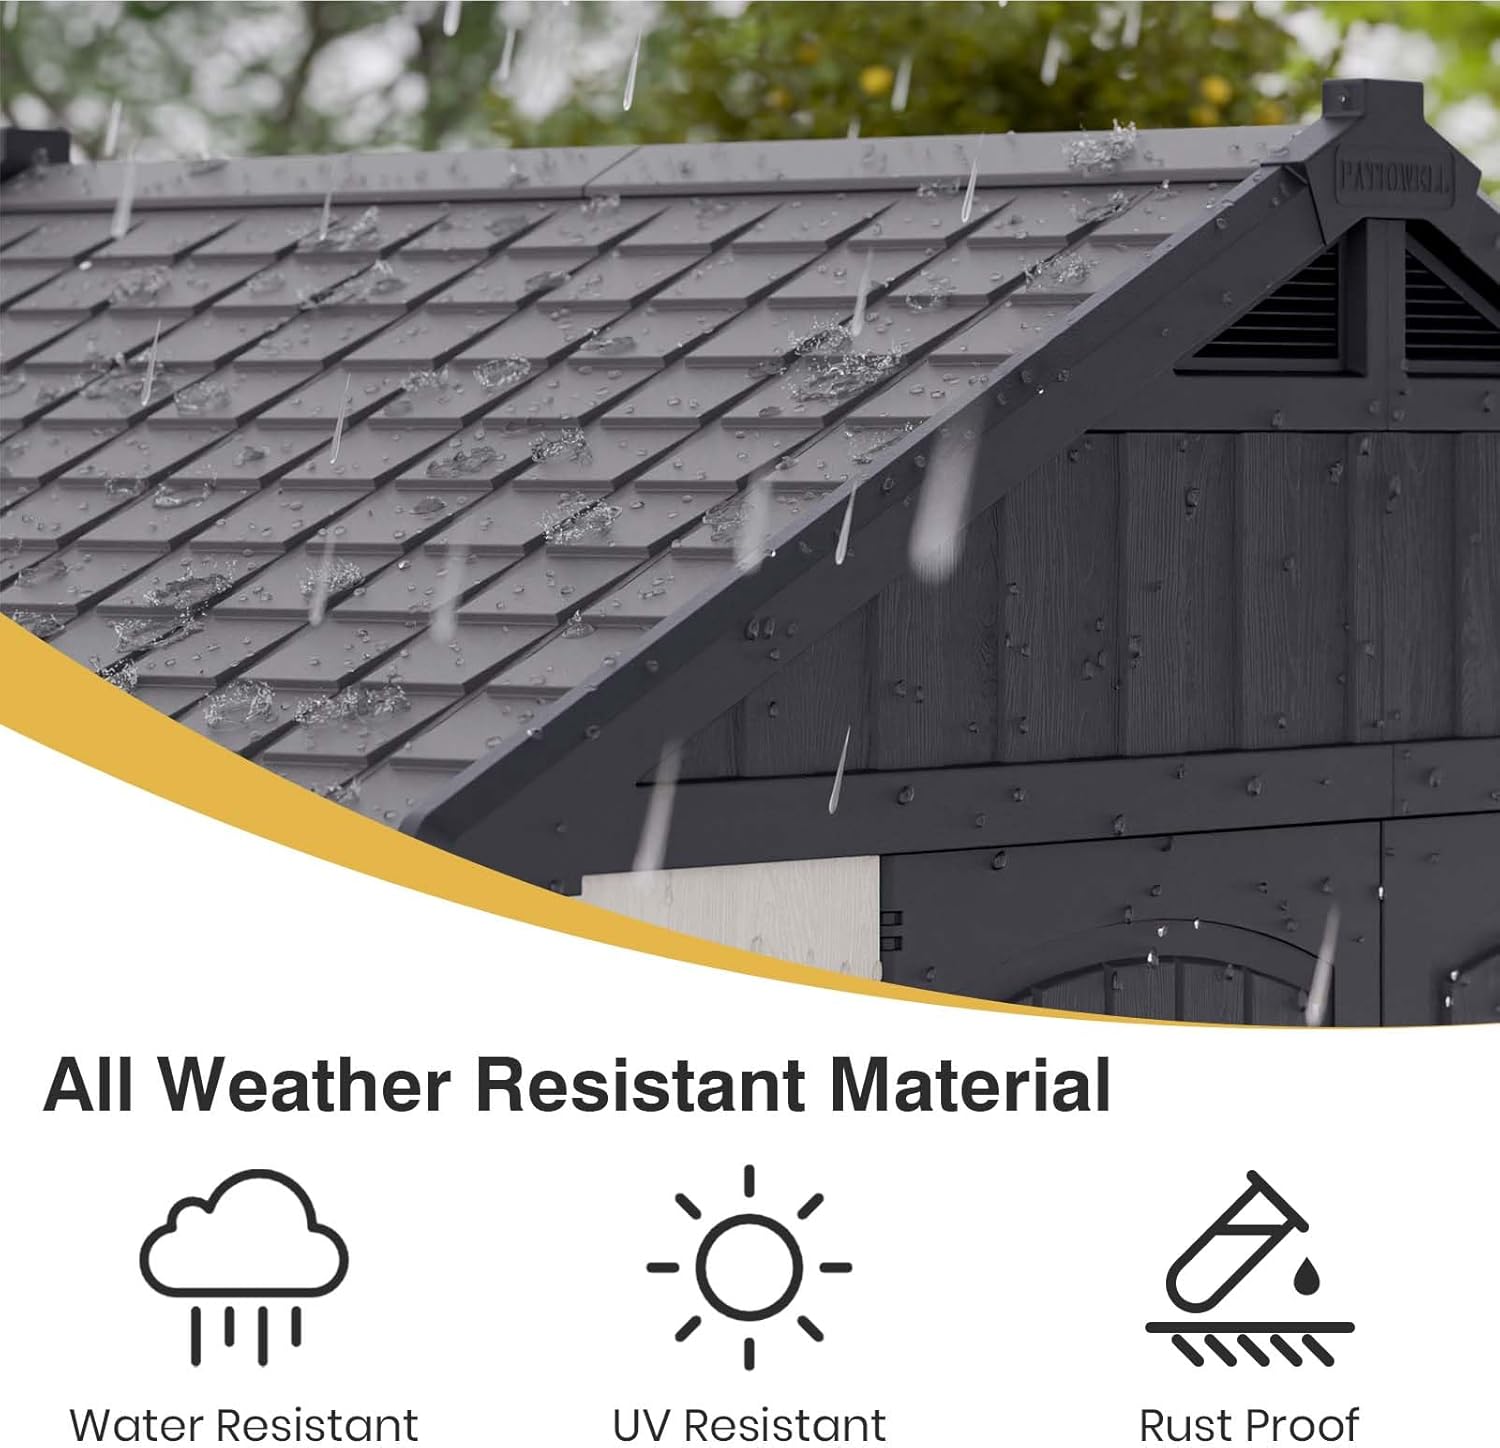
Image: The shed roof demonstrating its weather-resistant material.
Pas 7: instal·lació del panell de la porta
Install the door panels (DL, DR) by attaching the door frames (DF, DZ) and hinges (DDZ). Secure the door handles (DH) and the lockable door mechanism (DS, DC) with the appropriate screws (SP6-20). Ensure the doors open and close smoothly and the lock functions correctly for security.
Instruccions de funcionament
- Funcionament de la porta: The shed features lockable double doors. To open, disengage the lock and pull the handles. To close, push the doors firmly until they latch, then engage the lock for security.
- Window Functionality: The integrated window allows natural light into the shed, reducing the need for artificial lighting during the day.
- Ventilació: The shed design includes features for effective ventilation, helping to prevent moisture buildup and maintain air circulation inside.
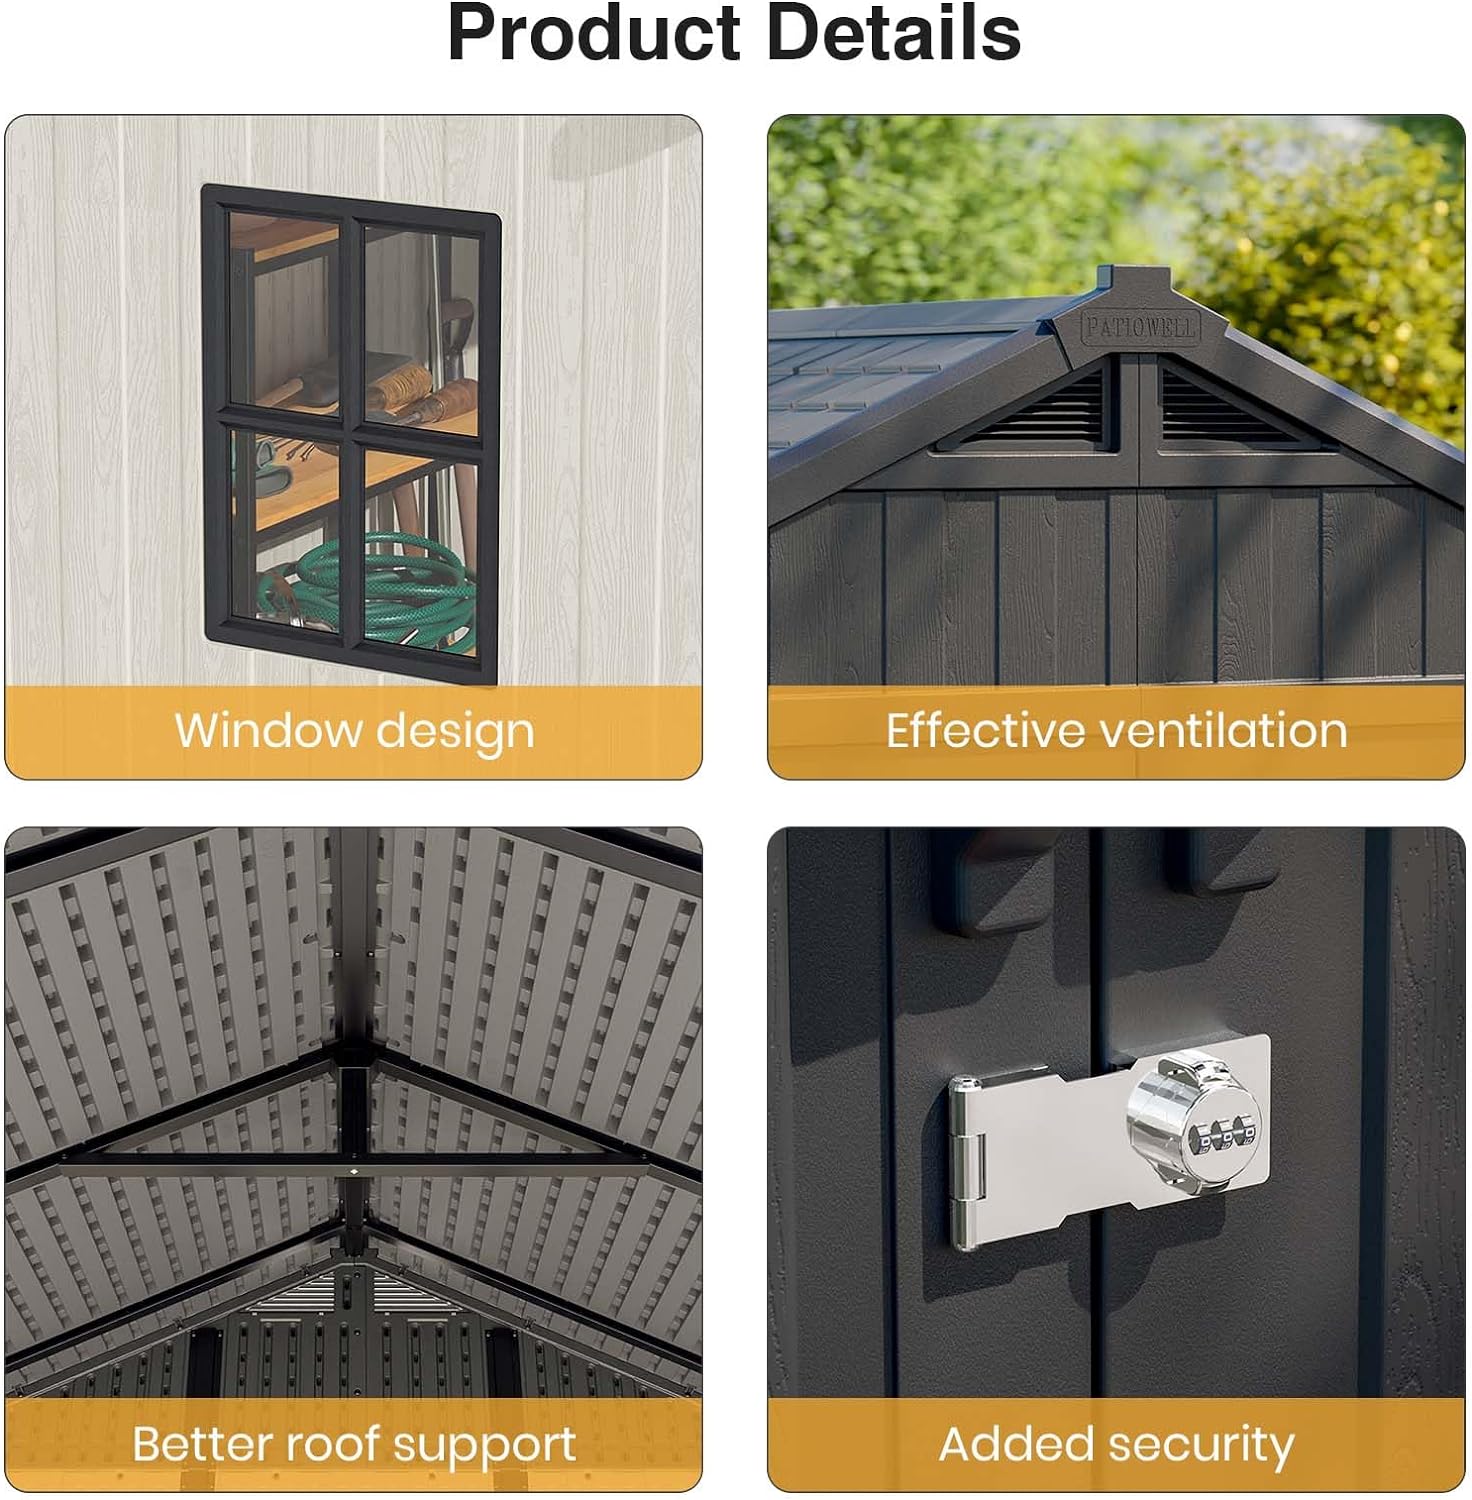
Image: Key product features including window, ventilation, roof support, and security lock.
Manteniment
Regular maintenance will extend the life and appearance of your Patiowell storage shed.
- Neteja: Clean the shed periodically with mild soap and water. Avoid abrasive cleaners or harsh chemicals that could damage the plastic/resin material.
- Inspecció: Regularly inspect all screws, bolts, and connections to ensure they remain tight. Re-tighten if necessary.
- Drenatge: Ensure the area around the shed is clear of debris to allow for proper drainage and prevent water accumulation around the base.
- Cura del material: The shed is made from recyclable and durable plastic/resin materials that are UV resistant. No special treatment is required for UV protection.
Resolució de problemes
- Warped Floor Panels: If floor panels warp during assembly, ensure they are laid flat and out of direct sunlight before and during installation. Promptly install wall panels after laying the floor to help maintain its shape.
- Difficulty Closing Doors: If doors are difficult to close or align, check that the shed is on a perfectly level surface. Minor adjustments to the door hinges or frame may be necessary.
- Peces que falten: If any parts are missing, refer to the package contents list and contact customer support for assistance.
- Dificultat de muntatge: While designed for easy assembly, some steps may require two people. Ensure all screws are tightened appropriately without over-tightening, especially into plastic components.
Especificacions
| Marca | Pou del pati |
| Número de model | 0404-B |
| Color | Beix |
| Material | Plàstic, resina |
| Dimensions del producte | 66.1 "P x 91.3" W x 94.5" H |
| Pes de l'article | 304.3 lliures |
| Estil | Resin & Plastic Storage Shed |
| Material base | Plàstic |
| Tipus de material superior | Plàstic |
| Nivell de resistència a l'aigua | Resistent a l'aigua |
| Material del marc | Plàstic |
| Muntatge obligatori | Sí |
| Límit de pes | 880 lliures |
| Zona Pis | 41.8 peus quadrats |
| Amplada de la porta | 55 polzades |
| Alçada de la porta | 70 polzades |
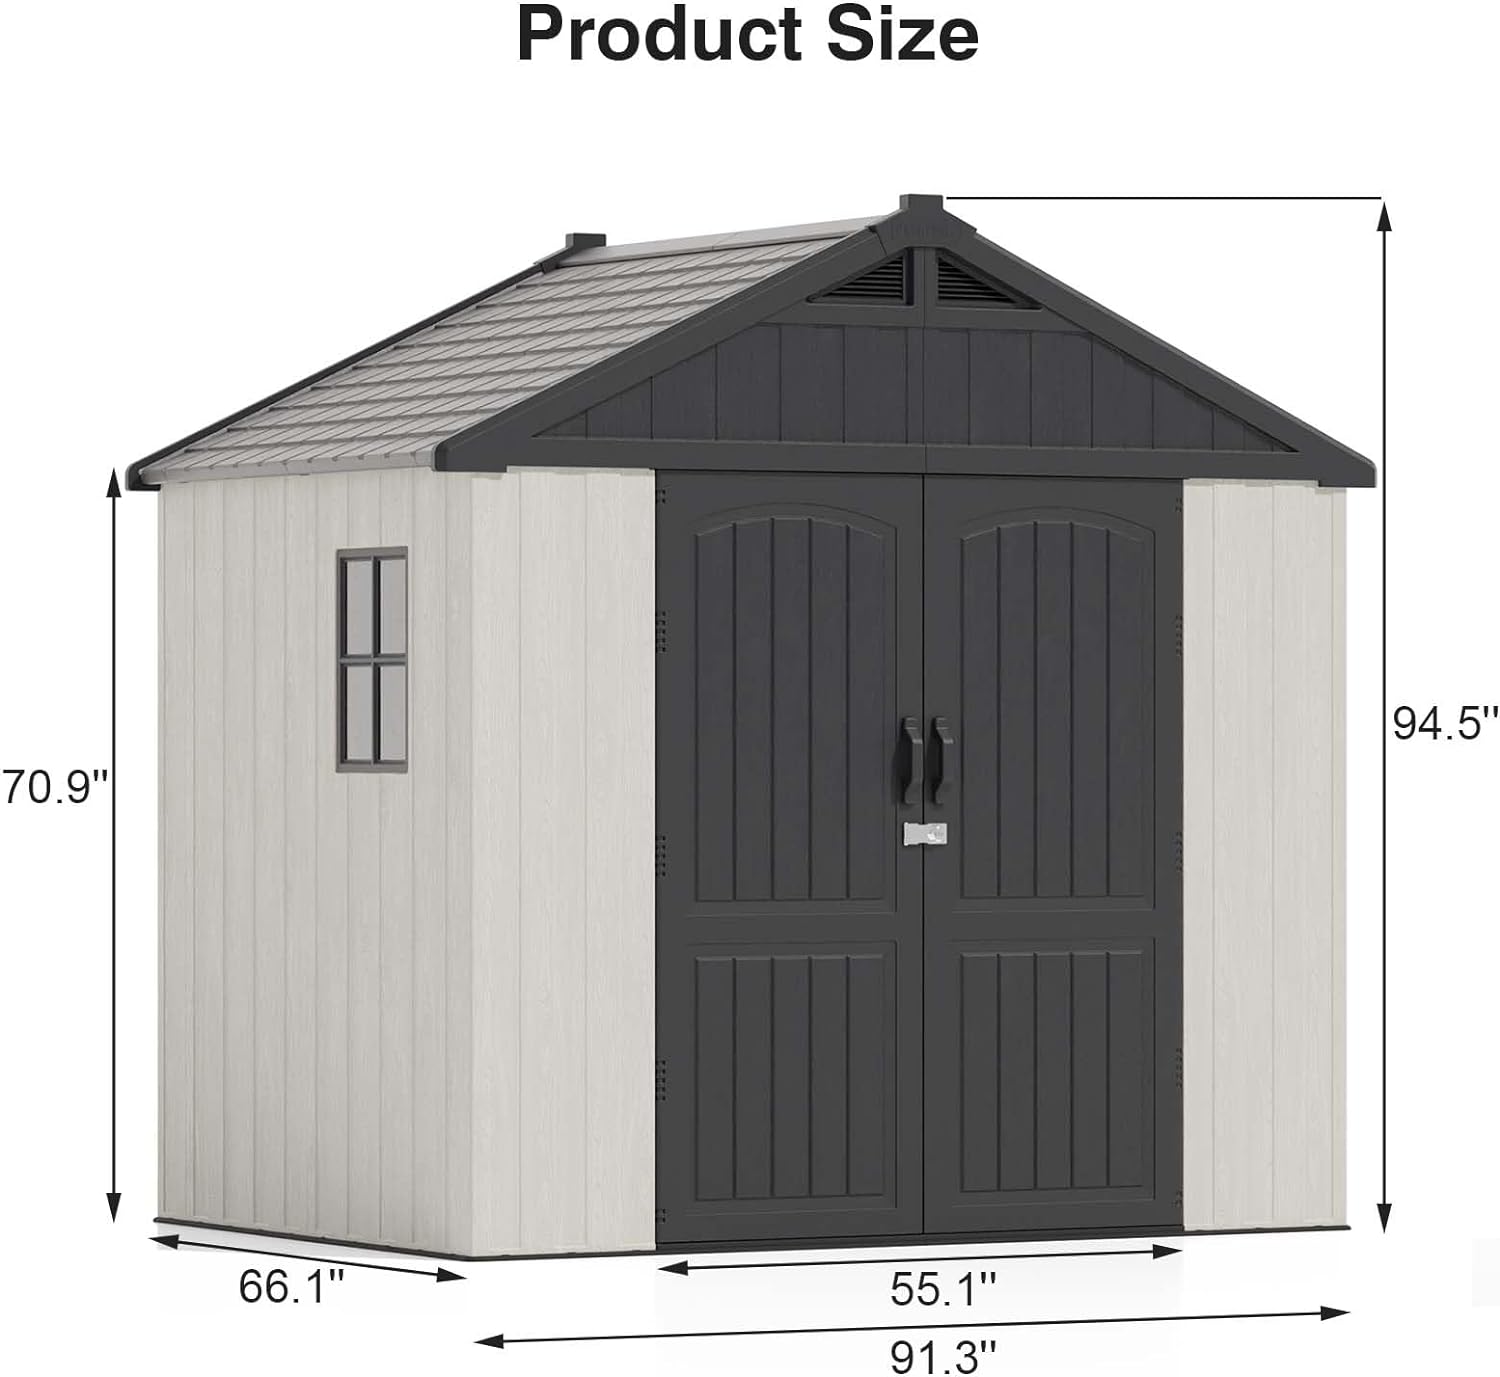
Image: Detailed dimensions of the Patiowell 8x6 FT Outdoor Storage Shed.
Garantia i Suport
For warranty information, please refer to the documentation included with your product packaging. For any questions, missing parts, or technical support, please contact Patiowell customer service. Contact details can typically be found on the product packaging or the official Patiowell weblloc.