1. Introducció
This manual provides detailed instructions for the safe and effective operation of the Mastfuyi FY372B TRMS 6000 Counts Auto-Ranging Clamp Meter. Please read this manual thoroughly before use and retain it for future reference.
The Mastfuyi FY372B is a versatile digital clamp meter designed for measuring various electrical parameters, including AC current, AC/DC voltage, resistance, capacitance, frequency, continuity, diode, duty cycle, and temperature. It features True RMS measurement, auto-ranging, Non-Contact Voltage (NCV) detection, live wire detection, and an automatic shutdown function for energy saving.
2. Informació de seguretat
ADVERTÈNCIA: Per evitar descàrregues elèctriques o lesions personals, llegiu i comprengueu tota la informació de seguretat abans d'utilitzar aquest producte.
- Respecteu sempre els codis de seguretat locals i nacionals.
- No utilitzeu el mesurador si sembla danyat o si l'aïllament dels cables de prova està compromès.
- No apliqueu més del volum nominaltage, tal com està marcat al comptador, entre els terminals o entre qualsevol terminal i terra.
- Tingueu precaució quan treballeu amb voltagper sobre de 30 V CA RMS, 42 V pic o 60 V CC. Aquests voltagsuposen un risc de xoc.
- Traieu els cables de prova del circuit abans de canviar les funcions.
- Assegureu-vos que el mesurador estigui en la funció i el rang correctes per a la mesura.
- Canvieu les piles quan aparegui l'indicador de bateria baixa per garantir lectures precises.
- No feu funcionar el mesurador en ambients amb gasos explosius, vapors o pols.
- Utilitzeu equips de protecció individual (EPI) adequats, com ara ulleres de seguretat i guants aïllants, quan treballeu amb circuits elèctrics.
3. Contingut del paquet
Verifiqueu que tots els elements que s'enumeren a continuació s'inclouen al vostre paquet:
- 1 x Mastfuyi FY372B Digital Clamp Mesurador
- 2 cables de prova (vermell i negre)
- 1 x Termopar tipus K
- 2 piles AAA de 1.5 V
- 1 x bossa de transport
- 1 x Manual d'usuari (aquest document)

Image: The Mastfuyi FY372B clamp meter displayed with its included accessories: test leads, thermocouple, AAA batteries, and a carrying case.

Image: A compact view of the Mastfuyi FY372B clamp meter, its test leads, thermocouple, batteries, carrying bag, and the user manual.
4. Producte acabatview
The Mastfuyi FY372B clamp meter is designed for ease of use and accuracy. Below is an overview of its main components and functions.

Image: An illustration of the Mastfuyi FY372B clamp meter highlighting its various measurement capabilities and features such as AC Current, AC/DC Voltage, Resistance, Capacitance, Frequency, Diode, Continuity, Live Wire, NCV, Data Hold, Flashlight, LCD Display, and Auto Shutdown.
Components clau:
- Clamp Mandíbula: S'utilitza per a la mesura de corrent altern sense contacte.
- Pantalla LCD: High-brightness, self-luminous screen for clear readings.
- Botons de funció:
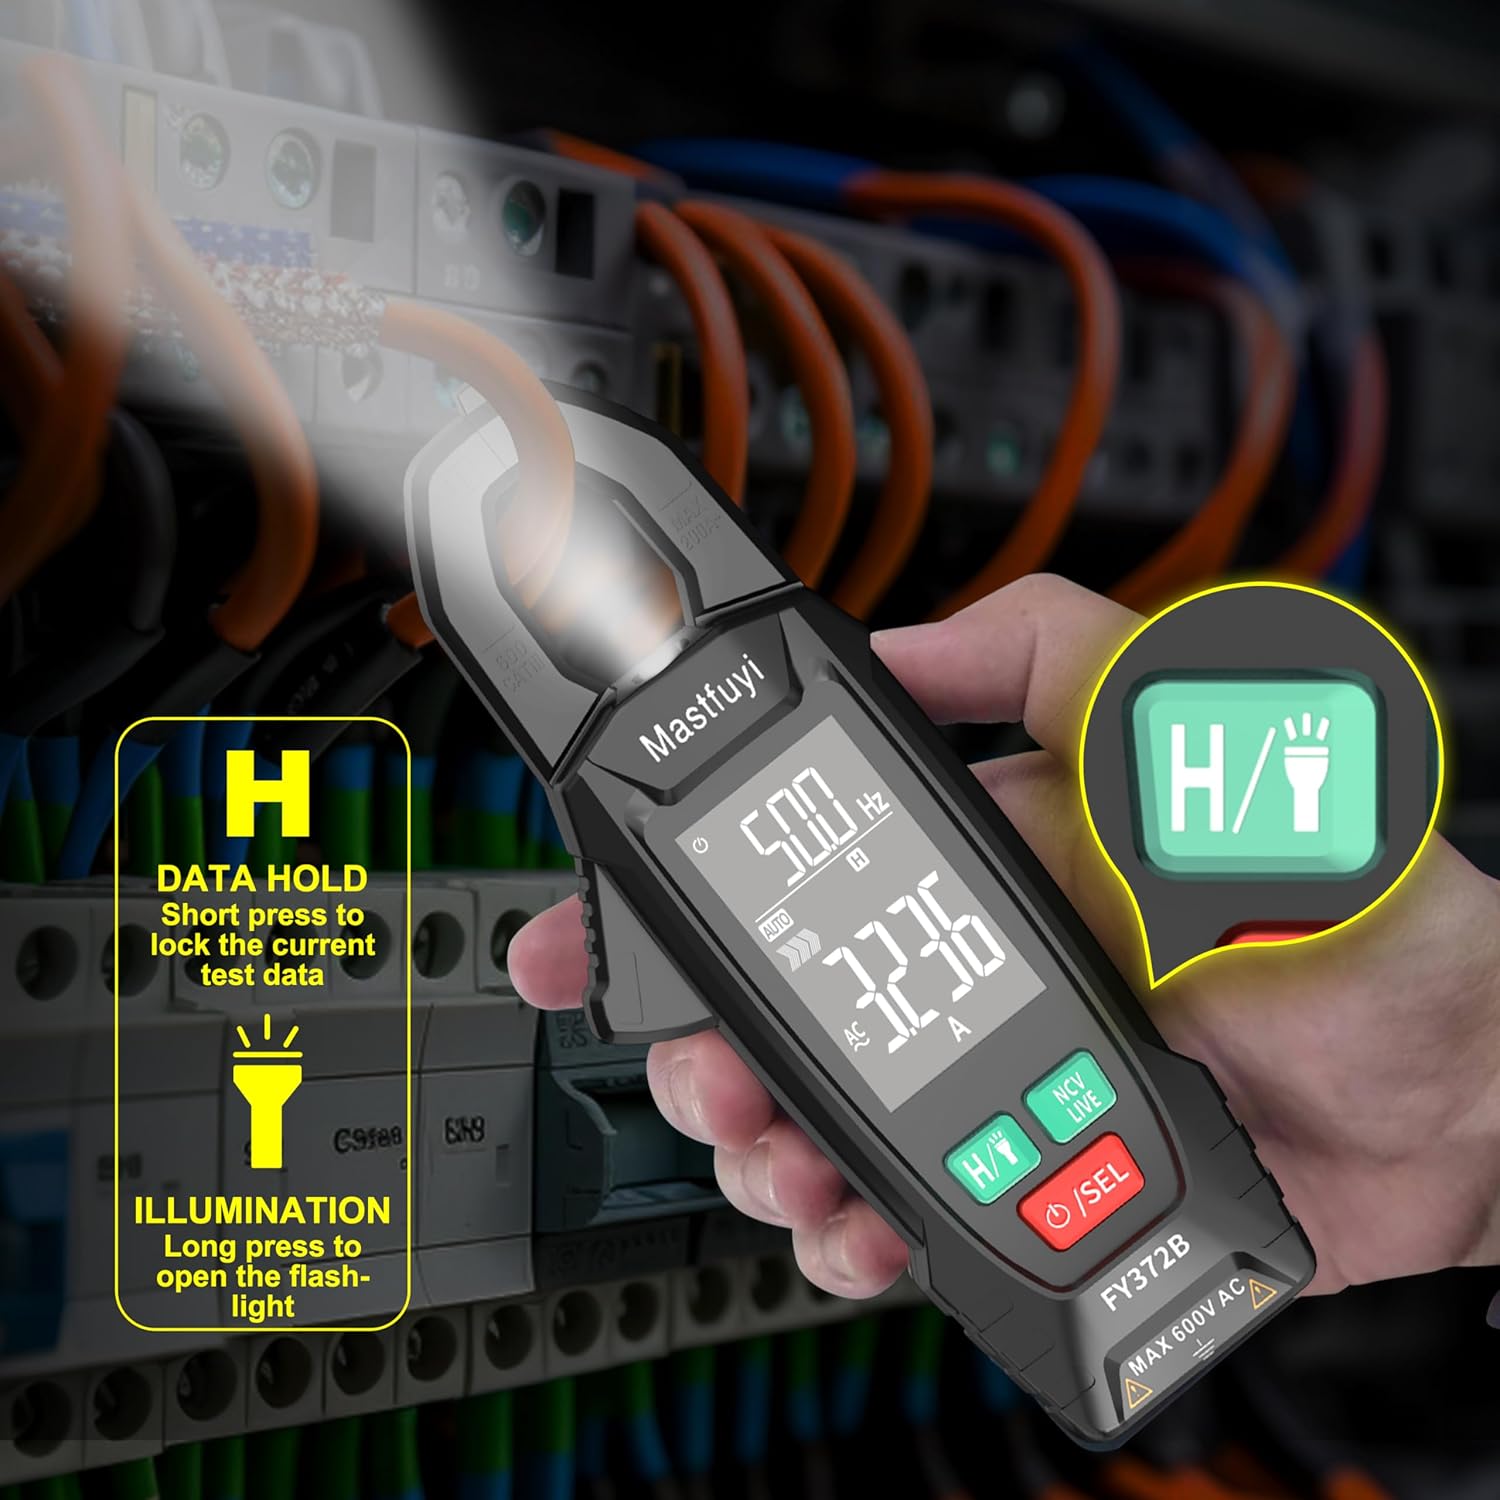
- H/💡 (Hold/Flashlight): Short press to hold data, long press to activate flashlight.
- NCV/LIVE: Short press to switch between Non-Contact Voltage (NCV) and Live Wire detection.
- /SEL (Power/Select): Short press to cycle through manual measurement modes, long press to power on/off.
- Terminals d'entrada: Per connectar els cables de prova per a voltage, resistance, capacitance, diode, continuity, and temperature measurements.
- Activador: Opens the clamp mandíbula.
5. Configuració
5.1 Instal·lació de la bateria
- Assegureu-vos que el mesurador estigui apagat.
- Localitzeu la tapa del compartiment de la bateria a la part posterior del mesurador.
- Utilitzeu un tornavís per obrir el compartiment de la bateria.
- Insert two 1.5V AAA batteries, observing the correct polarity (+/-).
- Substituïu la tapa del compartiment de la bateria i fixeu-la amb el cargol.
5.2 Encès inicial
Manteniu premut el botó /SEL button for approximately 2 seconds to power on the meter. The LCD display will illuminate.
6. Instruccions de funcionament
The Mastfuyi FY372B features both automatic and manual measurement modes. In automatic mode, the meter intelligently detects the measurement type (DC/AC voltage, AC current, continuity, resistance) and switches to the appropriate mode.
6.1 Automatic Recognition and Ranging (Smart Mode)
When powered on, the meter defaults to Smart Mode, indicated by "AUTO" on the display. In this mode, the meter automatically identifies and measures:
- Volum AC / DCtage
- Corrent alterna
- Resistència
- Continuïtat

Imatge: El clamp meter connected to a wall outlet with test leads, demonstrating automatic voltage measurement and auto-ranging capabilities.

Imatge: El clamp meter's jaw around a single wire, illustrating automatic recognition and measurement of AC current.
6.2 Manual Measurement Mode
To switch to manual measurement modes for specific functions (e.g., Capacitance, Frequency, Diode, Temperature), short press the /SEL botó per anar ciclant pels modes disponibles.

Imatge: El clamp meter with test leads connected to a resistor, demonstrating manual selection for resistance measurement.
6.3 Funcions de mesura específiques

Image: Four panels showing the clamp meter in action: measuring AC current by clamping a wire, measuring temperature with the thermocouple, measuring AC voltage with test leads in an outlet, and measuring DC voltage across a car battery.

Image: Six panels illustrating various functions: NCV detection near an outlet, resistance measurement with test leads, capacitance measurement, diode testing, continuity check, and live wire detection in an outlet.
6.3.1 Mesura de corrent altern
- Select AC Current mode (or use Auto mode).
- Obriu el clamp jaw using the trigger.
- Incloeu només un conductor (fil) dins del cercle.amp mandíbula. No tanqueuamp around an entire power cord, as this will result in a zero reading.
- Llegiu el valor del corrent altern a la pantalla.
6.3.2 AC/DC Voltage Mesura
- Seleccioneu AC Voltage o DC Voltage mode (or use Auto mode).
- Insert the red test lead into the "VΩmA" input terminal and the black test lead into the "COM" terminal.
- Connecteu els cables de prova en paral·lel al circuit o component que s'està provant.
- Llegeix el voltage valor a la pantalla.
6.3.3 Mesura de la Resistència
- Select Resistance mode (or use Auto mode).
- Insert the red test lead into the "VΩmA" input terminal and the black test lead into the "COM" terminal.
- Assegureu-vos que el circuit estigui desenergitzat abans de mesurar la resistència.
- Connecteu els cables de prova al component que s'ha de mesurar.
- Llegiu el valor de resistència a la pantalla.
6.3.4 Prova de continuïtat
- Select Continuity mode (or use Auto mode).
- Insert the red test lead into the "VΩmA" input terminal and the black test lead into the "COM" terminal.
- Assegureu-vos que el circuit estigui desenergitzat.
- Connecteu els cables de prova a través del circuit o component.
- If continuity exists (low resistance), the meter will emit an audible beep.
6.3.5 Mesura de la capacitat
- Select Capacitance mode (manual selection via /SEL botó).
- Insert the red test lead into the "VΩmA" input terminal and the black test lead into the "COM" terminal.
- Ensure the capacitor is fully discharged before measurement to avoid damage to the meter.
- Connecteu els cables de prova als terminals del condensador.
- Llegiu el valor de la capacitat a la pantalla.
6.3.6 Mesura de la freqüència
- Select Frequency mode (manual selection via /SEL botó).
- Insert the red test lead into the "VΩmA" input terminal and the black test lead into the "COM" terminal.
- Connect the test leads to the circuit where frequency needs to be measured.
- Read the frequency value in Hz on the display.
6.3.7 Prova de díodes
- Select Diode mode (manual selection via /SEL botó).
- Insert the red test lead into the "VΩmA" input terminal and the black test lead into the "COM" terminal.
- Connecteu el cable de prova vermell a l'ànode i el cable de prova negre al càtode del díode.
- La pantalla mostrarà el volum d'avançtagcaiguda de corrent. Invertiu els cables; una lectura de circuit obert indica un bon díode.
6.3.8 Mesura de la temperatura
- Select Temperature mode (manual selection via /SEL botó).
- Connect the K-type thermocouple to the meter's input terminals, observing polarity.
- Place the thermocouple probe on or in the object whose temperature is to be measured.
- Read the temperature value on the display. The meter supports dual display of °C/°F.

Imatge: El clamp meter connected to a K-type thermocouple, demonstrating temperature measurement in various scenarios like water, an air conditioner vent, and a radiator.
7. Característiques especials
7.1 Vol. sense contactetage (NCV) Detecció
La funció NCV permet la detecció del volum de CAtage without direct contact with the conductor, enhancing safety.
- Premeu el botó NCV/EN DIRECTE button to enter NCV mode.
- Moveu la part superior del mesurador a prop d'un voltatge de CAtage font.
- The meter will emit an audible beep and the NCV indicator on the display will illuminate, with increasing intensity for higher voltage.

Imatge: El clamp meter detecting non-contact voltage near an electrical outlet, showing visual and audible alarms for high voltage.
7.2 Detecció de cables en fase
Aquesta funció ajuda a identificar els cables actius en un circuit de CA.
- Premeu el botó NCV/EN DIRECTE button repeatedly until "LIVE" appears on the display.
- Insert the red test lead into the "VΩmA" input terminal.
- Touch the red test lead to the conductor or terminal to be tested.
- If a live wire is detected, the display will show "LIVE" and an alarm will sound.

Image: A comparison showing the clamp meter performing NCV detection (left) and Live Wire detection using a test lead (right) on electrical outlets.
7.3 Retenció de dades
Per congelar la lectura actual a la pantalla:
- Durant una mesura, premeu breument la tecla H/💡 button. "HOLD" will appear on the display.
- Premeu el botó H/💡 button again to release the data hold function.

Imatge: El clamp meter displaying a measurement with the "H" icon indicating that the data hold function is active.
7.4 Llanterna LED
For illumination in dark environments:
- Premeu llargament el botó H/💡 button to turn the flashlight on.
- Premeu llargament el botó H/💡 botó de nou per apagar la llanterna.
Imatge: El clamp meter in a dimly lit environment, showing the LED flashlight illuminating the work area and the "H" icon for data hold.
7.5 Apagat automàtic
To conserve battery life, the meter will automatically power off after approximately 10 minutes of inactivity.
- To disable auto-shutdown, press and hold the H/💡 button while powering on the meter.
- To re-enable auto-shutdown, power off the meter and then power it on normally.

Imatge: El clamp meter with an overlay indicating the 10-minute auto-shutdown feature for energy saving.
7.6 Indicador de bateria baixa
Quan la bateria voltage drops below the operating level, a low battery icon will appear on the display. Replace the batteries promptly to ensure accurate measurements.

Imatge: El clamp meter's display showing a low battery icon, indicating the need for battery replacement.
8. Manteniment
8.1 Neteja
- Netegeu el comptador amb anuncisamp drap i detergent suau. No utilitzeu abrasius ni dissolvents.
- Keep the input terminals and clamp jaw clean and free of dust or debris.
8.2 Substitució de la bateria
Refer to Section 5.1 for battery installation instructions. Always replace both batteries with new 1.5V AAA batteries when the low battery indicator appears.
8.3 Emmagatzematge
- If the meter is not used for an extended period, remove the batteries to prevent leakage.
- Store the meter in its carrying bag in a cool, dry place, away from direct sunlight and extreme temperatures.
9. Solució De Problemes
| Problema | Causa possible | Solució |
|---|---|---|
| El mesurador no s'encén. | Piles gastades o instal·lades incorrectament. | Comproveu la polaritat de la bateria o substituïu les bateries. |
| Lectures inexactes. | Low battery; incorrect function/range; external interference. | Replace batteries; ensure correct mode is selected; move away from strong electromagnetic fields. |
| No reading for AC current. | Clamping around multiple conductors or an entire power cord. | Ensure only a single conductor is within the clamp mandíbula. |
| Continuity test does not beep. | Open circuit; circuit is energized. | Check for breaks in the circuit; ensure circuit is de-energized. |
| Meter automatically shuts down too quickly. | Auto-shutdown feature is active. | This is normal behavior. To temporarily disable, refer to Section 7.5. |
10. Especificacions
| Paràmetre | Valor |
|---|---|
| Número de model | FY372B |
| Mostra | 6000 Counts, LCD |
| Tipus de mesura | Veritable valor RMS Clamp Mesurador |
| Font d'alimentació | 2 piles AAA de 1.5 V |
| Volum de funcionament màximtage | 250 Volts (Overload Protection) |
| Dimensions | 20.09 x 10.79 x 4.39 cm |
| Pes | 358 g |
| Interval de temperatura de funcionament | De 0 °C a 40 °C (32 °F a 104 °F) |
| Certificacions | CE, RoHS |
| Característiques | Auto-ranging, NCV, Live Wire Detection, Auto-shutdown, Data Hold, LED Light, Low Battery Indicator |

Image: A diagram illustrating the physical dimensions of the Mastfuyi FY372B clamp meter, showing its length, width, and jaw opening size.
11. Garantia i Suport
Mastfuyi provides a 48-month unconditional warranty for this product, ensuring peace of mind regarding manufacturing defects and performance issues.
Additionally, lifetime after-sales service is offered to assist with any questions or concerns you may have regarding the operation or maintenance of your Mastfuyi FY372B Clamp Metre.
For technical support or warranty claims, please contact Mastfuyi customer service through the platform where the product was purchased or refer to the contact information provided on the official Mastfuyi weblloc.


