1. Introducció
The Arduino Plug and Make Kit (model AKX00069) is designed as an accessible entry point into electronics and programming for beginners. This kit allows users to construct interactive projects using plug-and-play components, eliminating the need for soldering. It provides a hands-on learning experience for understanding basic electronic circuits, input/output operations, and programming logic with the Arduino IDE.
2. Components del kit
The Arduino Plug and Make Kit AKX00069 includes the following items:
- 1x Arduino UNO R4 WiFi board
- 7x Modulino nodes (various sensors, buttons, and output modules)
- 1x Modulino base board
- 1x USB-C cable for power and data connection
- 7x Qwiic cables for connecting Modulino nodes
- 24x cargols
- 20x fruits secs
- Structural frame components

Figura 2.1: Mésview of all components included in the Arduino Plug and Make Kit.
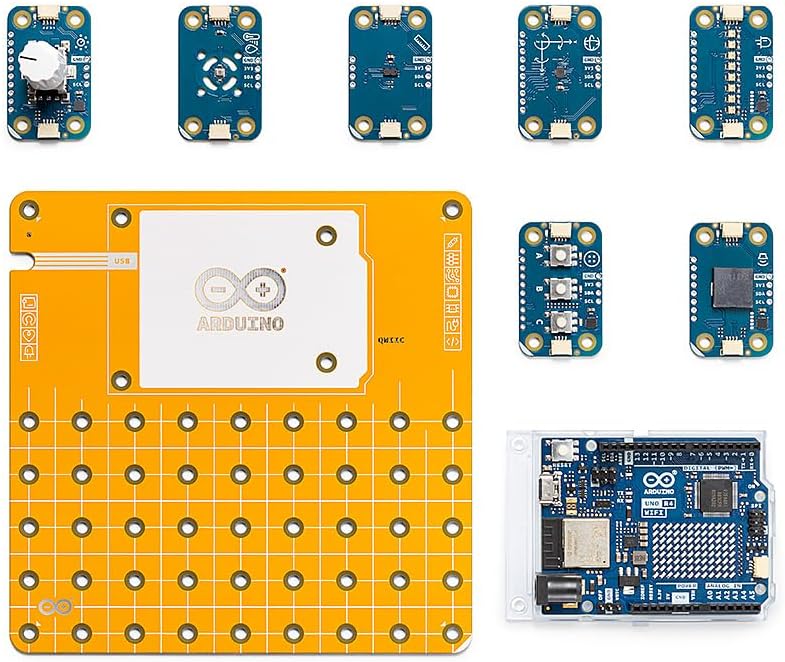
Figura 2.2: Detallada view of the main electronic components: Arduino UNO R4 WiFi, Modulino base, and various Modulino nodes.

Figure 2.3: The seven distinct Modulino nodes, each offering different functionalities like sensing or output.
3. Configuració inicial
Follow these steps to prepare your Arduino Plug and Make Kit for its first use:
- Desempaquetar components: Carefully remove all items from the kit packaging. Verify that all listed components are present.
- Muntar la base: Attach the Arduino UNO R4 WiFi board to the Modulino base using the provided screws and nuts. Ensure the board is securely fastened.
- Connect Modulino Nodes: Select the desired Modulino nodes for your project. Connect them to the Modulino base using the Qwiic cables. The plug-and-play design ensures correct orientation.
- Instal·lació de programari: Download and install the Arduino IDE (Integrated Development Environment) from the official Arduino weblloc (arduino.cc/en/software). This software is essential for writing and uploading code to your Arduino board.
- Connexió a l'ordinador: Use the supplied USB-C cable to connect your Arduino UNO R4 WiFi board to your computer. The board should power on, and your computer may attempt to install drivers.
- First Program (Sketch): Open the Arduino IDE. Select the correct board (Arduino UNO R4 WiFi) and port from the "Tools" menu. Load an example sketch (e.g., "Blink" from "File > Examples > 01.Basics > Blink") and upload it to the board to confirm basic functionality.

Figure 3.1: Illustrates the process of connecting a Modulino node to the main base board using a Qwiic cable.
4. Instruccions de funcionament
The Arduino Plug and Make Kit is designed for ease of use, allowing you to focus on project creation and coding. The Modulino system simplifies hardware connections, enabling rapid prototyping.
4.1. Project Development Workflow
- Concepte: Define the functionality of your project.
- Muntatge de maquinari: Connect the necessary Modulino nodes to the Modulino base and Arduino UNO R4 WiFi board.
- Desenvolupament de codi: Write or modify an Arduino sketch in the Arduino IDE. Utilize the extensive libraries available for Modulino nodes and the UNO R4 WiFi's features (Wi-Fi, Bluetooth, LED matrix).
- Upload and Test: Compile your sketch and upload it to the Arduino board. Test the project's functionality and debug as needed.
4.2. Utilizing UNO R4 WiFi Features
- Connectivitat Wi-Fi: The UNO R4 WiFi allows your projects to connect to the internet, enabling IoT (Internet of Things) applications. Refer to Arduino's online documentation for Wi-Fi library usage.
- Bluetooth: Integrate Bluetooth for wireless communication with other devices.
- Matriu LED: The onboard 8x12 LED matrix can be programmed to display patterns, text, or simple animations.

Figure 4.1: A user connecting the Arduino kit to a laptop, demonstrating the programming and interaction phase of a project.

Figure 4.2: A hand adjusting a potentiometer, illustrating interaction with a Modulino node.
5. Manteniment
Proper care and maintenance will extend the lifespan of your Arduino Plug and Make Kit components:
- Emmagatzematge: Store components in a dry, dust-free environment, preferably in their original packaging or a dedicated storage box.
- Neteja: Use a soft, dry cloth to clean the boards and components. Avoid using liquids or abrasive cleaners.
- Manipulació: Handle electronic components by their edges to avoid touching sensitive parts or static discharge.
- Cura del cable: Do not bend or crimp Qwiic or USB cables excessively. Store them neatly to prevent damage.
- Font d'alimentació: Always use the provided USB-C cable or a compatible power supply within the specified voltage range for the Arduino UNO R4 WiFi.
6. Solució De Problemes
Aquesta secció tracta els problemes habituals que podeu trobar:
| Problema | Causa possible | Solució |
|---|---|---|
| Arduino board not recognized by computer. | Missing or incorrect drivers; faulty USB cable; incorrect port selection in IDE. |
|
| Sketch upload fails. | Incorrect board or port selected; syntax errors in code; board not in bootloader mode. |
|
| Modulino node not responding. | Incorrect Qwiic cable connection; faulty node; incorrect code for the node. |
|
For further assistance, visit the official Arduino forums or support pages on arduino.cc.
7. Especificacions tècniques
| Característica | Detall |
|---|---|
| Número de model | AKX00069 |
| Junta principal | Arduino UNO R4 WiFi |
| Processador | MediaTek MT8125 (on UNO R4 WiFi) |
| RAM | LPDDR2 or DDR3 (on UNO R4 WiFi) |
| Connectivitat sense fil | 802.11ac (Wi-Fi), Bluetooth |
| Sistema operatiu | FreeRTOS (on UNO R4 WiFi) |
| Components inclosos | 7 Modulino nodes, Arduino Uno R4 WiFi, Structural Frame |
| Tecnologia de connectivitat | USB, Wi-Fi |
| Pes de l'article | 7.1 ounces (approximate total kit weight) |
8. Garantia i Suport
8.1. Garantia del producte
For detailed information regarding the warranty for your Arduino Plug and Make Kit AKX00069, please refer to the official Arduino website or the warranty documentation included with your purchase. Warranty terms typically cover manufacturing defects under normal use conditions.
8.2. Suport tècnic
Should you require technical assistance or have questions not covered in this manual, please utilize the following resources:
- Official Arduino Weblloc: www.arduino.cc - Provides extensive documentation, tutorials, and project examples.
- Arduino Forums: Engage with the Arduino community for peer support and solutions to common challenges.
- Contacte amb l'assistència: For specific product issues, refer to the support section on the official Arduino website for direct contact options.