1. Informació de seguretat
This device is a Class II laser product with an output power of 0.874mW. Adhere to all safety guidelines to prevent injury or damage. Always wear appropriate laser safety glasses when operating the machine. Ensure the work area is well-ventilated and free from flammable materials. Never look directly into the laser beam or allow it to strike reflective surfaces.
- Always wear certified laser safety eyewear.
- Do not operate the machine if any safety covers are removed or damaged.
- Mantingueu els nens i el personal no autoritzat allunyats de la zona d'operació.
- Assegureu-vos la correcta connexió a terra de l'equip.
- In case of emergency, immediately press the emergency stop button.
2. Producte acabatview
The Ovsuqu Fiber Laser Engraver JPT LP 30W is designed for precise marking and engraving on various materials. It features a JPT laser source, an 80mm rotary axis, and comes with EZCAD Lite software for operation.

Figure 2.1: Ovsuqu Fiber Laser Engraver JPT LP 30W with the rotary axis attached.

Figure 2.2: Ovsuqu Fiber Laser Engraver JPT LP 30W showing the main engraving unit and the separate control box.
2.1 Components clau
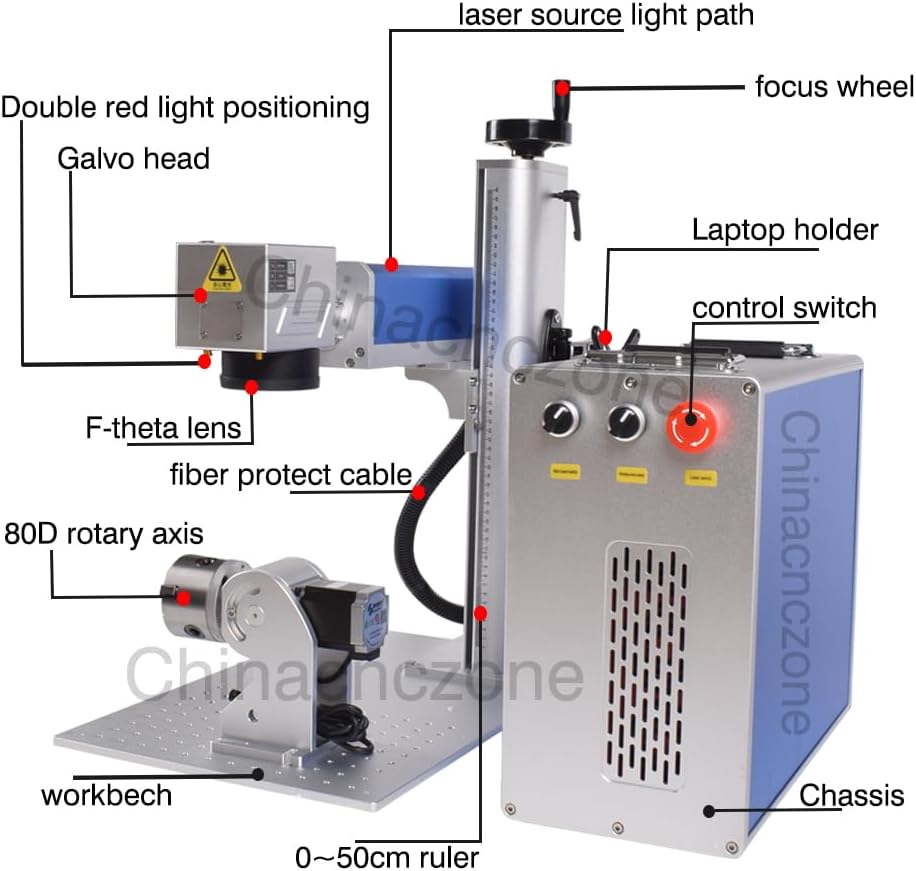
Figure 2.3: Labeled diagram of the laser engraver's main components, including the laser source light path, focus wheel, galvo head, F-theta lens, fiber protect cable, 80D rotary axis, workbench, 0-50cm ruler, laptop holder, control switch, and chassis.
- Font làser: JPT LP 30W fiber laser.
- Galvo Head: Directs the laser beam for marking.
- F-theta Lens: Focuses the laser beam onto the work surface.
- Eix rotatori: 80mm rotary attachment for cylindrical object engraving.
- Caixa de control: Houses the main board, power supply, and control interface.
- Banc de treball: Adjustable platform for material placement.
3. Configuració
3.1 Desembalatge i inspecció
Carefully unpack all components from the wooden crate. Inspect for any visible damage during transit. Verify that all listed accessories are present. The package includes the machine manual and software on a USB disk.
3.2 Muntatge
- Place the main engraving unit and the control box on a stable, level surface.
- Connect the fiber protect cable from the main unit to the control box.
- If using the rotary axis, connect it to the designated port on the control box.
- Assegureu-vos que totes les connexions siguin segures.

Figura 3.1: posterior view of the machine, highlighting the USB cable port, rotary axis port, power port, foot pedal port, cooling fan, and power switch.
3.3 Software Installation (EZCAD Lite)
The EZCAD Lite software and parameter files are provided on a USB disk. Install the software on a compatible computer (Windows XP/Vista/7/8/10/11). The software supports various file formats including Coreldraw, AutoCAD, Photoshop, PLT, PCX, DXF, BMP, SHX, TTF fonts, and automatic encoding for serial numbers, batch numbers, dates, barcodes, and QR codes.

Figure 3.2: Image showing the Original BJJCZ main board and a screenshot of the EZCAD Lite software working page.
3.4 Connexió d'alimentació
Connect the power cable to the power port on the control box and then to a grounded electrical outlet. Ensure the power switch is in the OFF position before connecting. The machine uses a Mean Well power supply for stable operation.

Figure 3.3: Details of the F-theta Scan Lens (Mount: M85, Wave Length: 1064nm, Scan Field: 70/110/175/200/300mm optional) and the Mean Well Power Supply, known for high work efficiency and stability.
4. Instruccions de funcionament
4.1 Compatibilitat de materials
This fiber laser engraver is suitable for marking on a wide range of materials:
- Metalls: Carbon Steel, Aluminum, Stainless Steel, Brass, Copper, Gold, Silver, etc.
- Non-metals: Nylon, light button, ABS, PVC, PES, etc.
4.2 Choosing the Right Laser Source and Lens
While Raycus, MAX, and JPT are all fiber laser sources, they have different characteristics:
- Raycus / MAX: Generally better for deep carving, hollow designs, and cutting.
- JPT: Excels at engraving with a delicate touch and fine details.
Lens selection impacts engraving depth and work area:
- Power vs. Depth: Higher laser power generally results in deeper engraving with the same lens.
- Lens Size vs. Depth: A smaller lens can achieve deeper engraving at the same power, but with a smaller engraving area.
- Lens Size vs. Area: A larger lens provides a larger engraving area, but the laser light intensity is weaker, resulting in shallower engraving.
For metal cutting, a Raycus or MAX laser source with a smaller lens is recommended. For faster work, consider higher power JPT models (e.g., 100W or 200W).

Figure 4.1: Informational graphic detailing considerations for selecting the appropriate laser source and F-theta lens based on desired engraving depth and work area.
4.3 Enfocament del làser
Accurate focusing is crucial for optimal engraving results. Use the focus wheel to adjust the distance between the F-theta lens and the material surface. The machine often includes a double red light positioning system to assist in finding the correct focal point.

Figura 4.2: Primer pla view of the focus wheel, used for precise vertical adjustment of the laser head to achieve optimal focus.
4.4 Using the Rotary Axis
For engraving cylindrical objects, attach the 80mm rotary axis to the designated port and secure the object in its chuck. Configure the rotary axis settings within the EZCAD Lite software according to the object's dimensions.

Figura 4.3: Primer pla view of the 80mm rotary axis, designed for engraving on curved or cylindrical surfaces.
5. Manteniment
Un manteniment regular garanteix la longevitat i el rendiment òptim del vostre gravador làser.
- Neteja de lents: Periodically inspect and gently clean the F-theta lens with a lens cleaning solution and a soft, lint-free cloth. Dust and debris can affect laser performance.
- Sistema de refrigeració: Ensure the cooling fans on the control box are free from obstructions and dust to maintain proper heat dissipation.
- Neteja general: Keep the workbench and surrounding area clean from material residue and dust.
- Inspecció del cable: Regularly check all cables for wear, damage, or loose connections.
6. Solució De Problemes
Aquesta secció ofereix solucions a problemes comuns que podeu trobar.
- Sense sortida làser:
- Check if the power switch is ON and the emergency stop button is disengaged.
- Verifiqueu que tots els cables estiguin connectats correctament.
- Ensure the software is running and the laser is enabled.
- Mala qualitat del gravat:
- Check the laser focus. Recalibrate if necessary.
- Adjust laser parameters (power, speed, frequency) in the software for the specific material.
- Clean the F-theta lens.
- Problemes de connexió de programari:
- Ensure the USB cable is properly connected between the computer and the control box.
- Reinstall the software drivers if necessary.
- Restart both the computer and the laser engraver.
If issues persist, refer to the support section for assistance.
7. Especificacions
| Característica | Especificació |
|---|---|
| Número de model | FL-30W |
| Font làser | JPT LP 30W Fiber Laser |
| Classe làser | Class II (0.874mW Output Power) |
| FDA Accession Number | 2420799-000 |
| Eix rotatiu | 80mm included |
| Work Area (Lens Dependent) | 200x200mm, 300x300mm (standard lenses) |
| Dimensions del producte | 18.9 x 22.44 x 30.31 polzades |
| Pes de l'article | 138.6 lliures |
| Programari | EZCAD Lite |
| Sistemes operatius suportats | Windows XP/Vista/7/8/10/11 |

Figure 7.1: Machine dimensions diagram, indicating height (63cm), width (45cm), depth (55cm for base, 35cm for main unit), and control box dimensions (38cm height, 21cm width).
8. Garantia i Suport
Ovsuqu provides comprehensive after-sales support for its products.
- Garantia: The product includes accessory warranties. Specific terms and duration may vary; please refer to your purchase documentation for details.
- Suport tècnic: Lifetime remote assistance is available.
- Recursos: Comprehensive installation videos and detailed user manuals are provided.
For any inquiries or assistance, please contact the Ovsuqu after-sales team. Contact information can typically be found on the product packaging or the official Ovsuqu weblloc.


