1. Introducció
This manual provides comprehensive instructions for the installation and operation of your GKU D700/D900 Dash Cam Hardwire Kit. This kit is designed to provide a continuous power supply to your dash camera, enabling features such as 24/7 parking surveillance and eliminating the need for a cigarette lighter power source. Please read this manual carefully before installation to ensure correct usage and optimal performance.
2. Producte acabatview
The GKU Hardwire Kit connects your dash camera directly to your vehicle's fuse box, providing a stable 5V/3A power output from a 12V-24V input. It features integrated battery drain protection to prevent your vehicle's battery from being depleted.

Figura 1: Acabatview of the GKU Dash Cam Hardwire Kit, showing the main cable, voltage converter, and fuse taps.
Característiques principals:
- Vigilància d'aparcament 24/7: Provides continuous power for parking monitoring.
- Protecció contra el descàrrega de la bateria: Automatically shuts down power when vehicle battery voltage drops below a safe threshold (11.8V +/- 0.2V) to ensure engine ignition.
- Vol. Amplitage Entrada: Compatible with 12V-24V vehicle electrical systems.
- Sortida estable: Delivers a steady 5V/3A power supply to the dash cam.
- Instal·lació de cable ocult: Allows for a clean, integrated power solution without visible wires.
- Proteccions múltiples: Includes short-circuit, over-current, over-voltage, sobretemperatura, alt volumtage surge, and input reverse connection protection.

Figura 2: Diagram illustrating the various protection features of the hardwire kit, including low voltage shutdown, short-circuit, over-current, over-voltage, sobretemperatura, alt volumtage surge, and input reverse connection protection.
3. Informació de seguretat
- Always ensure the vehicle engine is off before beginning installation.
- Disconnect the negative terminal of the vehicle battery to prevent short circuits during installation.
- If you are unsure about any step, consult a professional automotive electrician.
- Assegureu-vos que totes les connexions estiguin segures i aïllades correctament.
- Do not modify the hardwire kit or its components.
- Verify your dash cam uses a Type-C USB port for power. This kit is designed for Type-C connections.

Figura 3: Image emphasizing the requirement for the dash camera to have a Type-C USB port for compatibility with this hardwire kit. It visually distinguishes Type-C from Micro USB and Mini USB.
4. Guia d'instal·lació
Follow these steps carefully to install the GKU Hardwire Kit in your vehicle.
Esquema de cablejat acabatview:
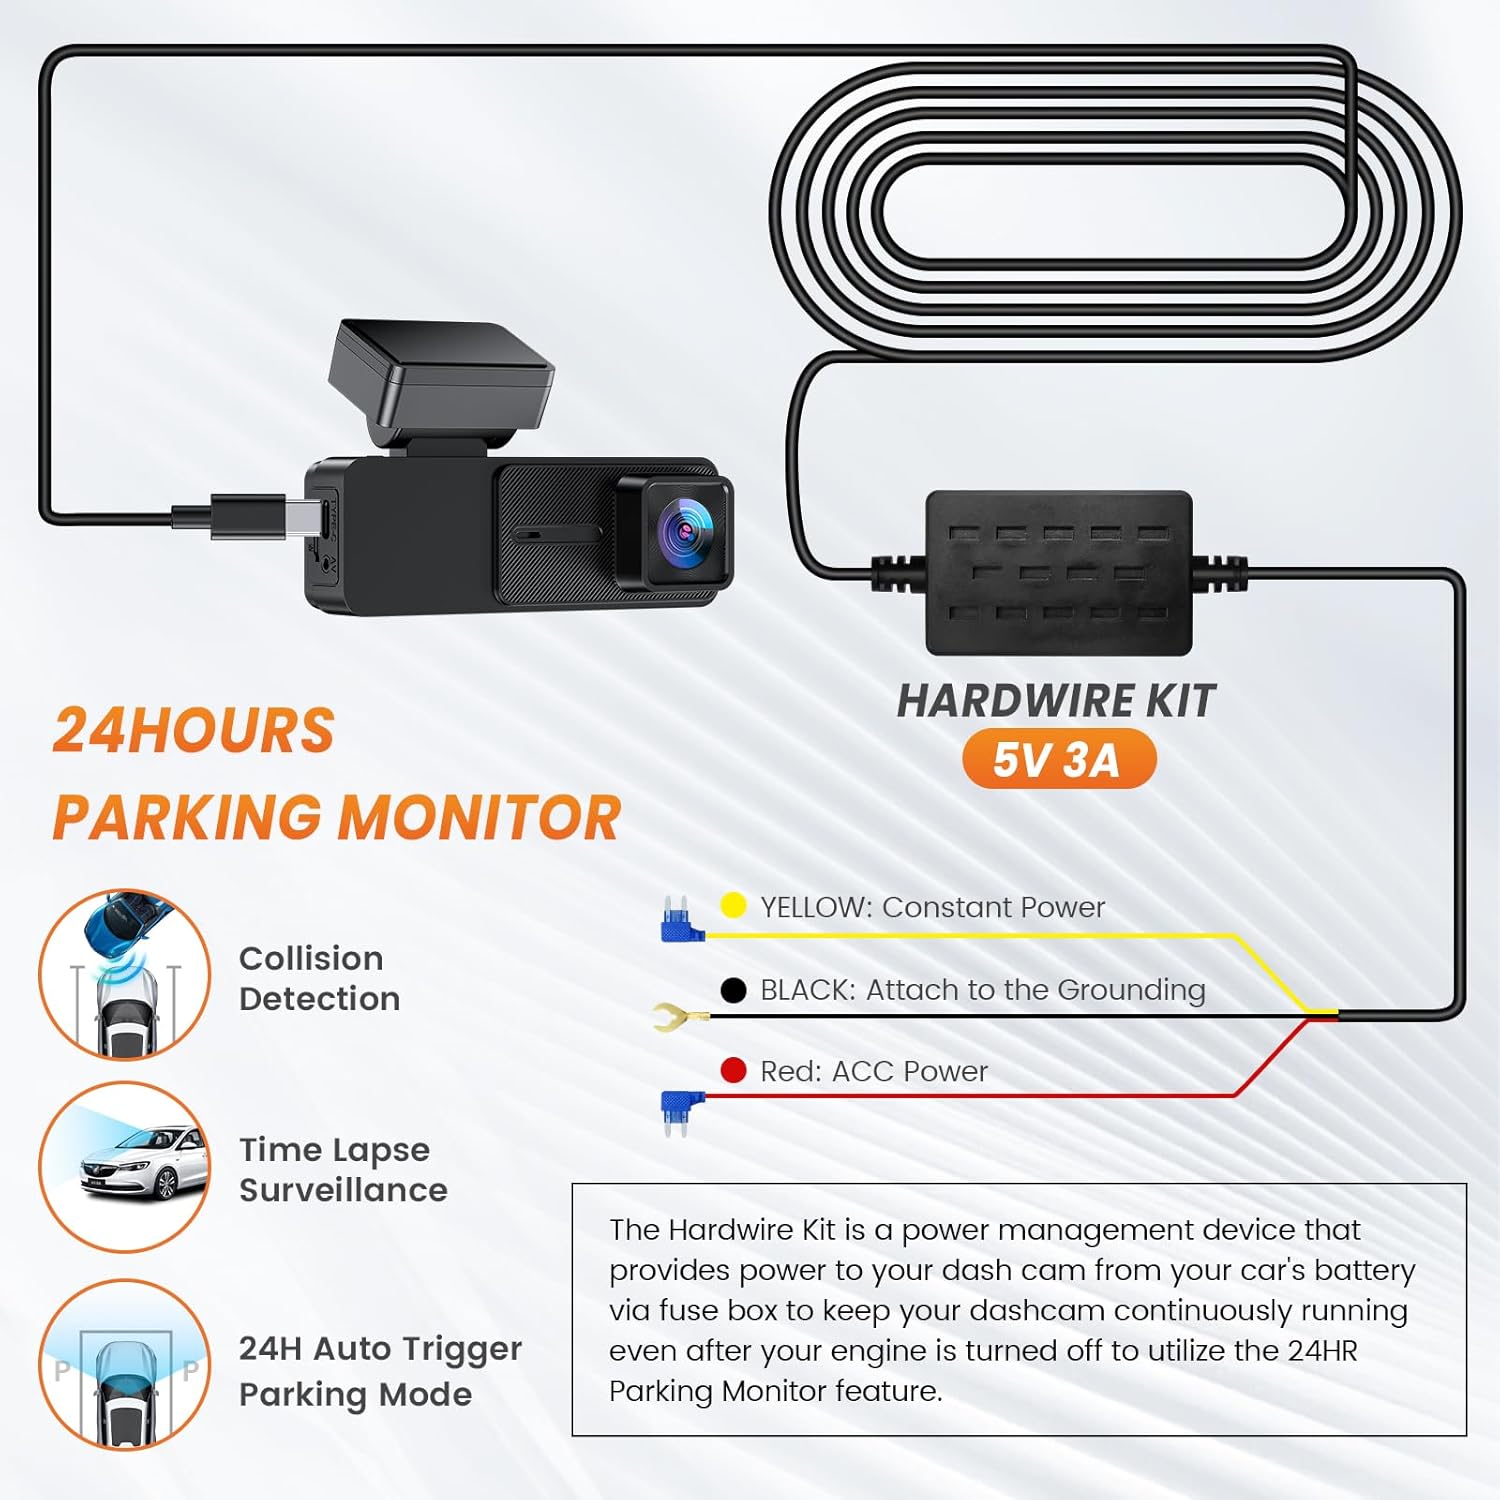
Figura 4: Simplified wiring diagram for the hardwire kit, showing connections for constant power (yellow), ignition/ACC power (red), and ground (black) to enable 24-hour parking monitoring.
- Fil groc: Connect to a fuse that provides potència constant (always on, even when the ignition is off). This is for parking surveillance.
- Fil vermell: Connect to a fuse that provides ACC power (Accessory power, turns on and off with the vehicle's ignition). This powers the dash cam when the vehicle is running.
- Fil negre: Connecta't a a punt de terra on the vehicle's chassis (e.g., a metal bolt or screw).
Passos detallats d'instal·lació:
- Preparació per a la instal·lació:
Ensure the vehicle engine is off. Disconnect the negative terminal of your vehicle's battery to prevent any electrical short circuits during the installation process.
- Muntar la càmera del salpicadero:
Decide on a suitable location for your dash cam, typically behind the rearview mirall, assegurant-vos que no us obstrueixi view. Securely mount the dash cam.
- Localitza la caixa de fusibles:
Identify your vehicle's fuse box. This is often located under the dashboard, in the glove compartment, or in the engine bay. Consult your vehicle's owner's manual if needed.
- Identificar les ranures dels fusibles:
Using a circuit tester, identify a fuse slot that provides potència constant (always on) for the yellow wire and a fuse slot that provides ACC power (on with ignition) for the red wire. Ensure the chosen fuse slots are appropriate for the dash cam's power requirements and do not interfere with critical vehicle functions.
- Connect the Fuse Taps:
Insert the appropriate fuse taps (add-a-fuse) into the identified fuse slots. Insert an existing fuse into the lower slot of the add-a-fuse, and a new fuse (matching the dash cam's requirement, typically 2A-5A) into the upper slot for the hardwire kit.
- Connecteu els cables:
Connect the yellow wire of the hardwire kit to the constant power fuse tap. Connect the red wire to the ACC power fuse tap. Connect the black wire to a suitable metal ground point on the vehicle's chassis.
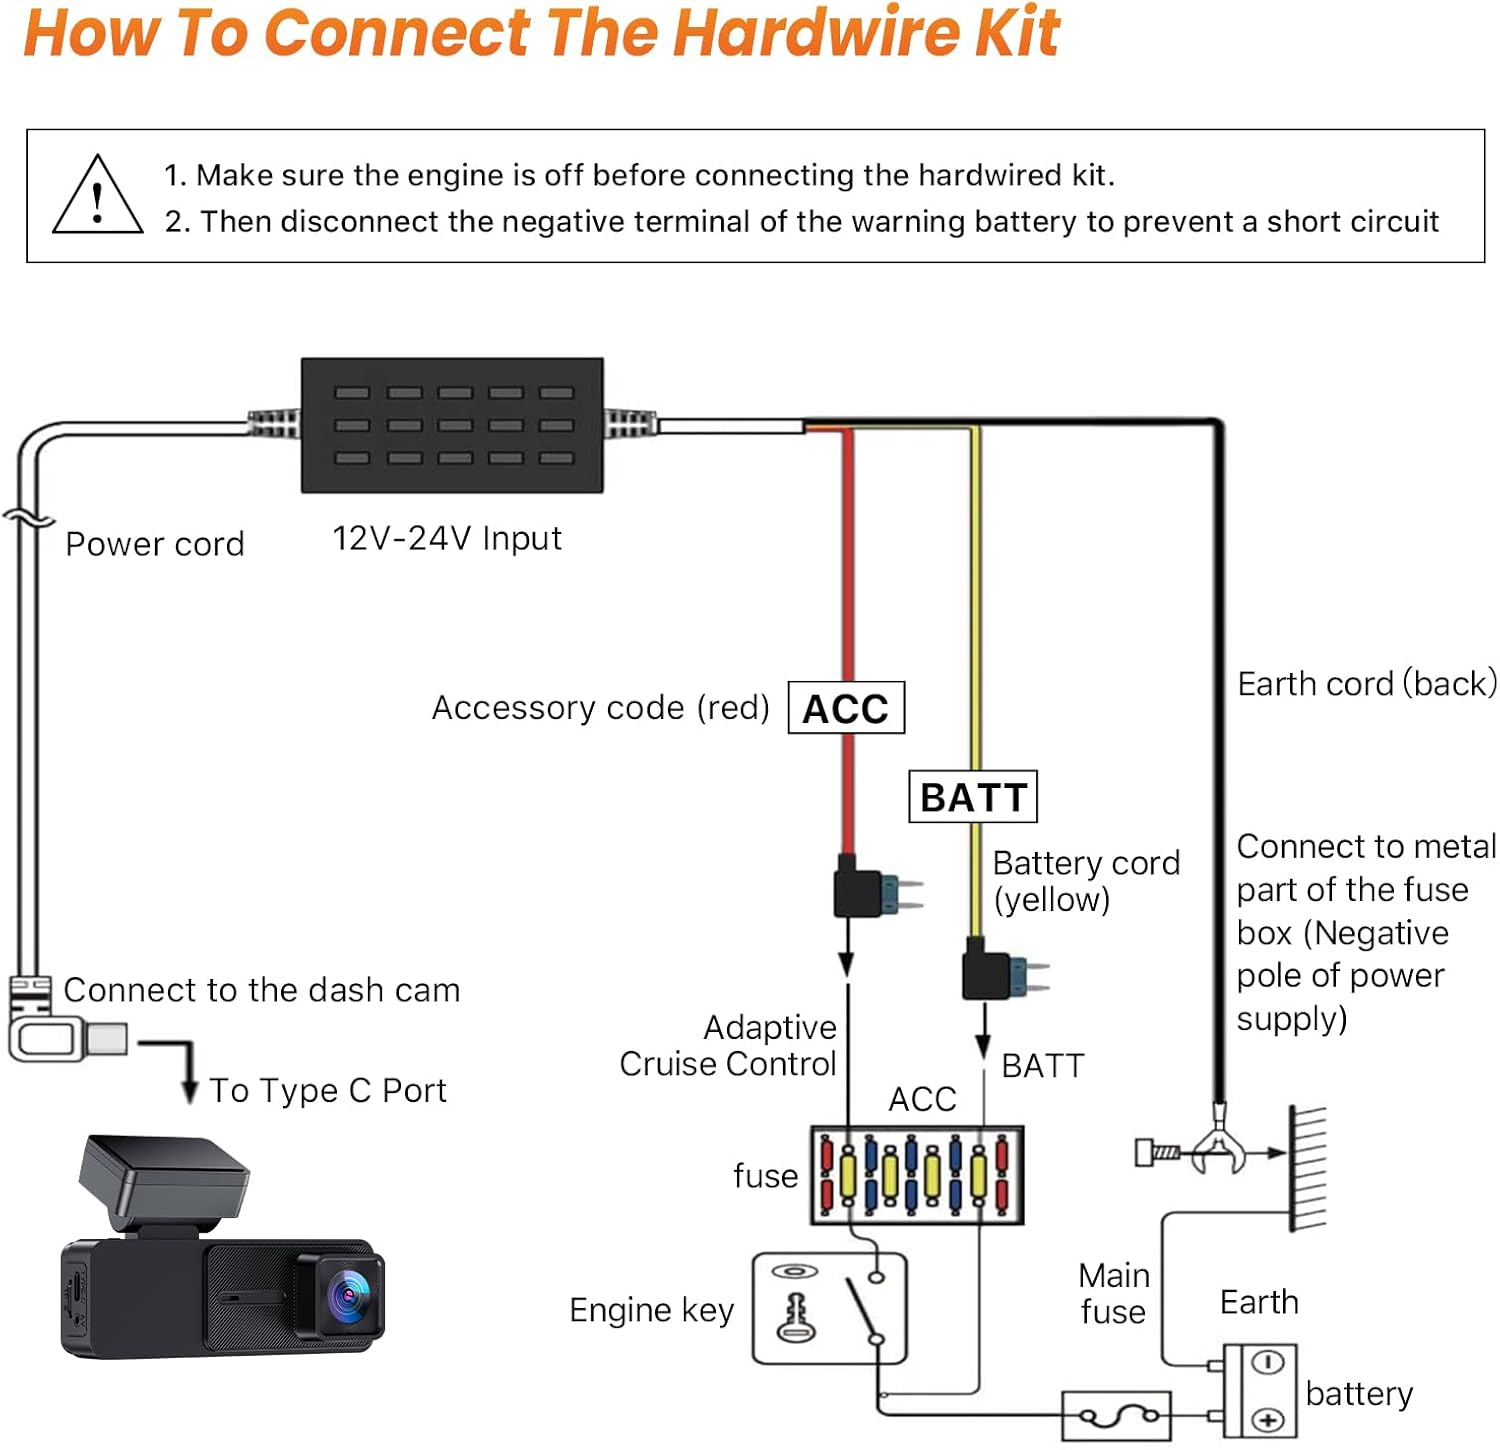
Figura 5: Detailed diagram showing how to connect the hardwire kit to the vehicle's fuse box and ground. It illustrates the connection of the red (ACC), yellow (BATT), and black (Ground) wires.
- Route Cables Neatly:
Carefully route the power cord from the dash cam to the hardwire kit and then to the fuse box, tucking cables behind trim panels and headliners for a clean, hidden installation. Use cable clips or tape to secure loose wires.

Figura 6: Visual guide demonstrating the steps for routing cables neatly within the vehicle's interior, including tucking wires into the headliner and A-pillar trim, and securing them to avoid obstruction.
- Torneu a connectar la bateria i proveu-ho:
Once all connections are secure and cables are routed, reconnect the negative terminal of your vehicle's battery. Start the vehicle to test if the dash cam powers on with the ignition. Turn off the vehicle and remove the key to verify if the dash cam switches to parking mode (if supported by your dash cam).
5. Funcionament
The GKU Hardwire Kit operates automatically once installed correctly.
- Vehicle On: When your vehicle's ignition is on, the hardwire kit provides continuous power to your dash cam via the ACC (red) wire, allowing it to record normally.
- Vehicle Off (Parking Mode): When your vehicle's ignition is turned off, the hardwire kit continues to supply power to your dash cam via the constant power (yellow) wire. This enables your dash cam's parking surveillance features (e.g., collision detection, time-lapse recording) for 24/7 monitoring.
- Protecció de la bateria: The integrated low voltage protection circuit monitors your vehicle's battery voltage. Si el voltage drops below 11.8V (for 12V systems) or 23.6V (for 24V systems), the kit will automatically cut power to the dash cam to prevent excessive battery drain, ensuring you can still start your vehicle.
6. Solució De Problemes
| Problema | Causa possible | Solució |
|---|---|---|
| La càmera del salpicader no s'encén. |
|
|
| Dash cam does not enter parking mode. |
|
|
| La bateria del vehicle es descarrega ràpidament. |
|
|
7. Especificacions
| Característica | Detall |
|---|---|
| Entrada Voltage | CC 12V - 24V |
| Vol. De sortidatage / Actual | DC 5V / 3A |
| Tipus de connector | Tipus C USB |
| Longitud del cable | Aproximadament 10.5 peus (3.2 metres) |
| Volum baixtage Protection (12V system) | Shuts down when voltage drops below 11.8V (+/- 0.2V) |
| Volum baixtage Protection (24V system) | Shuts down when voltage drops below 23.6V (+/- 0.4V) |
| Temperatura de funcionament | -20°C to 70°C (-4°F to 158°F) (Typical) |
| Components inclosos | Hardwire Kit with fuse taps |
8. Garantia i Suport
GKU products are designed for reliability and performance. For any questions, technical assistance, or warranty inquiries, please contact GKU customer support through the retailer's platform or the official GKU weblloc web. Si us plau, conserveu el comprovant de compra per a reclamacions de garantia.


