1. Instruccions de seguretat importants
Please read all safety instructions carefully before using this projector. Keep this manual for future reference.
- Font d'alimentació: Feu servir només l'adaptador de corrent especificat. Assegureu-vos que el volumtage coincideix amb els requisits del projector.
- Ventilació: No bloquegeu les obertures de ventilació. Assegureu-vos que hi hagi un flux d'aire adequat al voltant del projector per evitar el sobreescalfament.
- Aigua i humitat: No exposeu el projector a la pluja, la humitat ni cap líquid.
- Neteja: Unplug the projector before cleaning. Use a soft, dry cloth. Do not use liquid or aerosol cleaners.
- Calor: Mantingueu el projector allunyat de fonts de calor com ara radiadors, registres de calor, estufes o altres aparells que produeixin calor.
- Manteniment: No intenteu atendre aquest producte vosaltres mateixos. Consulteu tots els serveis a personal de servei qualificat.
- Protecció ocular: No mireu directament a la lent del projector quan estigui encès.amp està activat.
2. Contingut del paquet
Verifiqueu que tots els elements siguin presents al vostre paquet:
- Optex Compact WiFi Projector
- Control remot
- Adaptador d'alimentació
- Manual d'usuari (aquest document)
3. Producte acabatview
3.1 Davant i superior View
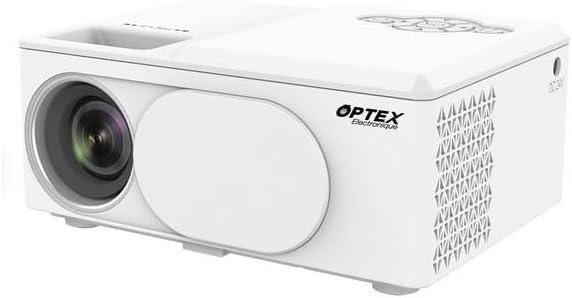
This image displays the Optex Compact WiFi Projector from a three-quarter front and top perspective. Visible components include the projection lens on the front left, a protective lens cover, and the main body of the projector. The top surface shows a recessed area for focus adjustment and a control panel with navigation buttons.
3.2 Tauler de control i ports

This image highlights two key areas of the projector. On the left, a close-up of the top control panel shows a circular array of navigation buttons (up, down, left, right, OK), power button, and return button, allowing for direct interaction with the projector's menu. On the right, a close-up of the side panel reveals the various input/output ports: DC 21V power input, IR receiver, two USB ports, an HDMI port, and a Type-C port, enabling diverse connectivity options.
4. Guia de configuració
4.1 Col·locació
- Col·loqueu el projector sobre una superfície estable i plana.
- Ensure the projector is positioned at an appropriate distance from the projection surface (wall or screen) to achieve the desired image size.
- For optimal image quality, project in a dark environment.
4.2 Connexió d'alimentació
- Connect the power adapter to the 'DC 21V' port on the side of the projector.
- Connecteu l'altre extrem de l'adaptador d'alimentació a una presa de corrent.
- L'indicador lluminós d'engegada del projector s'il·luminarà.
5. Instruccions de funcionament
5.1 Encès/Apagat
- Encès: Premeu el botó d'encesa del projector o del comandament a distància.
- Apagar: Press the power button again. Confirm shutdown if prompted.
5.2 Ajust del focus
- Gireu l'anell d'enfocament situat a prop de l'objectiu fins que la imatge projectada aparegui clara i nítida.
5.3 Selecció de la font d'entrada
- Press the 'Source' button on the remote control or navigate through the projector's menu to select the desired input source (e.g., HDMI, USB, WiFi).
- HDMI: Connect an HDMI cable from your device (laptop, game console) to the projector's HDMI port.
- USB: Insert a USB drive into a USB port to play media files.
5.4 WiFi Connection and Screen Mirroring
- Navigate to the 'Settings' or 'WiFi' menu on the projector.
- Seleccioneu la vostra xarxa WiFi i introduïu la contrasenya.
- Once connected, select the 'Screen Mirroring' or 'Wireless Display' option.
- On your smartphone or tablet, enable screen mirroring (e.g., Miracast, AirPlay, Smart View) and select the projector from the list of available devices.
6. Manteniment
6.1 Neteja de la lent
- Feu servir un drap suau i sense borrissol dissenyat específicament per a lents òptiques.
- Gently wipe the lens to remove dust or smudges. Do not use abrasive cleaners.
6.2 Neteja del cos del projector
- Wipe the exterior of the projector with a soft, dry cloth.
- No utilitzeu productes químics o dissolvents aggressivs.
6.3 Emmagatzematge
- When not in use, store the projector in a cool, dry place.
- Cover the lens with its protective cap to prevent dust accumulation.
7. Solució De Problemes
Si teniu problemes, consulteu els següents problemes i solucions habituals:
- Sense energia: Ensure the power adapter is securely connected to both the projector and the power outlet. Try a different outlet.
- Sense imatge: Check the input source selection. Ensure the connected device is powered on and sending a signal. Verify all cables are securely connected.
- Imatge borrosa: Adjust the focus ring on the projector lens. Ensure the projection surface is flat and the projector is at an optimal distance.
- Sense so: Check the volume settings on both the projector and the connected source device. Ensure external speakers are properly connected if used.
- El control remot no funciona: Comproveu les piles del comandament a distància. Assegureu-vos que no hi hagi cap obstrucció entre el comandament a distància i el receptor d'infrarojos del projector.
8. Especificacions tècniques
| Característica | Especificació |
|---|---|
| Marca | Optex |
| Tecnologia de visualització | LED |
| Resolució nativa | 800 x 400 |
| Resolució de visualització màxima | 1920 x 1080 (Full HD) |
| Brillantor | 2100 lúmens |
| Tecnologia de connectivitat | HDMI, USB, WiFi |
| Interfície del maquinari | HDMI, USB, Type-C |
| Tipus de controlador | Control remot |
| Consum d'energia | 43 watts |
| Factor de forma | Portàtil |
| Tipus de muntatge | Muntatge de taula |
9. Garantia i atenció al client
Aquest producte inclou una garantia estàndard del fabricant. Per conèixer els termes i condicions específics de la garantia, consulteu la documentació que s'inclou amb la compra o poseu-vos en contacte amb el vostre distribuïdor.
For technical support or customer service inquiries, please contact the Optex customer support team through their official weblloc web o la informació de contacte que es proporciona a la documentació de compra.


