Introducció
This manual provides comprehensive instructions for the installation, operation, and maintenance of your Akia Screens Motorized Projector Screen. Designed for optimal viewing experience, this 110-inch diagonal screen features a 16:9 aspect ratio, MaxWhite 2 material, and is compatible with 4K, 8K, HD, and 3D projection. Its motorized function allows for convenient retraction and deployment via remote control or 12V trigger.
Informació de seguretat
Please read all safety warnings and instructions carefully before installation and operation to prevent injury and damage to the product. Retain this manual for future reference.
- Ensure the screen is installed by qualified personnel following local building codes.
- Do not attempt to disassemble or modify the screen motor or electrical components.
- Keep hands and objects clear of the screen casing during operation to avoid pinching or entanglement.
- Do not expose the screen to excessive moisture or extreme temperatures.
- Use only the provided power adapter and remote controls.
- This screen is NOT COMPATIBLE with Ultra Short Throw (UST) projectors.
Contingut del paquet
Verify that all components are present and undamaged upon unboxing:
- Motorized Projector Screen Unit (110-inch)
- Comandament a distància per infrarojos (IR).
- Wall Box Controller with built-in IR sensor
- Cable d'alimentació
- Installation Kit (mounting brackets, screws, anchors)
- Manual d'usuari (aquest document)

Image: The Akia Screens 110-inch motorized projector screen, showcasing the main unit along with the two remote controls and a connecting cable.
Producte acabatview
The Akia Screens motorized projector screen is designed for versatile installation and high-quality projection. Key features include:
- C de metall resistentasing: Houses the screen and motor, suitable for wall or ceiling installations.
- MaxWhite 2 Screen Material: A multi-layer weave with 1.1 gain and a 180-degree wide viewing angle, optimized for 4K Ultra HD, 8K, and Active 3D projection. It is GreenGuard and GreenGuard GOLD Certified.
- Black Backing: Eliminates light penetration for a brighter, sharper image.
- Black Masking Borders: Standard black borders enhance picture contrast and absorb projector overshoot.
- Tubular Motor: Ensures smooth and quiet operation for screen retraction and deployment.

Imatge: Primer pla views of the screen's durable black metal casing and the black masking borders that frame the projection surface.

Image: Illustration of the MaxWhite 2 screen material, highlighting its black backing and certifications like GreenGuard and ISF, indicating quality and low chemical emissions.
Configuració
1. Mounting the Screen
The screen can be installed on a wall or ceiling. Ensure the mounting surface is strong enough to support the screen's weight (approximately 24 lbs for the 110-inch model).
- Mesura i marca: Determine the desired mounting location. Use a level to mark the positions for the mounting brackets. Refer to the screen's overall width (105.5 inches) and product dimensions (102.8"W x 63.87"H) for accurate placement.
- Forats: Drill pilot holes at the marked locations. Use appropriate drill bits for your wall or ceiling material.
- Instal·lar els suports: Secure the mounting brackets using the provided screws and anchors. Ensure they are firmly attached.
- Hang Screen: Carefully lift the screen and attach it to the installed mounting brackets. Ensure it is securely seated.
2. Potència de connexió
Plug the power cable into the screen's power input and then into a standard electrical outlet. The screen is designed for plug-and-play operation.
3. Remote Control and Wall Box Setup
The screen comes with an Infrared (IR) remote and a wall box controller. The wall box controller has a built-in IR sensor and an RJ50 port for the 12V trigger feature.
- Comandament IR: Point the IR remote directly at the IR sensor on the wall box controller for operation.
- Wall Box Controller: Mount the wall box controller in a convenient location. It can be detached for a cleaner look if you primarily use the IR remote or an optional RF remote (sold separately).
4. 12V Trigger Feature (Optional)
The 12V trigger feature allows the screen to automatically deploy or retract in synchronization with your projector's power cycle. This requires a projector with a 12V trigger output.
- Connect a 12V trigger cable (not included, typically supplied with projector or purchased separately) from your projector's 12V output to the RJ50 port on the screen's wall box controller.
- Once connected, the screen will automatically lower when the projector is turned on and retract when the projector is turned off.

Image: The screen's control system, illustrating the infrared (IR) remote and the wall box controller with its RJ50 port for the 12-volt trigger connection.
Instruccions de funcionament
Ús del comandament a distància
The included IR remote control allows for easy operation of the screen.
- Botó amunt: Press to retract the screen fully into its casing.
- Botó ABAIX: Press to deploy the screen fully.
- Botó STOP: Press to stop the screen at any desired position during deployment or retraction.
Programmable Vertical Drop Position
The screen features a user-friendly programmable vertical drop position for customized viewing altures.
- Deploy the screen to your desired lower limit using the DOWN button.
- Press and hold the STOP button on the remote or wall box controller for approximately 5 seconds until the screen jogs slightly. This sets the new lower limit.
- To reset to factory default, consult the full technical manual or contact customer support.
Manteniment
Proper care will ensure the longevity and performance of your projector screen.
- Neteja de la superfície de la pantalla: The MaxWhite 2 screen material is easy to clean. Use a soft cloth dampened with mild soap and water. Gently wipe the screen surface. Do not use abrasive cleaners, solvents, or harsh chemicals, as these can damage the screen.
- Casing Maintenance: Wipe the metal casing amb un sec o lleugerament damp drap per eliminar la pols.
- Cura del motor: The motorized mechanism is maintenance-free. Do not lubricate or attempt to service the motor.
- Emmagatzematge: When not in use for extended periods, ensure the screen is fully retracted into its casing to protect the surface from dust and damage.
Resolució de problemes
| Problema | Causa possible | Solució |
|---|---|---|
| Screen does not respond to remote. |
|
|
| Screen stops unexpectedly during operation. |
|
|
| Screen is wavy or has creases. |
|
|
| 12V trigger not working. |
|
|
Especificacions
| Característica | Detall |
|---|---|
| Número de model | AK-MOTORIZE110H2 |
| Mida de la pantalla (diagonal) | 110 polzades |
| Viewing Area (H x W) | 54 polzades x 96 polzades |
| Relació d'aspecte | 16:9 HD Format |
| Overall Extended Size (H x W) | 68.6 polzades x 105.5 polzades |
| Product Dimensions (Casing) | 102.8 cm d'amplada x 63.87 cm d'alçada |
| Material de pantalla | MaxWhite 2 (1.1 Gain, 180° Viewing Angle, Black Backed) |
| Compatibilitat | 4K Ultra HD, 8K, Active 3D (Not compatible with UST projectors) |
| Certificacions | GreenGuard, GreenGuard GOLD, UL 2818 |
| Sistema de control | IR Remote, Wall Box Controller, 12V Trigger (RJ50) |
| Tipus de muntatge | Muntatge a la paret i al sostre |
| Pes de l'article | 24 lliures |
| CasinMaterial de g | Metall |
| País d'origen | Xina |
| Data de primera disponibilitat | 1 d'agost de 2024 |
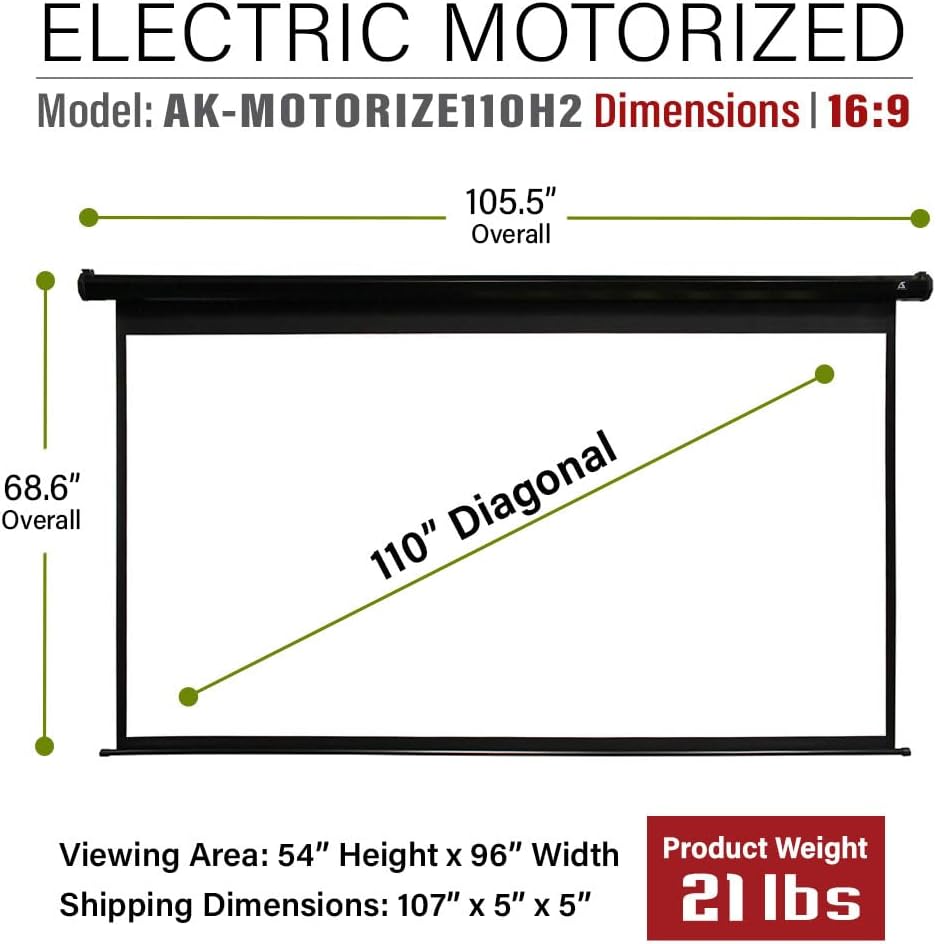
Image: A technical diagram illustrating the overall and viewing dimensions of the 110-inch motorized projector screen.
Garantia i Suport
Akia Screens provides comprehensive support for its products.
- Garantia: 2-Year Manufacturer's Warranty from an ISO9001 certified manufacturer (since 2004).
- Suport tècnic: Lifetime Technical Support available via Email, Web Chat, or Toll-Free phone call. Support is provided by a U.S. Based Professional Service Team.
For assistance, please visit the official Akia Screens weblloc web o consulteu la informació de contacte que es proporciona amb la documentació del producte.

Image: A visual representation of Akia Screens' U.S. based customer support team, highlighting the 2-year warranty and lifetime technical support.


