1. Introducció
This user manual provides comprehensive instructions for the installation, operation, and maintenance of your BAFANG 48V 500W Rear Hub Motor Conversion Kit. This kit is designed to transform a standard bicycle into an electric bicycle, offering enhanced power and efficiency for various riding conditions.
The kit includes a 48V 500W geared brushless rear hub motor, a controller, brake levers, a thumb throttle, a PAS (Pedal Assist Sensor), necessary cables, and a headlight. Optional components such as a battery and LCD display are available to customize your e-bike experience.
Si us plau, llegiu aquest manual detingudament abans de la instal·lació i l'ús per garantir el funcionament correcte i la seguretat.
2. Producte acabatview
The BAFANG 48V 500W Rear Hub Motor Conversion Kit is engineered for robust performance and ease of integration. It is compatible with bicycles featuring disc brakes and a rear dropout width of 135-142 mm, specifically designed for cassette-type freewheels (up to 9-speed).

Figura 2.1: Complete BAFANG 48V 500W Rear Hub Motor Conversion Kit showing the motor wheel, controller, display, battery options, and various sensors and levers.

Figura 2.2: Diagram illustrating compatibility requirements (135-142mm dropout, disc brakes, cassette) and key motor specifications including 40 KM/h max speed, 65 N.m max torque, IPX5 water resistance, and 75% efficiency.
Característiques principals:
- Motor potent: 48V 500W geared brushless rear hub motor with a maximum torque of 65 N.m and efficiency of ≥75%.
- Alta velocitat: Capable of reaching speeds up to 35 KM/h.
- Compatibilitat: Designed for bicycles with 135-142 mm rear dropout width and disc brake systems. Supports cassette freewheels up to 9 speeds.
- Pantalla personalitzable: Choose from various LCD display models (e.g., 500C, Bafang DPC18, EKD01) to monitor riding data.
- Flexible Battery Options: Compatible with different battery types (e.g., G70, Standard Downtube, Max Downtube, Rear Rack Battery) to suit installation and range needs.
- Multiple Riding Modes: Supports three working modes for versatile riding experiences.
3. Configuració i instal·lació
3.1. Contingut del paquet
Abans de començar la instal·lació, comproveu que tots els components siguin presents al paquet:
- BAFANG 48V 500W Rear Hub Motor with Rim & Spokes
- Controlador
- Caixa del controlador
- Palanques de fre
- Acelerador del polze
- PAS Sensor (Pedal Assist Sensor)
- Cable d'extensió del motor
- 1T4 Cable (main wiring harness)
- Far
- Adhesius
- Manual d'usuari (aquest document)
Nota: The cassette (freewheel) and battery are not included in the standard kit and must be acquired separately if not opted for during purchase. Tires of 1.5"-2.4" are recommended for this motor rim.
3.2. Comprovació de compatibilitat
Ensure your bicycle meets the following requirements:
- Rear Dropout (Fork) Width: Your bicycle's rear dropout should measure between 135-142 mm.
- Sistema de fre: The kit is designed for bicycles with disc brakes. If your bicycle uses V-brakes, please contact the seller for alternative solutions.
- Compatibilitat de casset: The motor hub is compatible with cassette-type freewheels (not freewheel type) with up to 9 speeds.

Figura 3.1: Available wheel sizes for the motor kit, including 20", 26", 27.5", and 700C, with corresponding diameters and tire compatibility.
3.3. Passos d'instal·lació
Follow these general steps for installation. Refer to the wiring diagram for specific connections.
- Prepare the Bicycle: Remove the existing rear wheel and any associated components (e.g., cassette, brake rotor).
- Install Cassette and Brake Rotor: Attach your cassette and disc brake rotor to the new BAFANG motor wheel. You will need a cassette tool and chain whip for this step.
- Mount the Motor Wheel: Install the BAFANG motor wheel into the rear dropout of your bicycle, ensuring the dropout width is within the 135-142 mm range. Secure it properly.
- Install Controller and Box: Mount the controller inside the provided controller box and secure it to your bicycle frame, typically near the bottom bracket or on the downtube.
- Instal·leu el sensor PAS: Attach the Pedal Assist Sensor (PAS) to the crank arm or bottom bracket area. Ensure it is correctly aligned to detect pedal rotation.
- Install Brake Levers and Throttle: Replace your existing brake levers with the provided e-bike brake levers (which include motor cut-off switches). Install the thumb throttle on the handlebar.
- Instal·lar la pantalla (opcional): If using a display, mount it on the handlebar.
- Instal·leu el far: Mount the headlight on the front of your bicycle.
- Connecteu el cablejat: Carefully connect all components using the 1T4 cable and motor extension cable. Refer to the wiring diagram below. Ensure all connections are secure and properly seated to avoid errors (e.g., Error 08 for poor motor cable contact).
- Instal·lar la bateria (opcional): Secure your chosen battery to the bicycle frame (downtube or rear rack, depending on battery type) and connect it to the system.
- Gestió de cables: Route and secure all cables neatly using zip ties or cable wraps to prevent snagging and damage.

Figura 3.2: Simplified wiring diagram showing connections between the hub motor, controller, display, brake levers, throttle, PAS sensor, headlight, and optional taillight.

Figura 3.3: Diagram illustrating the placement of various kit components on a bicycle, including the rear cassette hub motor, pedal sensor, controller box, headlight, 1T4 cable, brake lever, thumb throttle, and optional display.
4. Operating Your E-Bike Kit
4.1. Encès / apagat
To power on the system, ensure the battery is connected and fully charged. Press and hold the power button on your display unit (if applicable) or controller. To power off, press and hold the same button until the system shuts down.
4.2. Display Functions (Optional)
If you have an LCD display, it provides crucial riding information and allows for system configuration. Common display models include 500C, Bafang DPC18, and EKD01, each offering unique features.

Figura 4.1: Acabatview of different BAFANG display options (EKD01, DPC18, P860C, DZ40, DM03, 500C, 800S), highlighting their screen size, handlebar diameter compatibility, operating voltage, USB port availability, language options, Bluetooth, boot password, and light sensor features.
Typical display functions include:
- Current Speed, Average Speed, Max Speed
- Trip Distance, Odometer
- Indicador de nivell de bateria
- Pedal Assist Level (PAS) Selection
- Error Codes (if any)
- Control de fars
Consult your specific display's manual for detailed operation and settings.
4.3. Modes de conducció
The kit supports three primary working modes:
- Mode d'assistència al pedaleig (PAS): The motor provides assistance based on your pedaling input. The level of assistance can usually be adjusted via the display.
- Mode totalment elèctric (accelerador): The motor provides power directly via the thumb throttle, without requiring pedaling.
- Normal Bicycle Mode: The motor is off, and the bicycle functions as a standard pedal-powered bike.
4.4. Battery Usage (Optional)
If you have purchased a battery with your kit, ensure it is fully charged before your first ride. Different battery capacities and form factors are available to suit various needs.
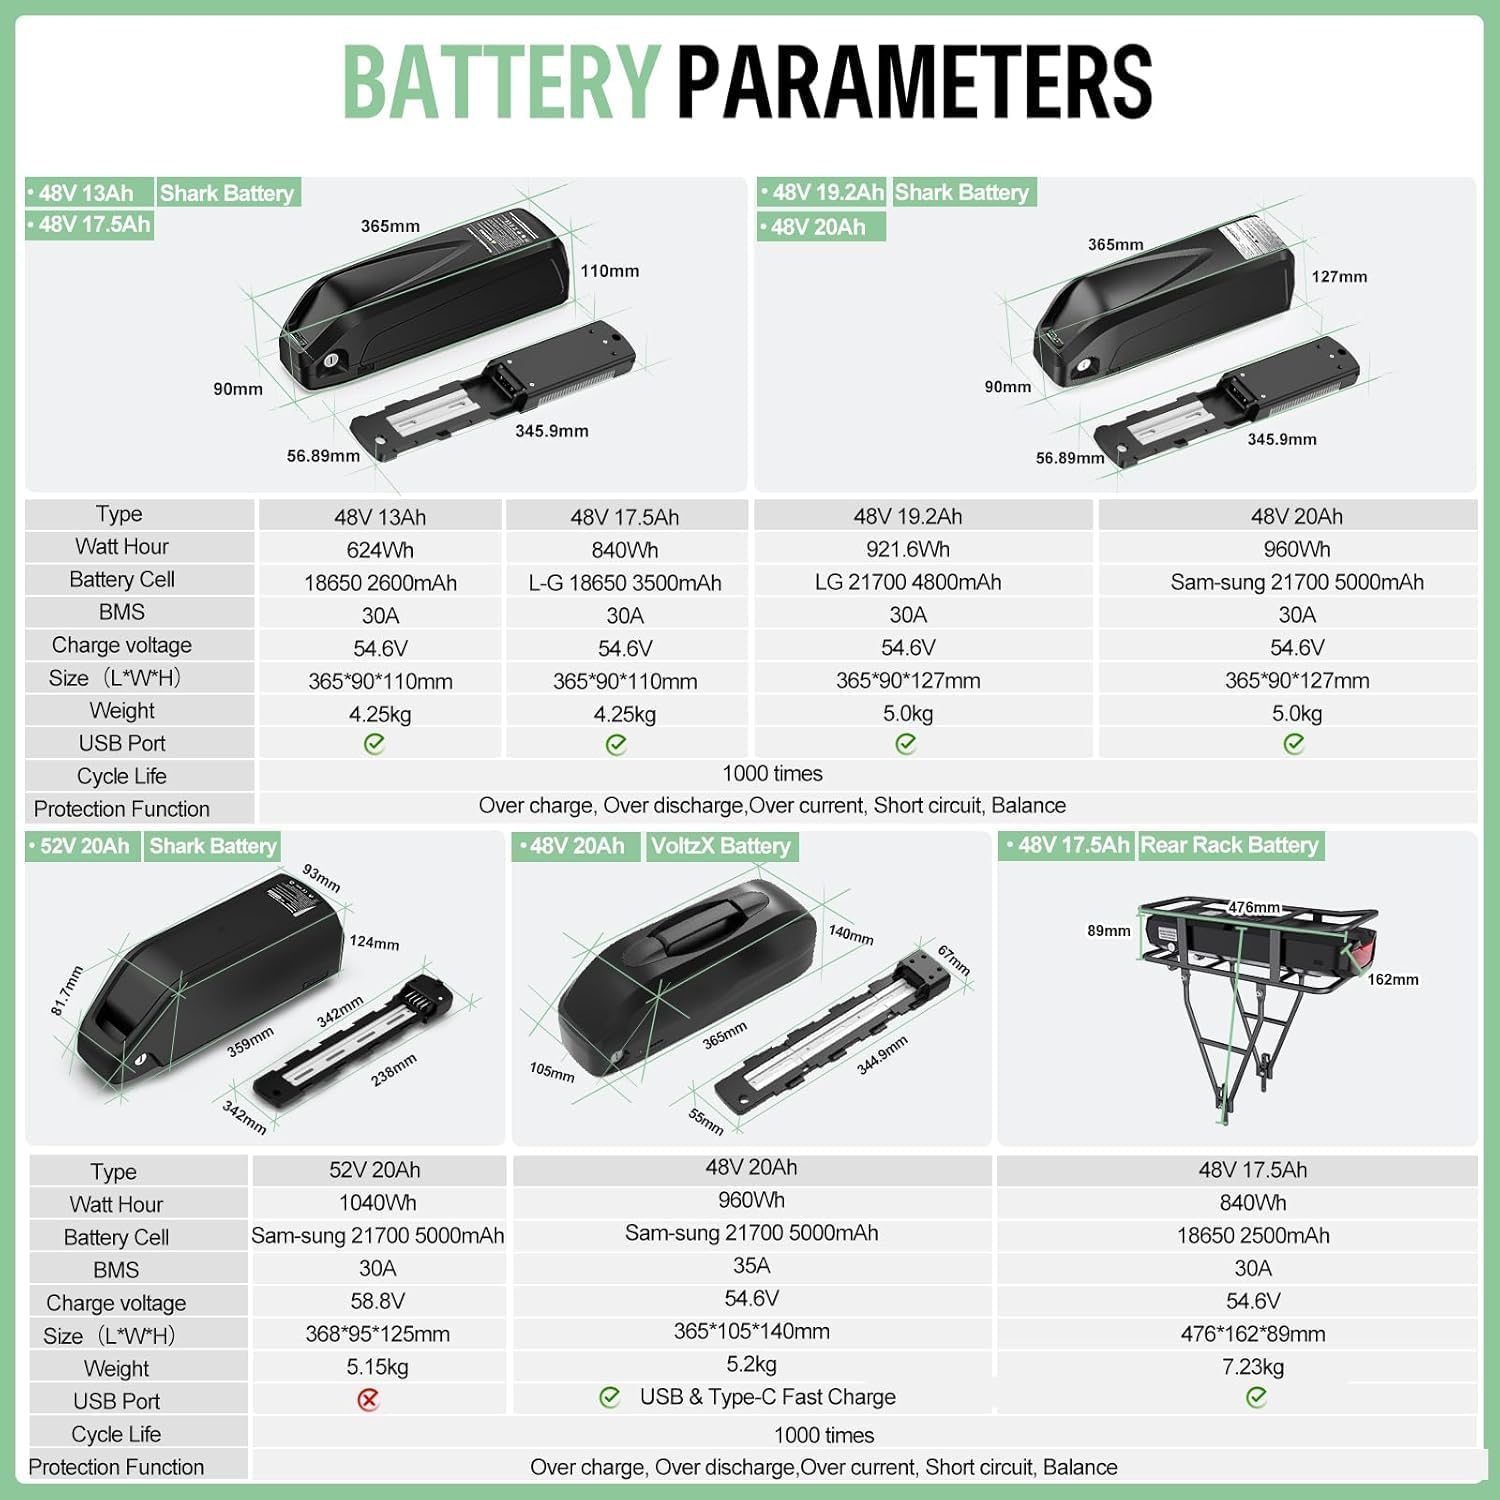
Figura 4.2: Detailed specifications for various 48V and 52V battery options, including Watt-hours, battery cell type, BMS, charge voltage, size, weight, USB port availability, and cycle life. Options include Shark Battery (downtube) and Rear Rack Battery.
Always use the charger provided or recommended by BAFANG for your battery. Avoid overcharging or completely draining the battery to prolong its lifespan. Store the battery in a cool, dry place when not in use.
5. Manteniment
Regular maintenance is crucial for the longevity and optimal performance of your e-bike conversion kit.
- Neteja: Keep the motor, controller, and electrical connections clean and free from dirt, dust, and moisture. Use a damp drap per netejar; eviteu el rentat a alta pressió.
- Inspecció del cable: Periodically inspect all cables and connectors for signs of wear, fraying, or damage. Ensure all connections are secure.
- Sistema de fre: Regularly check the brake levers and disc brakes for proper function and wear. Ensure the motor cut-off switches on the brake levers are working correctly.
- Pressió dels pneumàtics: Maintain correct tire pressure as recommended for your bicycle and riding conditions.
- Cura de la bateria: Follow the battery manufacturer's guidelines for charging, storage, and discharge. Avoid extreme temperatures.
- General Bicycle Maintenance: Continue with regular maintenance of your bicycle's mechanical components, including chain lubrication, gear adjustments, and bearing checks.
6. Solució De Problemes
This section addresses common issues you might encounter with your BAFANG e-bike conversion kit.
| Problema | Causa possible | Solució |
|---|---|---|
| Motor not assisting / No power |
|
|
| Error Code 08 on Display | Poor contact or issue with the motor cable connection. | Check the motor cable connection to the controller. Ensure it is fully seated and not under strain. Disconnect and reconnect to ensure good contact. |
| Inconsistent or jerky assistance |
|
|
| La pantalla no s'encén |
|
|
If you encounter persistent issues not covered here, please contact BAFANG customer support or your seller for assistance.
7. Especificacions
Especificacions del motor:
- Volum nominaltage: 48 V
- Potència nominal: 500W
- Parell màxim: 65 Nm
- Posició: Rear Cassette Wheel
- Construcció: Geared Brushless Motor
- Eficiència: ≥80%
- Noise Grade: <55 dB
- Temperatura de funcionament: -20 a 45 ℃
- Velocitat màxima: Approximately 35 KM/h
General Kit Specifications:
- Número de model: LC G020 48V500W RDC + BAT DZ
- Bicycle Type Compatibility: Aluminum Alloy Bicycle
- Brake Type Compatibility: Fre de disc
- Color: Negre
- Material: Alumini
- Number of Speeds (Cassette): Up to 9 speeds
- Mides de les rodes: 20, 26, 27.5, 28, 700C Inches (depending on variant)
- Installation Width (OLD): 135-142 MM
8. Garantia i Suport
For warranty information and technical support, please refer to the terms provided by your original point of purchase or contact the seller directly. Keep your purchase receipt as proof of purchase.
For general inquiries or further assistance, you may also visit the official BAFANG weblloc web o contacteu amb els seus canals d'atenció al client.


