1. Introducció
This manual provides detailed instructions for the safe and effective operation, maintenance, and troubleshooting of your Nitecore MH40S rechargeable flashlight and NB10000 power bank. Please read this manual thoroughly before use to ensure optimal performance and longevity of your devices.
2. Contingut del paquet
Verifiqueu que tots els elements que s'enumeren a continuació siguin presents al vostre paquet:
- Nitecore MH40S Flashlight
- 2 x Nitecore NL2150 5,000mAh Li-ion Batteries
- Nitecore NB10000 10,000mAh Power Bank
- Commutador remot sense fils
- Adaptador de control de qualitat
- Cable de càrrega USB-C
- Junta tòrica de recanvi
- Corda
- Subjecció de ganxo i bucle
- 2 x Hook-and-loop Straps
- Funda

3. Característiques del producte
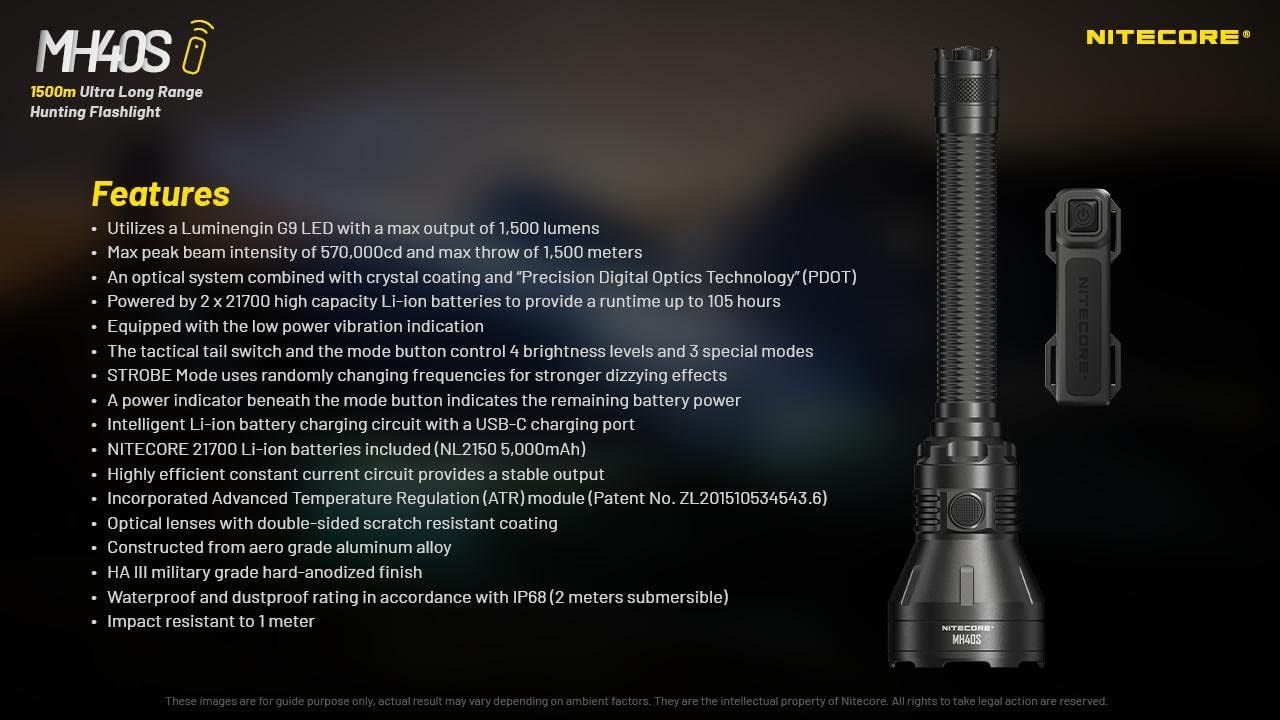
- Utilizes a Luminengin G9 LED with a maximum output of 1,500 lumens.
- Maximum peak beam intensity of 570,000cd and a maximum throw of 1,500 meters.
- Optical system combines crystal coating and "Precis Digital Optics Technology" (PDOT).
- Powered by 2x high-capacity Li-ion batteries, providing a runtime of up to 105 hours.
- Equipped with a low power vibration indicator.
- Tactical tail switch and mode button control 4 brightness levels and 3 special modes.
- STROBE mode uses randomly changing frequencies for enhanced disorienting effects.
- Power indicator beneath the mode button displays remaining battery power.
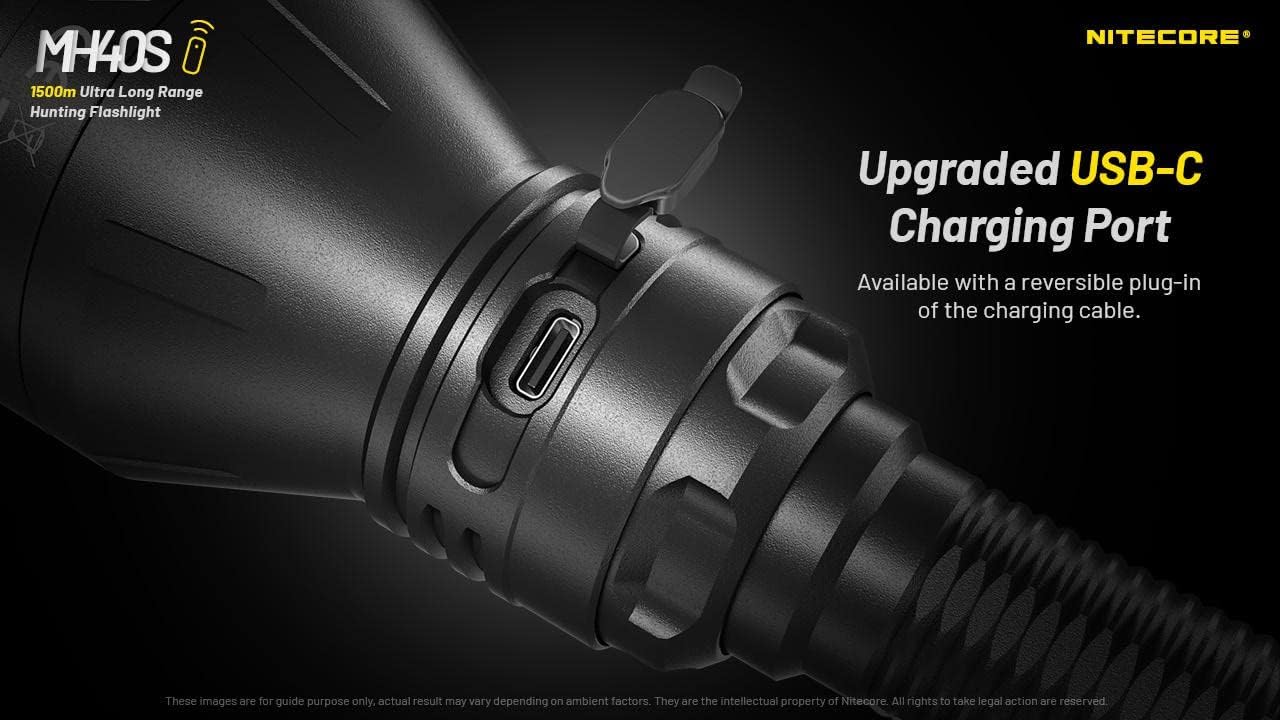
- Intelligent Li-ion battery charging circuit with a USB-C charging port.
- Includes Nitecore NL2150 5,000mAh Li-ion batteries.
- Highly efficient constant current circuit ensures stable output.
- Incorporates Advanced Temperature Regulation (ATR) module.
- Optical lenses feature double-sided scratch-resistant coating.
- Construït amb aliatge d'alumini de grau aerodinàmic amb acabat anoditzat dur de grau militar HA III.
- Waterproof and dustproof rating in accordance with IP68 (2 meters submersible).
- Resistent als impactes fins a 1 metre.

4. Especificacions
4.1 MH40S Flashlight Technical Data
| Estàndard FL1 | TURBO | ALTA | MITJANS | BAIXA | STROBE | BALISA | SOS |
|---|---|---|---|---|---|---|---|
| Sortida | 1,500 lúmens | 500 lúmens | 150 lúmens | 18 lúmens | 1,500 lúmens | 1,500 lúmens | 1,500 lúmens |
| Temps d'execució | 3h 15min | 7h 15min | 25h | 105h | — | — | — |
| Distància del feix | 1,500 m | 860 m | 450 m | 150 m | — | — | — |
| Intensitat del feix | 570,000 cd | 186,000 cd | 51,000 cd | 5,800 cd | — | — | — |
Note: The stated data is measured in accordance with international flashlight testing standards ANSI/PLATO FL 1-2019, using 2x 21700 Li-ion batteries (5,000mAh) under laboratory conditions. Actual data may vary due to different battery types or environmental conditions.

4.2 Especificacions generals
- LED: Luminengin G9 LED
- Reflector: SMO
- Bateria: 2 x 21700 Li-ion (NL2150 5,000mAh included)
- Modes especials: Location Beacon, SOS, Strobe
- Beam Color: Llum blanca
- Longitud: 256 mm (10.08 polzades)
- Mida del cap: 65 mm (2.56 polzades)
- Pes: 245.8 g (8.67 oz) (sense piles)
- Material: Aliatge d'alumini de grau aerodinàmic
- Acabat: HA III military-grade hard-anodized
- Classificació impermeable: IP68 (2 metres submergible)
- Resistència a l'impacte: 1 metre
4.3 NB10000 Power Bank Specifications
- Capacitat: 10,000mAh 3.85V
- Energia nominal: 6,400mAh 5V
- Entrada (USB-C): 5V - 2.4A / 9V - 2A
- Sortida (USB-C): 5V - 3A / 9V - 2A / 12V - 1.5A
- Dual Ports Output: 5V - 3A (MAX)
- Material: Carbon fiber frame and panels
- Dimensions: 4.8" x 2.32" x 0.42"
- Pes: 5.29 oz
- Característiques: Dual output channels (USB and USB-C), LED remaining power level indicator, one-touch low current mode.
5. Configuració
5.1 Instal·lació de la bateria
- Unscrew the tail cap of the MH40S flashlight.
- Insert the two Nitecore NL2150 21700 Li-ion batteries with the positive (+) terminals facing the head of the flashlight.
- Torneu a enroscar la tapa de la cua fermament per garantir un contacte adequat i una resistència a l'aigua.
Avís: Assegureu-vos que les piles estiguin inserides amb la polaritat correcta. Una inserció incorrecta pot fer malbé el dispositiu.
5.2 Càrrega inicial
Before first use, fully charge the MH40S flashlight and the NB10000 power bank.
5.2.1 Charging the MH40S Flashlight
- Localitza el port de càrrega USB-C al cos de la llanterna.
- Open the rubber cover protecting the port.
- Connect the USB-C charging cable to the flashlight and the QC Adapter.
- Plug the QC Adapter into a power outlet.
- The power indicator beneath the mode button will flash during charging and remain solid when fully charged.
- Close the rubber cover after charging to maintain water and dust resistance.
5.2.2 Charging the NB10000 Power Bank
- Connect the USB-C charging cable to the USB-C input port on the NB10000.
- Connect the other end of the cable to a USB power source (e.g., QC Adapter, computer USB port).
- The LED indicators on the power bank will show the charging status.
6. Instruccions de funcionament
6.1 Basic Flashlight Operation
The MH40S features a tactical tail switch and a mode button for control.

6.1.1 Encesa/apagada
- Momentània activada: Half-press and hold the tactical tail switch. Release to turn off.
- Constantment encès/apagat: Fully press the tactical tail switch until a click is heard to turn on. Fully press again to turn off.
6.1.2 Brightness Level Adjustment
- With the flashlight on, press the mode button to cycle through brightness levels: LOW - MID - HIGH - TURBO.
- The flashlight will memorize the last used brightness level (except for special modes) when turned off and on again.
6.1.3 Special Modes (STROBE, BEACON, SOS)
- With the flashlight on, press and hold the mode button to activate STROBE mode.
- While in STROBE mode, press the mode button again to cycle through BEACON and SOS modes.
- To exit special modes, short press the mode button or turn off the flashlight.
6.2 Wireless Remote Switch Operation
The included wireless remote switch allows for convenient control of the MH40S from a distance of up to 1 meter (3.28 feet).

- Momentània activada: Press and hold the designated button on the remote switch. Release to turn off.
- Constantment encès/apagat: Press the designated button on the remote switch to turn on. Press again to turn off.
- ESTROBA: Press the designated STROBE button on the remote switch to activate. Press again to turn off.
The remote switch is powered by a 3V CR1632 button cell battery and features advanced power cut-off (APC) technology for extended standby time.
6.3 NB10000 Power Bank Usage
- Dispositius de càrrega: Connect your device to the USB-A or USB-C output port of the NB10000 using an appropriate charging cable.
- Indicador de nivell de potència: Press the power button on the NB10000 to check the remaining battery level via the LED indicators.
- Mode de baixa intensitat: For charging delicate electronics (e.g., Bluetooth earphones, smartwatches), activate the low current mode by pressing and holding the power button until a specific indicator lights up.
7. Manteniment
- Neteja: Netegeu el cos de la llanterna amb un drap suau iamp tela. No utilitzeu netejadors abrasius ni dissolvents.
- Rosques i juntes tòriques: Lubricate the threads and O-rings regularly with silicone grease to maintain water resistance. Replace worn O-rings as needed.
- Cura de la bateria: Remove batteries if the flashlight will not be used for an extended period. Store batteries in a cool, dry place.
- Port de càrrega: Keep the USB-C charging port clean and free of debris. Ensure the rubber cover is securely closed when not charging.
8. Solució De Problemes
- La llanterna no s'encén:
- Comproveu la polaritat de la bateria.
- Assegureu-vos que les bateries estiguin completament carregades.
- Estrenyeu bé la tapa de la cua.
- Clean battery contacts with an alcohol swab.
- Brillantor reduïda o temps d'execució curt:
- Pot ser que les piles estiguin baixes; recarregueu-les.
- Batteries may be aging; consider replacement.
- Ensure the flashlight head and tail cap are tightly screwed on.
- Remote switch not responding:
- Check the distance between the remote and the flashlight (max 1 meter).
- Replace the CR1632 battery in the remote switch.
- Assegureu-vos que no hi ha cap obstrucció bloquejant el senyal.
- Problemes de càrrega:
- Verify the USB-C cable is properly connected.
- Ensure the power source (QC Adapter) is functioning.
- Netegeu el port de càrrega per detectar qualsevol residu.
9. Informació de seguretat
- No encengueu la llanterna directament als ulls.
- Mantenir fora de l'abast dels nens.
- Do not disassemble or modify the flashlight or power bank, as this voids the warranty and may cause damage.
- Avoid exposing the devices to extreme temperatures or direct sunlight for prolonged periods.
- Use only recommended batteries and charging accessories.
- Eliminar les bateries segons la normativa local.
10. Garantia i Suport
Nitecore products are covered by a warranty. For detailed warranty information and support, please refer to the official Nitecore weblloc web o poseu-vos en contacte amb el vostre distribuïdor local. Conserveu el rebut de compra per a reclamacions de garantia.
Per obtenir més ajuda, visiteu el Botiga Nitecore a Amazon or the official Nitecore weblloc.


