1. Introducció
The Radiolink R12F is a 12-channel 2.4GHz RC receiver designed for compatibility with various Radiolink transmitters. It features a robust FHSS spread spectrum algorithm for excellent anti-interference performance and supports multiple signal output modes including PWM, SBUS, and CRSF. This manual provides essential information for setting up, operating, and maintaining your R12F receiver.

Figure 1: Radiolink R12F 12-Channel 2.4GHz RC Receiver. This image displays the compact black receiver unit with its various ports and binding button clearly labeled.
2. Informació de seguretat
This product is not a toy. It is not suitable for children under 14 years of age. Always operate remote control equipment responsibly and in accordance with local regulations. Ensure all connections are secure and correct before operation to prevent damage or injury.
3. Què hi ha a la caixa
- 1x R12F Receiver
- 1 x manual d'instruccions
4. Especificacions
| Dimensions: | 35.6 x 25 x 13.6 mm (1.4 x 0.98 x 0.54 polzades) |
| Pes: | 11.8 g (0.42 unces) |
| Longitud de l'antena: | 205 mm (8.07 polzades) |
| Canal: | 12 canals |
| Vol. Operatiutage: | 3-12V |
| Corrent de funcionament: | Banda ISM de 2.4 GHz (2400 MHz ~ 2483.5 MHz) |
| Sortida del senyal: | SBUS+CRSF+PWM |
| Distància de control: | 4000 meters in the air |
| Transmissors compatibles: | T16D/T12D/T8FB/T8S/RC8X/RC6GS V3/RC4GS V3 RC6GS V2/RC4GS V2/RC6GS/RC4GS |

Figure 2: Detailed specifications for the Radiolink R12F receiver, including dimensions, weight, and compatible transmitters.
5. Configuració
5.1. Lligament del receptor
The R12F receiver is typically pre-bound to compatible Radiolink transmitters when purchased as a kit. If you need to bind a new receiver or re-bind an existing one, follow these steps:
- Power on your compatible Radiolink transmitter.
- Locate the binding button on the side of the R12F receiver.
- Press and hold the binding button while powering on the R12F receiver. You can supply power via the USB-C port or by connecting an ESC.
- The LED on the receiver will flash rapidly, indicating it is in binding mode.
- The receiver will automatically bind to the closest compatible transmitter. Once bound, the LED will turn solid.

Figure 3: The location of the binding button on the Radiolink R12F receiver.
Video 1: Demonstrates the binding process and various working modes of the R12F receiver.
5.2. Actualització del firmware
To access the latest features and ensure optimal performance, it is recommended to keep your R12F firmware updated. The receiver supports online firmware updates.
- Download the latest firmware from the official Radiolink weblloc.
- Connect the R12F receiver to your computer using a Type-C USB cable. The cable can also supply power to the receiver, eliminating the need for a separate battery connection during the update.
- Hold the binding button on the receiver while plugging it into the computer. The receiver will appear as a drive on your computer.
- Drag and drop the downloaded firmware file into the receiver's drive.
- Safely eject the receiver from your computer. The firmware update is now complete.
Figure 4: The R12F receiver connected to a computer via a Type-C USB cable for a firmware update. The cable provides both data transmission and power.
5.3. Connecting Servos and Power
The R12F receiver supports PWM, SBUS, and CRSF signal outputs. Connect your servos and ESCs to the appropriate channels on the receiver. The receiver supports a wide voltage input of 3-12V, allowing for high-voltage servos. It also features anti-polarity connect protection, preventing damage if polarities are mistakenly connected.
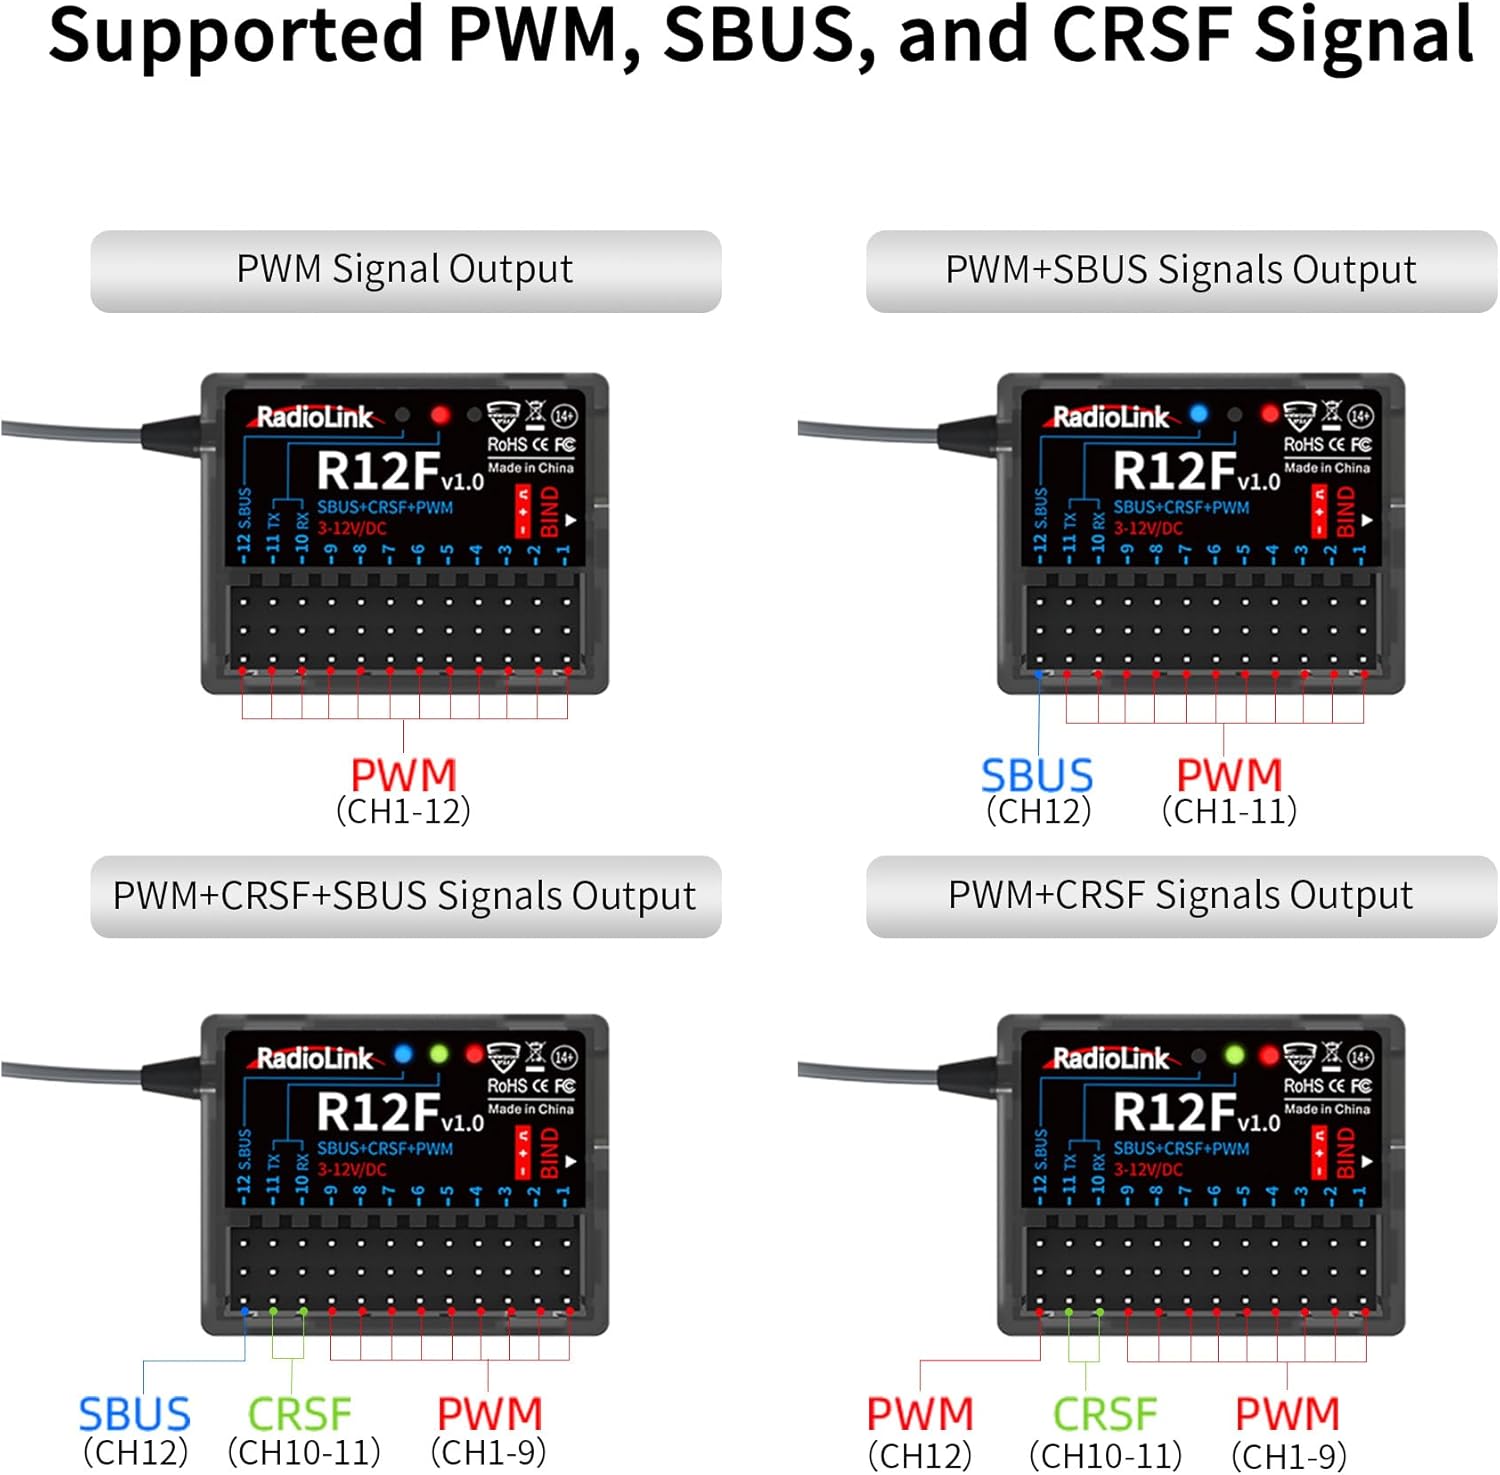
Figure 5: Diagram illustrating various signal output configurations (PWM, SBUS, CRSF) for the R12F receiver.
6. Funcionament
6.1. Simulator Function
The R12F receiver can be used with open-source simulators without requiring a separate dongle. This feature requires the R12F firmware to be updated to V1.6 or above. Simply connect the receiver to your computer via a Type-C cable, and it will function as a PC Game Joystick communication program. Compatible simulators include AeroFly, Uncrashed, Liftoff, Tryp FPV, FPV LogicV, Velocidrone, and more.

Figure 6: The R12F receiver connected to a computer, demonstrating its compatibility with various open-source flight simulators.
Video 2: Demonstrates how to use the R12F receiver with a T8S transmitter to play a simulator.
6.2. Telemetry and Voltage Alarmes
The R12F receiver can provide telemetry data, including external voltage, back to your compatible transmitter. If you are not utilizing the external voltage telemetry feature, you may receive continuous low voltage alarms from your transmitter. To disable this, navigate to your transmitter's receiver settings, then sensors, and turn off the external voltage alarm. The default low voltage alarm is typically set to 3.5V.

Figure 7: Diagram showing the anti-polarity connect protection feature and wide voltage support for the R12F receiver.
6.3. Control Surface Adjustments (End Points & Trims)
Adjusting end points and trims is crucial for precise control of your model. Access these settings through your transmitter's menu. For example, if your flaps are not flush with the wing in the up position, you can adjust the trim for the corresponding channel (e.g., Channel 6) to a negative value until the desired position is achieved. Similarly, end points can be adjusted to prevent over-stressing servos.
6.4. Auxiliary Channel Settings
The R12F offers 12 channels. Channels 1-4 are typically fixed for Aileron, Elevator, Throttle, and Rudder (AETR). Channels 5-12 can be assigned to various switches or potentiometers on your transmitter to control auxiliary functions like flaps, landing gear, or other model features. You can change these assignments within your transmitter's auxiliary channel settings.
7. Compatibilitat
The Radiolink R12F receiver is compatible with a range of Radiolink transmitters, including T16D, T12D, T8FB, T8S, RC8X, RC6GS V3, RC4GS V3, RC6GS V2, RC4GS V2, RC6GS, and RC4GS. It supports various model types such as helicopters, fixed-wing aircraft, gliders, multi-rotors, engineering vehicles, racing boats, robots, lawnmowers, bait boats, and mechas.

Figure 8: Visual representation of various Radiolink transmitters compatible with the R12F receiver.

Figura 9: Examples of various RC models, including helicopters, fixed-wing aircraft, drones, and ground vehicles, compatible with the R12F receiver.
8. Característiques clau
- Extended Control Distance: Offers 600 meters stable offshore control distance and 4000 meters air control distance.
- Advanced Anti-Interference: Utilizes FHSS spread spectrum algorithm and 67-channel pseudo-random frequency hopping.
- Multiple Signal Outputs: Supports PWM, SBUS, and CRSF signals, allowing personalized output modes.
- Open-Source Simulator Support: Can be used with simulators without a dongle (firmware V1.6+ required).
- Anti-Polarity Connect Protection: Prevents damage to the receiver even if polarities are mistakenly connected.
- Vol. Amplitage Potència: Supports 3-12V power input, compatible with high-voltagi servos.
- Online Upgradeable: Firmware can be updated via a Type-C cable for new features.
- Subsidiary ID: Enables advanced control scenarios like rescue, towing, parent-child, and friend teaching in one control.
9. Solució De Problemes
9.1. Motor Beeping Continuously
If your motor beeps continuously upon initial connection, it might indicate a low voltage alarm from the transmitter due to unconfigured telemetry. Refer to section 6.2 on how to disable the external voltage alarm in your transmitter settings if you are not using telemetry.
9.2. Binding Issues
If the receiver does not bind or loses connection, ensure the receiver firmware is up to date (refer to section 5.2). Also, verify that the binding process (section 5.1) is followed correctly, ensuring the binding button is held while powering on the receiver.
9.3. Control Surface Movement Issues
If control surfaces move in the wrong direction or have excessive travel, adjust the 'Reverse' and 'End Points' settings in your transmitter's general settings (refer to section 6.3). Incorrect settings can stress servos and lead to premature failure.
10. Manteniment
Keep the receiver clean and free from dust and moisture. Avoid exposing it to extreme temperatures. Regularly check all wiring and connections for signs of wear or damage. Ensure antennas are not cut or damaged, as this can significantly reduce range and performance.
11. Garantia i Suport
For quick support, contact Radiolink Direct's after-sales service. You can find contact information on the Radiolink Direct store or through the online user instructions. Full user manuals and FAQ troubleshooting files are also available on each Amazon sales page.


